IPv6 with NSX
A look at IPv6 and the situation with NSX. In this blog, I navigate the valley of tears known as IPv6, demonstrate how it can be utilized with NSX, and explain some of the fundamentals.
3623 Words // ReadTime 16 Minutes, 28 Seconds
2026-03-01 12:00 +0100
Introduction
IPv6 has been around as a standard since 1998—so it feels like forever. I was 16 years old at the time. Since then, we’ve been hearing that IPv4 addresses are running out and IPv6 is the solution. And although IPv6 is now 25 years old (do you feel as old as I do now?), it is still far from being standard. To be honest, in the last 25 years, I’ve had exactly one customer who uses IPv6 in their data center, and that’s only as a dual stack.
According to estimates by Cloudflare from 2023, global acceptance of IPv6 is around 35.9%. ChatGPT puts it at around 45%, but we are still a long way from widespread adoption. PS: My blog can be accessed with IPv6 native.
Nevertheless, I wanted to take a look at the status quo and set up a working IPv6 setup with NSX, but unfortunately it’s not as easy as I had imagined. Perhaps I should briefly mention the framework conditions. I have a consumer DSL connection from Deutsche Telekom. They generously provide me with a public IPv4 and a /56 IPv6 prefix. I already have my OPNsense appliance running in dual stack. I will only discuss this configuration to a limited extent, as it can be different for each operator.
Unfortunately, my IPv4 and IPv6 are dynamic because I have a normal private customer connection and not a business tariff. Thanks for that – not. Unfortunately, this also means that I have to come up with something else for the IPv6 prefixes for NSX. More on that later. I also have a Mikrotik router between OPNSense and the NSX T0 router.

Network setup (click to enlarge)
The current setup is deliberately simple. My T0 router is active/standby at this point and I only use one uplink VLAN. The reason for this is simple. The entire setup runs on a small NUC Ultra 7 with only one LAN card. Any HA setup would be excessive here. But before we jump into the setup, we need to talk about a few IPv6 basics.
GUA / ULA / Link Local and other IPv6 basics
GUA
We start with what is probably the simplest prefix range, the GUA or Global Unicast. This prefix is publicly routable on the Internet and starts with 2000::/3.
ULA
The ULA prefix is the Unique Local Address range and is comparable to the private IP ranges of IPv4. These are not routed on the Internet and play an important role in my setup, as I unfortunately get assigned a dynamic prefix by my provider. ULA starts with fc00::/7 The first bit following the prefix indicates, if set, that the address is locally assigned. This splits the address block in two equally sized blocks, fc00::/8 and fd00::/8. fd00::/8 is the range that is actually used for private addressing. NSX uses an fc00::/8 network by default for hotplug networks between T0 and T1 routers. For this reason alone, you should avoid fc00::/8 and use fd00::/8 networks for private addressing, even though the risk of having duplicate IPs is very low.
Link-Local
LL is automatically available on every interface. Used for Neighbor Discovery, Router Advertisements, and often as BGP Next-Hop. Only valid in the local Layer 2. LL starts with fe80::/10.
Multicast
Replaces broadcast in IPv6. Used for neighbor discovery, DAD, and router advertisements. Multicast can be recognized by the following prefix: ff00::/8.
IPv4-mapped IPv6
IPv4 addresses in IPv6 format, e.g., for MP-BGP, when IPv6 routes are transported over an IPv4 session. The prefix is ::ffff:0:0/96 I had planned to use this for my NSX networks, but my OPNSense couldn’t handle it. My IPv6 routes weren’t in the routing table. I couldn’t figure out whether it was due to OPNSense’s FRR implementation or Mikrotik.
Prefix Delegation
My internet provider gives me a GUA /56 prefix via prefix delegation. Unfortunately, as already mentioned, this is dynamic. My OPNSense supports dynamic prefixes, and thanks to /56, I can create up to 256 /64 networks and assign these individual VLAN interfaces to the OPNSense. Unfortunately, NSX does not support this, which is why I ultimately had to resort to NAT66 and ULA.
SLAAC
SLAAC stands for Stateless Address Autoconfiguration and enables a host to automatically generate its IPv6 address from a /64 prefix announced by the router. To do this, the router sends router advertisements containing the prefix and the default gateway. The client then independently forms its complete IPv6 address without the need for a DHCP server to assign the address.
DHCPv6
DHCPv6 provides IPv6 addresses and additional network information centrally via a server. It can either assign the complete address (stateful) or only provide additional information such as DNS (stateless). If DHCP runs in stateless mode, SLAAC is used for IP address assignment.
NAT66
NAT66 is the IPv6 variant of Network Address Translation, in which the source IPv6 address is replaced by another IPv6 address when leaving the network. It is often used when ULA addresses are used internally and the provider assigns a dynamic global prefix. NAT66 works statefully, which means that the router stores connection states for reverse translation. This keeps the internal address design stable, regardless of the external prefix. However, NAT66 contradicts the end-to-end principle of IPv6.
NSX Supportet IPv6 features
- IPv6 and Dual-Stack Overlay Segments
- IPv6 Distributed Routing (Tier-0 / Tier-1)
- IPv6 BGP (MP-BGP)
- IPv6 Distributed Firewall (L3/L4)
- IPv6 Gateway Firewall
- IPv6 Load Balancer VIPs
- NAT66 support
- DHCPv6 (Stateful & Stateless)
- SLAAC support
NSX DAD-Profile
I could make a DAD joke now, but…
Router: “Doctor, it hurts when IP.” Doctor: “Then stop using IPv6.”
Okay, let’s not go there, that’s awful…
Duplicate Address Detection (DAD) in NSX is an IPv6 mechanism that ensures that an IPv6 address is unique within a segment before it is actively used. NSX uses the standardized Neighbor Discovery Protocol to check whether an address is already being used by another VM, thereby preventing address conflicts.
NSX ND-Profile
An ND (Neighbor Discovery) profile in NSX defines parameters such as router advertisement DHCPv6 mode (stateful/stateless) and SLAAC behavior for a segment. The ND profile controls how IPv6 addresses are assigned and which default gateway information is distributed to the workloads.
That was quite a lot
Now that we’ve refreshed the basics, let’s move on to the setup.
Configuring the OPNSense and Mikrotik router
I decided to set up my routing dynamically with BGP and fell into a few traps. Since I can’t do much with my 4,722,366,482,869,645,213,696 public IPv6 addresses (that’s an unimaginable 4.7 sextillion IP addresses) because they are not permanent, I have decided on a ULA setup and will then use NAT66. I have decided to use my ULA networks from the fd11:22:33::/56 prefix range. For one thing, it is still completely unused and relatively easy to read. My DNS servers have long been IPv6-capable in my network and have their own ULA IPs, which are somewhat arbitrary, however. Historically grown, as we say in Germany. To keep everything clear, here is a short table:
| Purpose / Connection | Prefix | Description |
|---|---|---|
| ULA Core Aggregate | fd11:22:33::/56 | Main internal IPv6 prefix |
| OPNsense ↔ MikroTik Transit | fd11:22:33:ff02::/64 | transit network |
| MikroTik ↔ NSX T0 Transit | fd11:22:33:ff01::/64 | transit network |
| NSX Segment 1 | fd11:22:33:ff10::/64 | Workload |
| NSX Segment 2 | fd11:22:33:ff11::/64 | Workload |
| NSX Hotplug Network | fc00::/8 | T0 - T1 network |
| Public IP Prefix | 2003:c4:XXXX:b100::/56 | Telekom Internet |
The target setup is shown as a graphic.

Network setup - IPs (click to enlarge)
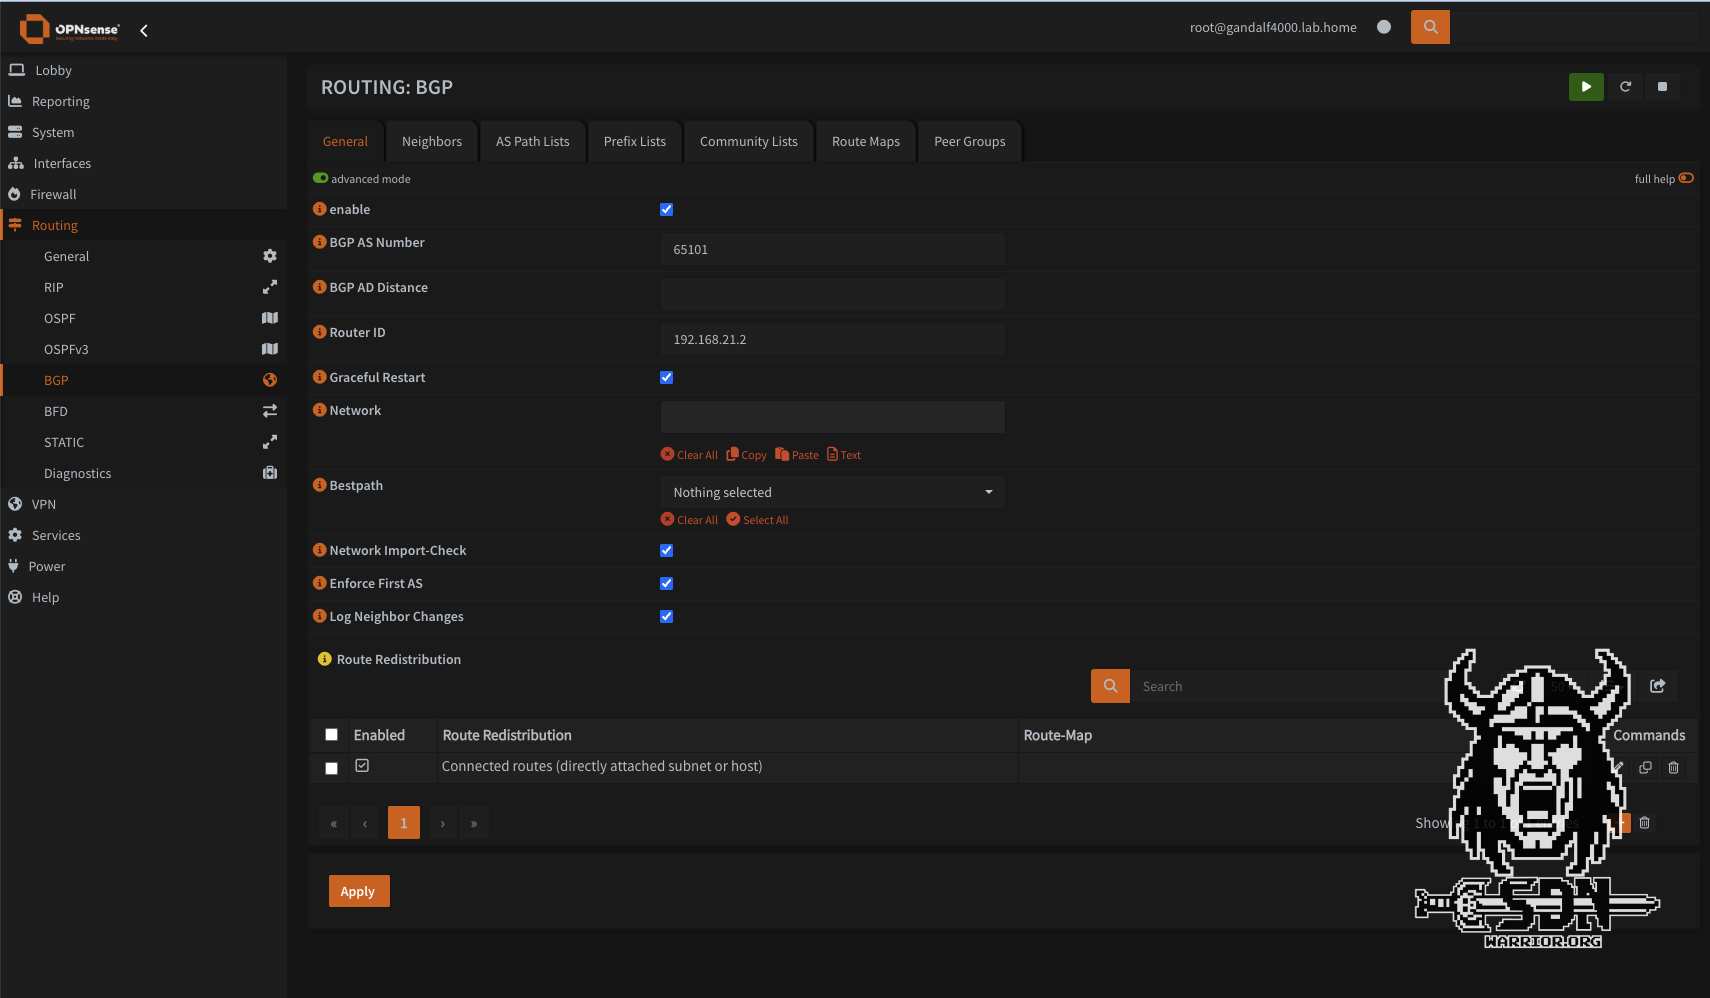
First, I configure my static IPv6 on my OPNSense on my BGP interface. It is important to select the IPv6 configuration type. This must be set to Static IPv6 and not Track Interface. With Track Interface, I would take a /64 prefix from my GUA IP address range, which unfortunately is not static.

OPNSense config (click to enlarge)
It is also important that I assign the IP address cleanly with /64, otherwise the network cannot be used for SLAAC, and SLAAC is what we want to use on the other end, as all devices and operating systems that are dual-stack capable can do this.
Next, IPv6 must be enabled on the Mikrotik. This requires a reboot and can be configured under IPv6 -> Settings -> Disable IPv6. By default, the checkbox is selected and must be deselected. One might almost think that none of the vendors are really interested in IPv6.
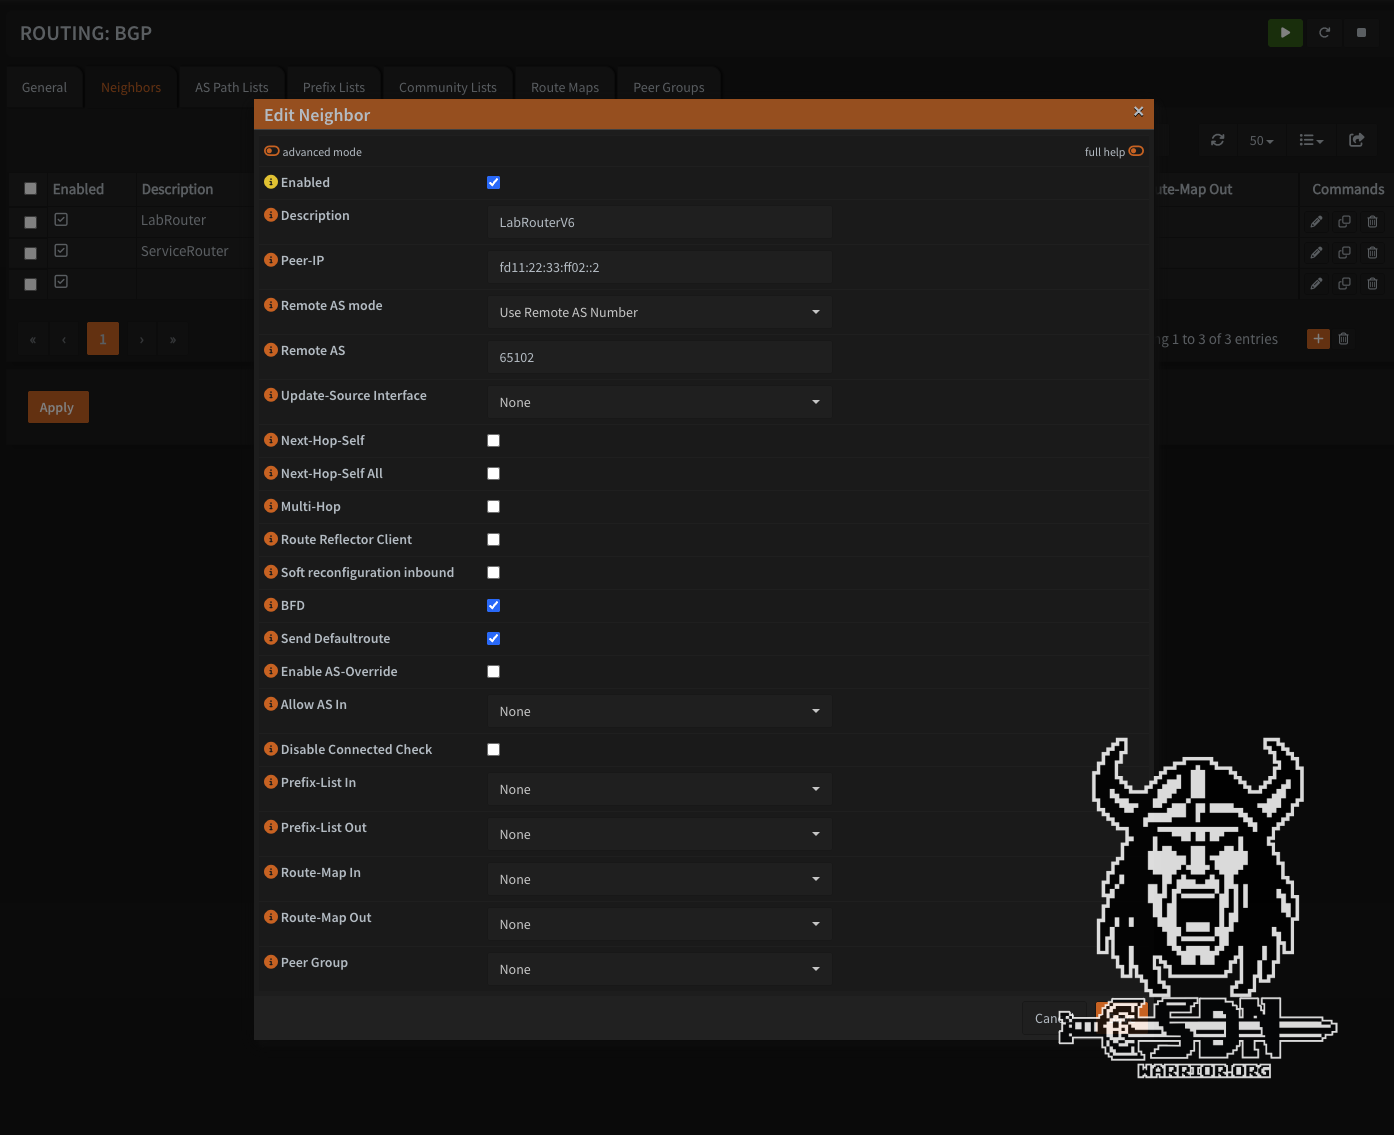
But let’s get to the first problem I had. My lab already had a BGP configuration between the lab router and OPNSense via IPv4. OPNSense Business Edition does not properly support IPv6 route exchange via IPv4.
I saw my IPv6 routes in the FRR plugin, but not in the routing table of the OPNSense.
OPNSense Routing (click to enlarge)
Conversely, it doesn’t work either, so I couldn’t get this to work. OPNSense simply didn’t want to learn IPv6 routes over IPv4.
After an hour of troubleshooting, I gave up and configured a normal IPv6 and IPv4 BGP session.
The settings are relatively straightforward. I am listing my settings here as an example. However, there is nothing special about them.
 ;;; OPNSenseIPv6
     name="OPNSenseIPv6" instance=OPNSense
     remote.address=fd11:22:33:ff02::1/128 .as=65101
     local.default-address=fd11:22:33:ff02::2 .role=ebgp
     connect=yes listen=yes routing-table=main as=65102 nexthop-choice=default hold-time=3m
     keepalive-time=1m afi=ipv6 use-bfd=yes
     output.redistribute=connected,bgp
Here are the OPNSense settings, but they are pretty standard. Thanks to my new Hugo Gallery shortcode, it’s now easier to view them.
Now that that’s done, I can finally get started on the NSX setup.
NSX IPv6 setup - it just works?
Of course not! Anyone who thought it would all be easy is mistaken. What I didn’t really know—but what a quick glance at the documentation revealed—is that NSX has IPv6 forwarding disabled by default. Apparently, no one really wants to use IPv6.

NSX Global Network Config (click to enlarge)
So I quickly jumped into the NSX Global Network config and enabled IPv6 L3 forwarding. For IPv6 to work, the T0 router must receive IPv6 addresses in addition to IPv4 addresses.

NSX Edge Network Config (click to enlarge)
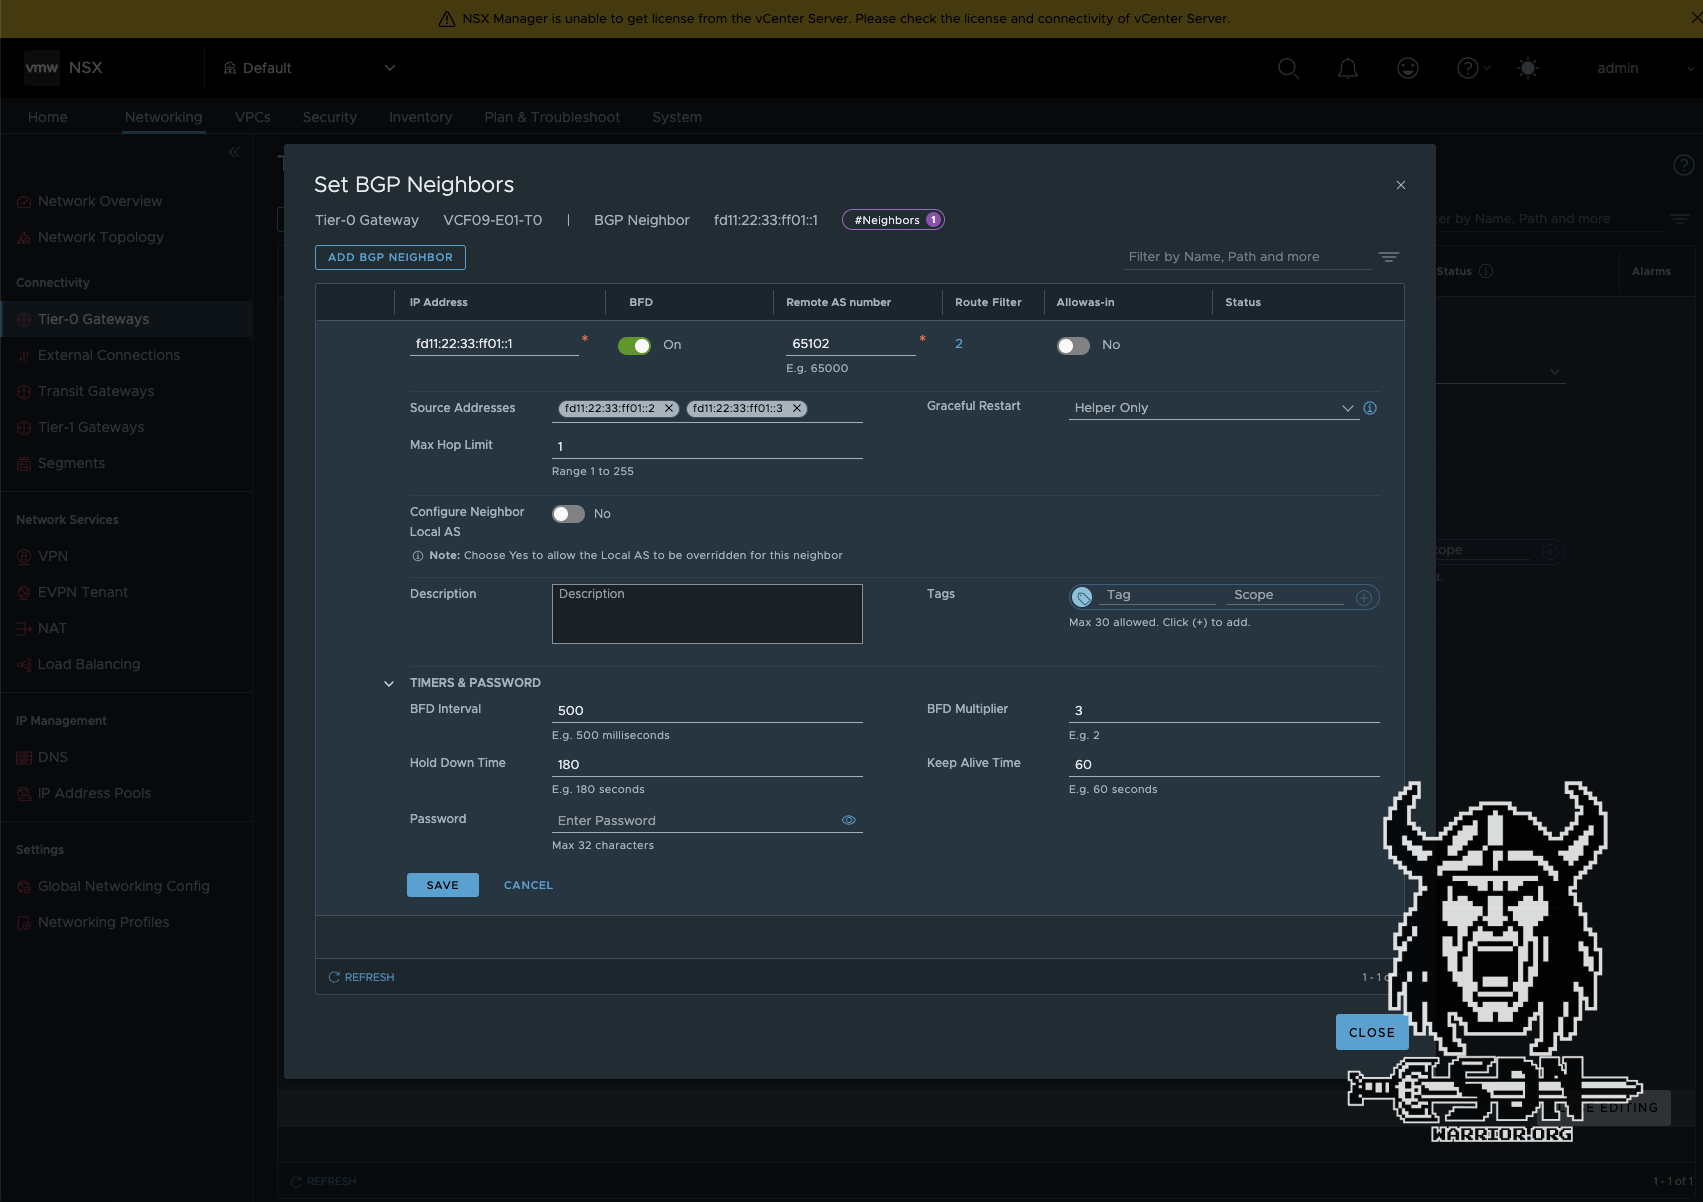
Next, I configure my IPv6 routing, and this is where RFC 5549 comes into play. To minimize the number of BGP sessions and IPv4 addresses, you can exchange both IPv4 and IPv6 routes over a single IPv6 BGP session.
Mikrotik now also supports RFC 5549. The Mikrotik configuration is very similar to the OPNSense configuration. The main difference is that both IPv4 and IPv6 address families are enabled in one session.
;;; BGP_VCF09-E01-Edge01
     name="VCF09-E01-Edge1-01" instance=VCF09-E01-Edge1-U1
     remote.address=fd11:22:33:ff01::2/128 .as=65004
     local.default-address=fd11:22:33:ff01::1 .role=ebgp
     connect=yes listen=yes routing-table=main as=65102 hold-time=3m keepalive-time=1m afi=ip,ipv6
     use-bfd=yes
     output.redistribute=connected,bgp .default-originate=if-installed

;;; BGP_VCF09-E01-Edge02
     name="VCF09-E01-Edge2-01" instance=VCF09-E01-Edge1-U1
     remote.address=fd11:22:33:ff01::3/128 .as=65004
     local.default-address=fd11:22:33:ff01::1 .role=ebgp
     connect=yes listen=yes routing-table=main as=65102 hold-time=3m keepalive-time=1m afi=ip,ipv6
     use-bfd=yes
     output.redistribute=connected,bgp .default-originate=if-installed
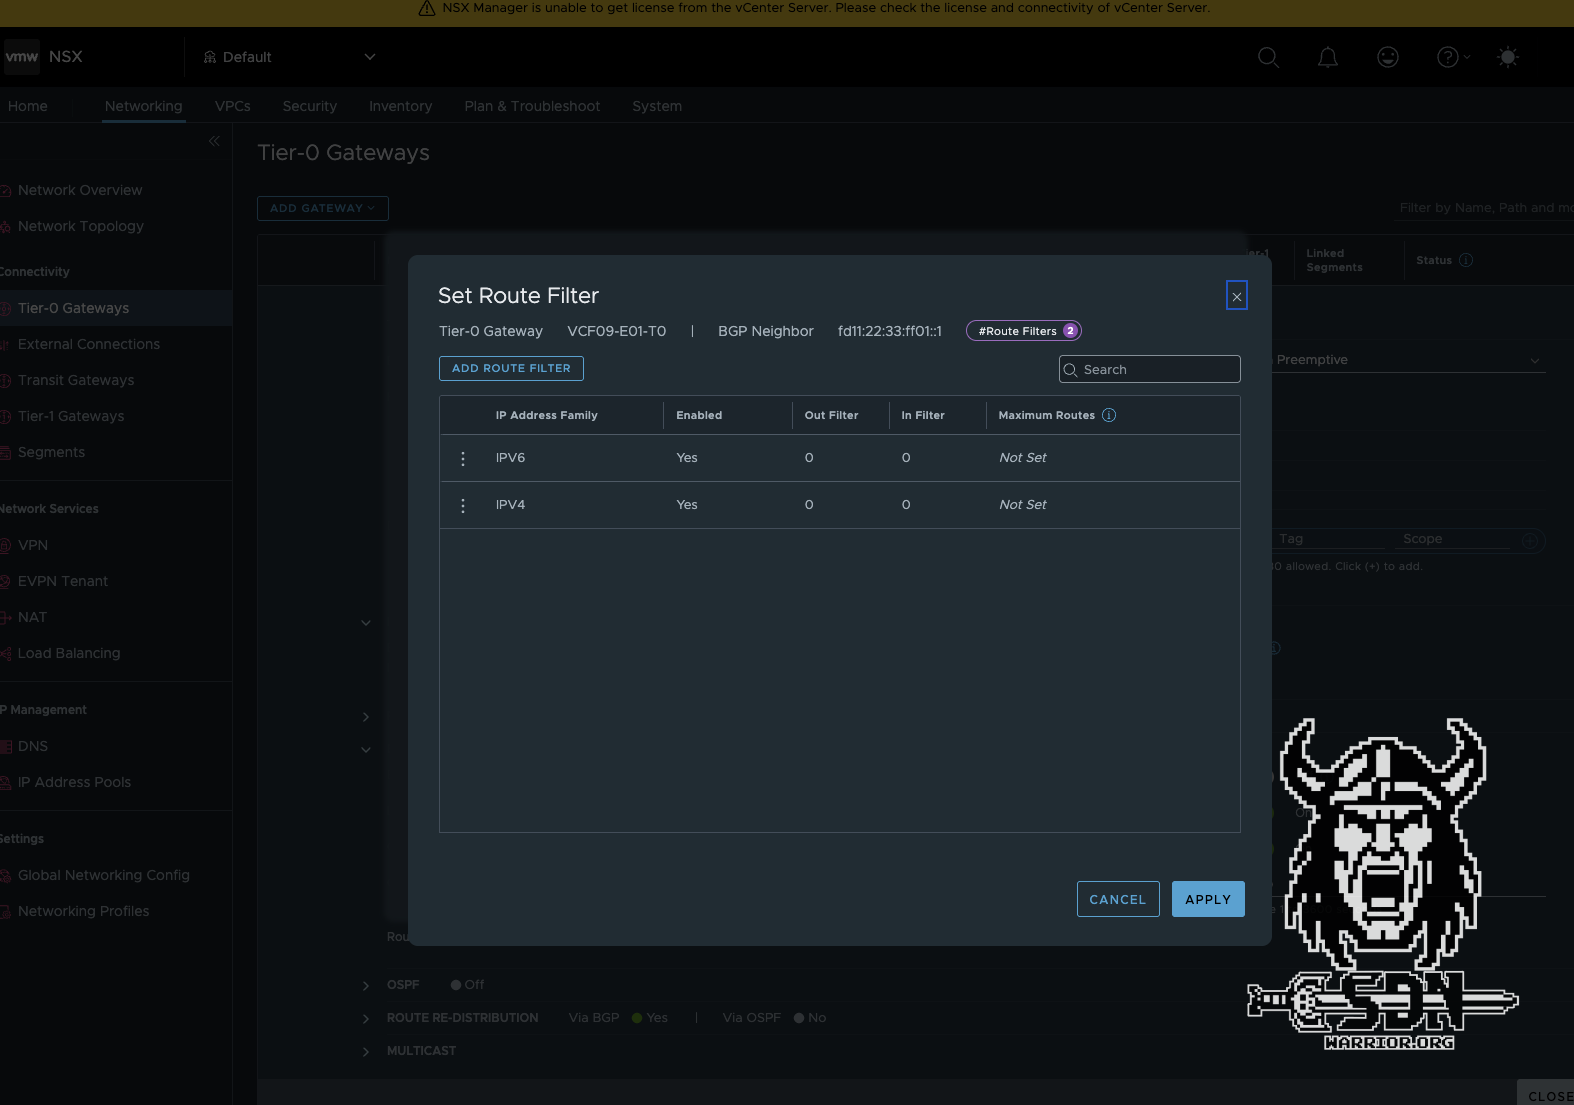
Next, the routing must be created on the T0 router. It is important to note that an IPv6 session must be created and an IPv6 route filter must be added to the default IPv4 route filter. Otherwise, the routing will not work. The rest of the configuration is standard. I always use BFD in my setups for fast network convergence, but it is not a must.
BGP peering should now be up and running. The IPv4 routing table on the Mikrotik looks a little strange. The immediate gateway shows the link local IP address of the NSX Edge Node. The IPv4 address is only how RouteOS represents IPv4 over IPv6 and is not actually used.
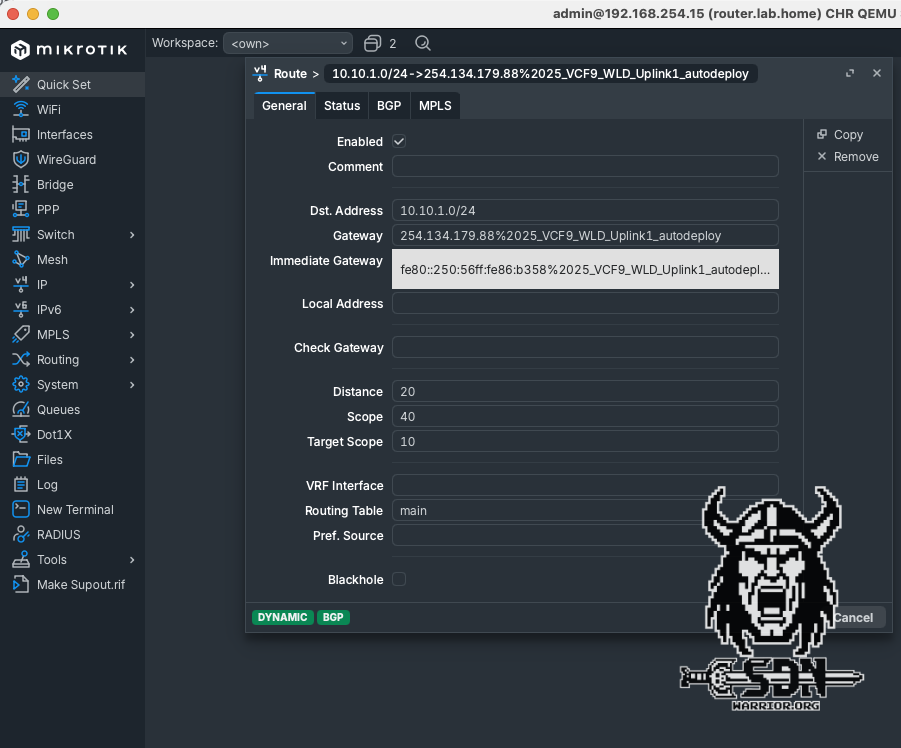
In the traceroute of the Mikrotik switch, you can also clearly see that for IPv4 networks, the next hop is actually the IPv4 address of the active EdgeVM.
[admin@router.lab.home] > tool/traceroute 10.10.0.1
Columns: ADDRESS, LOSS, SENT, LAST, AVG, BEST, WORST, STD-DEV
#  ADDRESS      LOSS  SENT  LAST   AVG  BEST  WORST  STD-DEV
0  10.28.25.12  0%       3  0.6ms  0.5  0.4   0.6    0.1
1  10.10.0.1    0%       3  0.3ms  0.3  0.2   0.4    0.1
IPv6 segments, ND and DAD…
Now that the routing part is done, it would have been much faster if I had used static routing, but that would also have been much more boring. Now I can finally create segments. And yes, I know I already created some for my tests, because without segments, there are no networks and therefore no routing test. But just imagine if I hadn’t done that yet.
In my setup, I decided to build a T1 router for my IPv6 segments and a T1 router for my IPv4 networks, but why did I do that? Firstly, for clarity, and secondly, because of the ND profile, which is still needed. The ND profiles can be defined either globally at the T0 level or more specifically at the T1 level. NSX supports 5 modes for ND:
- Disabled - Router advertisement messages are disabled.
- SLAAC with DNS Through RA - The address and DNS information is generated with the router advertisement message.
- SLAAC with DNS Through DHCP - The address is generated with the router advertisement message and the DNS information is generated by the DHCP server.
- DHCP with Address and DNS through DHCP - The address and DNS information is generated by the DHCP server.
- SLAAC with Address and DNS through DHCP - The address and DNS information is generated by the DHCP server. This option is only supported by NSX Edge and not by ESX hosts.
The standard is SLAAC with DNS Through RA, but as I already mentioned, problems can arise with some operating systems or devices. Specifically, some devices or operating systems cannot use Route advertisment for DNS. Alpine Linux is one such case. I do get a valid IPv6 and can ping my DNS server with it, but name resolution does not work, and without that, the internet is not particularly useful. The DNS servers were, of course, configured correctly in the ND profile.
That’s why I create an ND profile with SLAAC with DNS Through DHCP. This has the advantage that SLAAC and RA can generally be used, but DHCPv6 stateless is also used to explicitly assign DNS. The profiles can be found under Networking -> Networking Profiles -> Select profile type -> ND Profile. In the new profile, I only change the mode; otherwise, all settings remain at default. Under Networking -> Tier-1 Gateways -> Additional Settings -> ND Profile, I then select my new profile for my IPv6 T1 router.
All that’s missing is our DAD…
Why did the boy get fired from his keyboard factory job? - Because he was not doing enough shifts.
Again? Really? OK, let’s keep it short: the default DAD profile from NSX is sufficient for my purposes and can be assigned to both T1 and T0 in virtually the same way as the ND profile. And now I’m never going to talk about DAD ag…Why don’t programmers like nature? - Too many bugs.
Okay, continuing in context, I want to finish the article, even though I’ve just spent 30 minutes scrolling through Reddit and reading dad jokes.
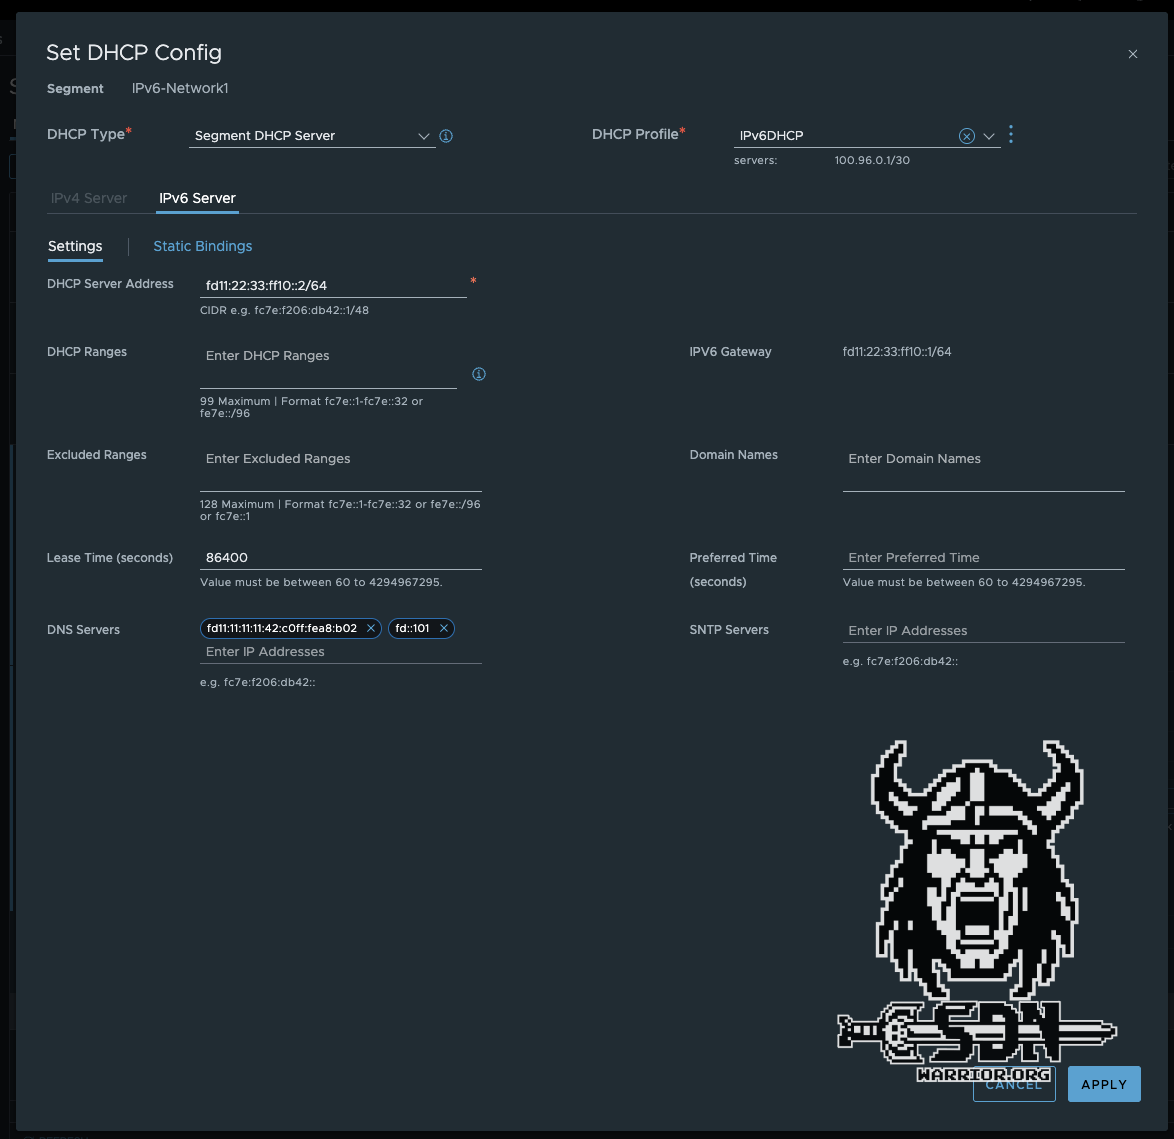
Then I create an overlay segment connected to my IPv6 T1 and configure the following IPv6 gateway CIDR: fd11:22:33:ff10::1/64. I also create a segment DHCP server in which I specify the ULA IPs of my DNS servers in the lab and, of course, a DHCP server IP address from the segment. In my case, I simply take the next free IP fd11:22:33:ff10::2/64.

Next, I create a VM from my Alpine template and connect it to the new segment, power up the VM, and am disappointed.
Are we there yet?
In order for my Alpine VM to get an IPv6 address at all, I have to edit the file /etc/network/interfaces and add iface eth0 inet6 auto.
auto lo
iface lo inet loopback

auto eth0
#iface eth0 inet dhcp
iface eth0 inet6 auto
One thing is already working after reboot: my VM is getting a ULA IP address via SLAAC and can also ping my DNS server.
inet6 fd11:22:33:ff10:2b17:367c:2ddc:2925/64 scope global dynamic noprefixroute flags 100
  valid_lft 2591977sec preferred_lft 604777sec
inet6 fe80::250:56ff:fe86:9e5/64 scope link
  valid_lft forever preferred_lft forever
Ping test:
template:~# ping6 fd::101
PING fd::101 (fd::101): 56 data bytes
64 bytes from fd::101: seq=0 ttl=60 time=1.157 ms
64 bytes from fd::101: seq=1 ttl=60 time=1.190 ms
64 bytes from fd::101: seq=2 ttl=60 time=1.471 ms
However, name resolution still does not work or rather, DHCPv6 is ignored. For this to work with Alpine, a small package needs to be installed. I should have mentioned this earlier, but then the suspense would have been ruined. For this to work, Alpine needs dhcpcd. I will incorporate this into my template in the future. Installation is super easy if you have internet access.
apk update
apk add dhcpcd
rc-update add dhcpcd
Then restart the network service or simply restart the entire VM, which is faster for me—but then again, I’m no Linux expert. Wow, I finally have name resolution, but only if you have an IPv6-capable DNS, of course. In my environment, that’s two Adguard Home instances. But I could also just use my OPNSense. Does the internet work now? Of course not. I get nice IPv6 name resolution and the routing works too, and yes, it’s not because of firewall rules, no, NAT66 is missing.
Because the entire setup is based on ULA IPs due to the dynamic Telekom prefix, and these are not routable on the internet, we now have to resort to NAT again. I would have liked to use NAT NPTv6, but that is not possible with my setup. I can’t track the PPPoE interface, which means that every time I am assigned a new prefix by Telekom, I would have to manually adjust NAT NPTv6 like a caveman. So in the end, it will be stateful NAT from an IPv6 ULA address to an IPv6 GUA IP. The whole thing is comparable to normal SNAT with IPv4. NSX supports NAT66, but since NSX cannot be a prefix delegation client, that doesn’t help me in my situation.
After configuring OPNSense Outbound NAT for IPv6 and the source IP range fd:11:22:33::/56, my internet is now working – what a struggle!
template:~# ping6 google.com
PING google.com (2a00:1450:4001:804::200e): 56 data bytes
64 bytes from 2a00:1450:4001:804::200e: seq=0 ttl=115 time=7.439 ms
64 bytes from 2a00:1450:4001:804::200e: seq=1 ttl=115 time=7.570 ms
64 bytes from 2a00:1450:4001:804::200e: seq=2 ttl=115 time=7.546 ms
VCF9 and IPv6
Does VCF9 support IPv6? The answer is a clear yes and no. The situation is complicated: individual components support dual stack or even native IPv6, but important core components either do not support IPv6 at all or the automatic provisioning does not support IPv6. In the official documentation for VCF9, there are exactly 143 search hits for IPv6, which pretty much sums up the situation. VKS Supervisor, for example, is one of the components that does not support IPv6, and this is what determines the success or failure of my automation of modern workloads in VCF9. My recommendation would therefore be to continue to rely on IPv4 and use IPv6 as a dual stack for VM workloads at most.
Conclusion
Was it stressful? That’s a difficult question. On the one hand, I rediscovered a lot of forgotten knowledge about IPv6, and on the other hand, playing around with routing was really fun. It’s a disappointment that VCF doesn’t yet fully support IPv6. The same applies to VPCs. Since this will be the future standard, it’s a bit strange that IPv6 isn’t supported. You can assign IPv6 in the VPC connection profile, but it doesn’t work in the VPC.
It’s also a pity that I can only test it to a very limited extent. I definitely want to do more tests, including with IPv6 DHCP, and see if I can somehow use my dynamic prefix and assign normal GUA IPs. I also want to try a few things with AVI. As a backup plan, I also have a public VPS server with fixed IPv6 IPs, which I currently use as a Wireguard rendezvous server and as an internet breakout in case Telekom decides to disadvantage Cloudflare services again, but that’s a whole other story.
It should be noted that even after 25 years, IPv6 is still not standard and IPv4 remains very important in data centers. Furthermore, it is somewhat disappointing that something as simple as DNS over RA is not yet supported by every operating system and every end device. I hope you enjoyed the article and feel encouraged to play around with IPv6 yourself.
