VCF9 - VCF5.X to VCF9 upgrade
A brief guide to upgrading from VCF5.X to VCF9 on a brownfield site.
2081 Words // ReadTime 9 Minutes, 27 Seconds
2025-09-07 23:00 +0200
Introduction
I have been asked several times on LinkedIn for an article on the topic of brownfield upgrades from VCF 5 to VCF 9. Well, here we are. I thought it would be relatively easy and that you could just click your way through, but I was wrong. But let’s start at the beginning.
As things stand at the moment, if you have NSX version newer then 4.2.1.3 in your VCF environment, here’s the bad news—it’s not possible as of today. NSX 4.2.1.4 and newer has a newer code base than NSX 9.0.0.0 and is therefore not compatible. The problem should be fixed with VCF 9.0.1.
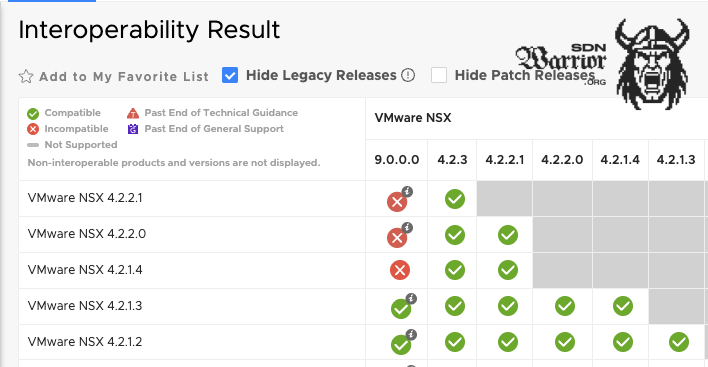
Interoperability Matrix (click to enlarge)
It is best to always check the Product Interoperability Matrix for this.
Since my last available VCF 5 lab was unfortunately already patched to the latest NSX version, I had no choice but to deploy a fresh VCF 5.2.1, as the NSX version here is low enough. And oh my God, I really didn’t miss the Excel or Json deployment of VCF 5.X, but for my readers’ sake, I’ll struggle through it once again.
Management domain and basic setup
I have deployed a management domain with 4 ESXi servers and vSAN. I have set up the whole thing in a nested configuration. Since the SDDC Manager does not yet support download tokens, I used the VMwareDepotChange script. I have already covered this process in my blog.
| Software Component | Version | Date | Build Number |
|---|---|---|---|
| Cloud Builder VM | 5.2.1 | 09 OCT 2024 | 24307856 |
| SDDC Manager | 5.2.1 | 09 OCT 2024 | 24307856 |
| VMware vCenter Server Appliance | 8.0 Update 3c | 09 OCT 2024 | 24305161 |
| VMware ESXi | 8.0 Update 3b | 17 SEP 2024 | 24280767 |
| VMware NSX | 4.2.1 | 09 OCT 2024 | 24304122 |
After the initial deployment, I updated the SDDC to version 5.2.1.1, as it contained several bug fixes. Finally, I took a snapshot of the SDDC Manager, and we were ready to go.
Uprade SDDC
In my setup, the first step is to upgrade the SDDC Manager. As I mentioned above, after the upgrade, the setup will be added to my VCF Operations, which is already up to date.
SDDC Manager upgrade (click to enlarge)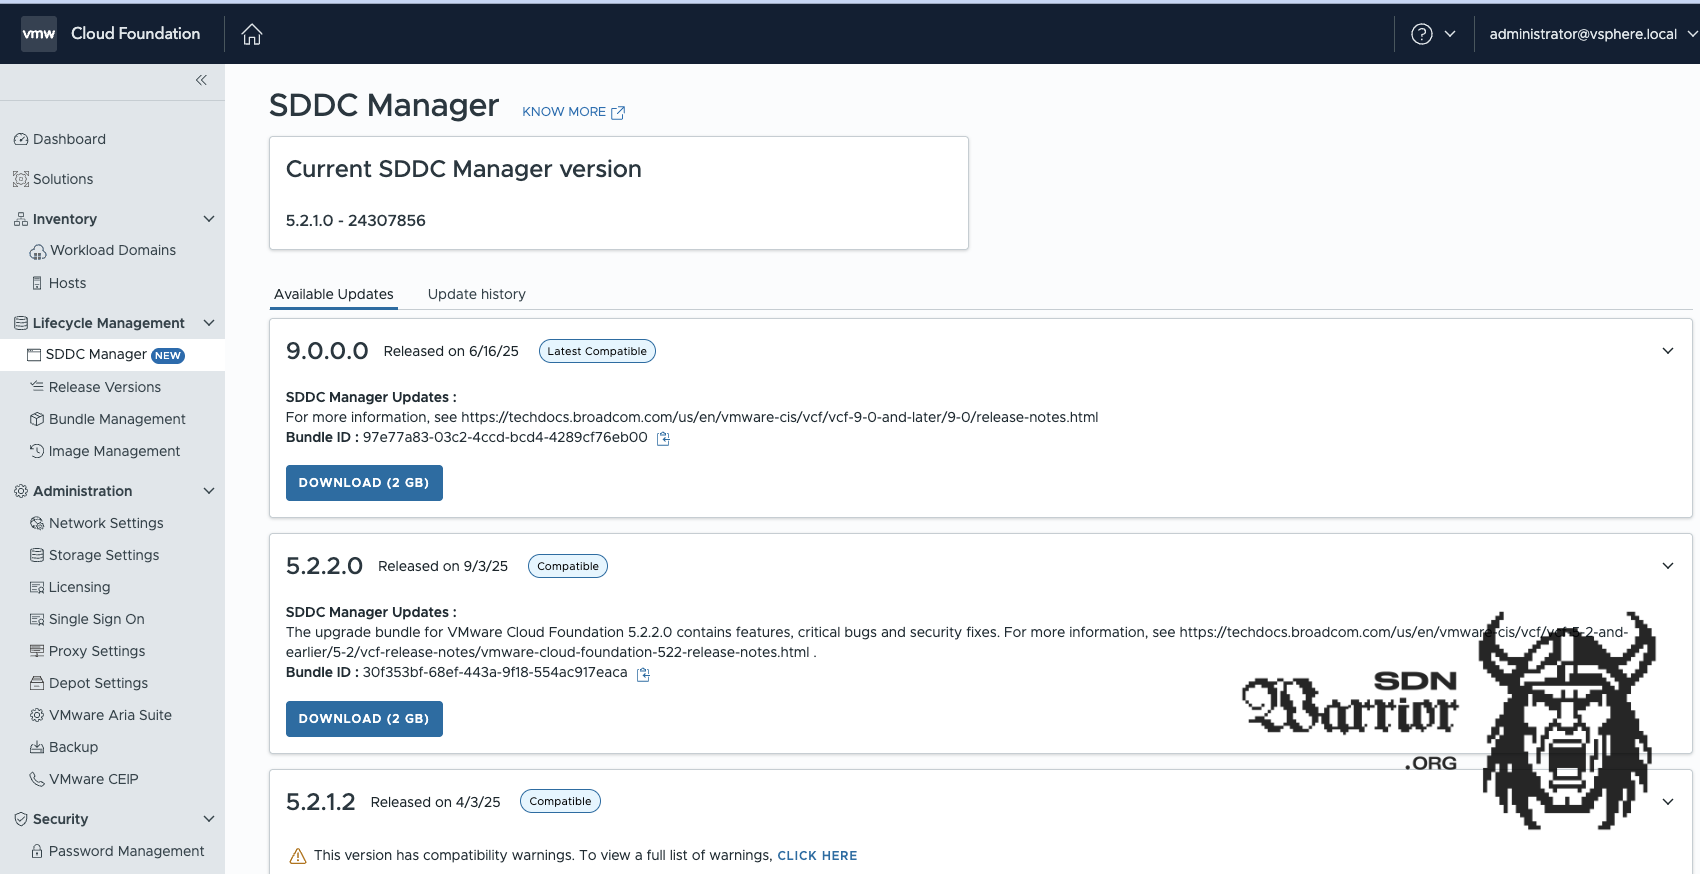
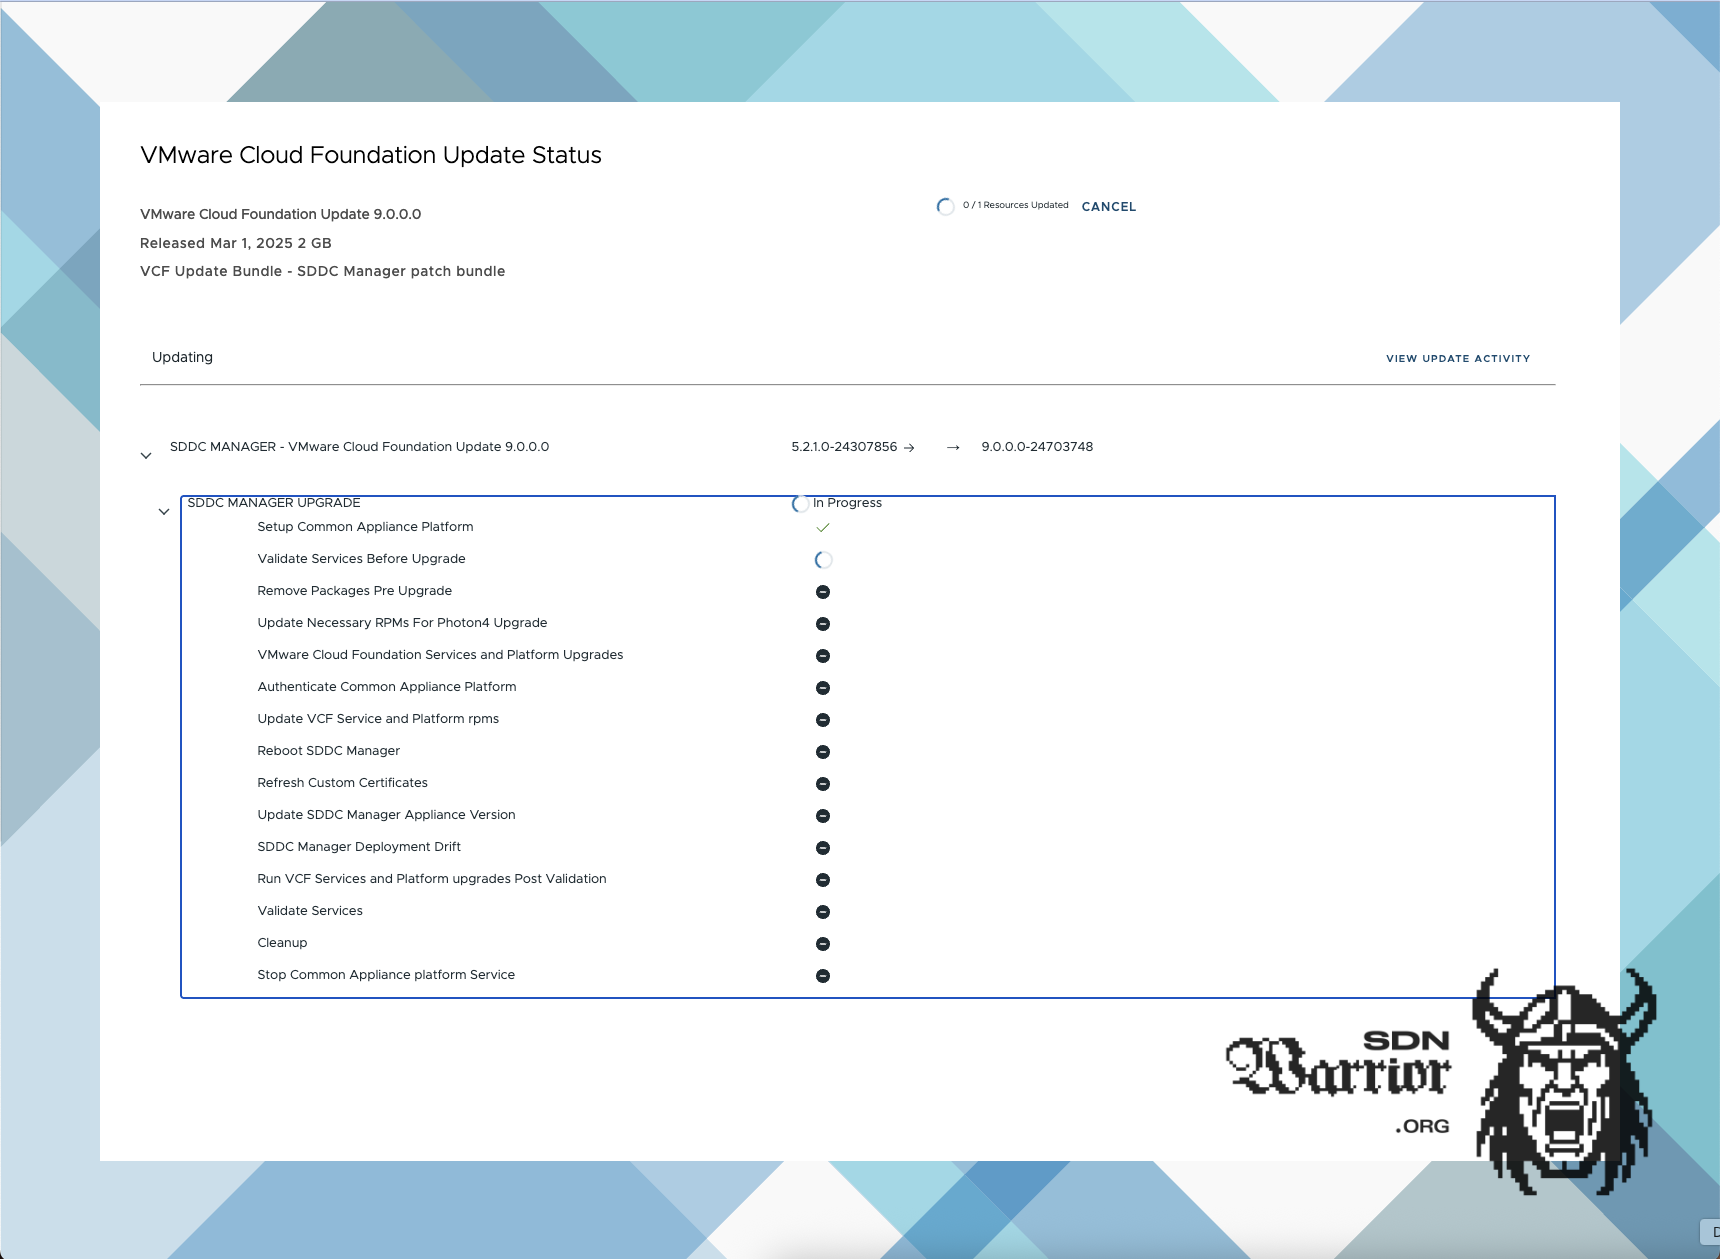
SDDC Manager upgrade status (click to enlarge)
The SDDC is booted once during the upgrade. I had a minor problem with the SDDC in that it no longer displayed the upgrade status after rebooting. Instead, I only saw update status 0. I checked the log file /var/log/vmware/capengine/cap-update/workflow.log via SSH on the SDDC manager and looked to see if the following was visible:
YYYY-MM-DDTHH:MM:SS.426528 workflow_manager.go:221: Task stage-cleanup completed
YYYY-MM-DDTHH:MM:SS.426646 workflow_manager.go:183: All tasks finished for workflow
YYYY-MM-DDTHH:MM:SS.426699 workflow_manager.go:354: Updating instance status to Completed
After that, I rebooted the SDDC again and the error was fixed. I had never had this problem before and couldn’t find any KB articles about it. Maybe my nested environment was too slow. So take this fix with a grain of salt. Finally, I configured my VCF9 offline repo in the SDDC as a repository, as I don’t want to download all the VCF9 binaries from the network.
Binary Management
SDDC version 9 supports the Broadcom download token, so there is no need to change anything with a script on the SDDC, but I prefer my central offline repo. I built my own repo with the help of Timo Sugliani’s instructions. It is the easiest way to get your own offline repo, even if you have no Linux knowledge. However, you still need a valid download token.
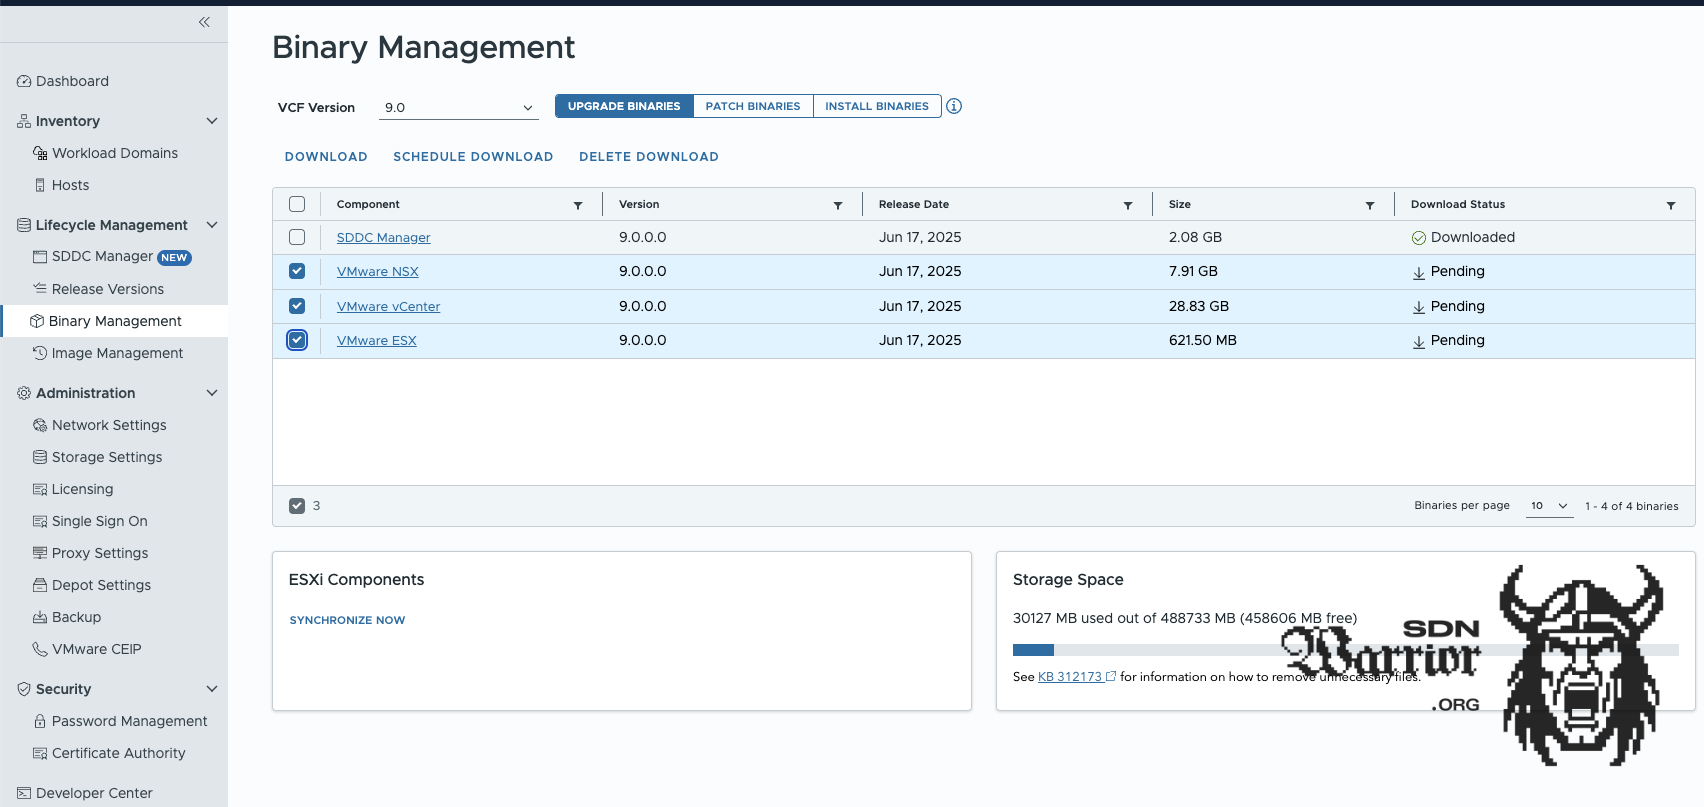
Binary Management (click to enlarge)
Next, I download the upgrade binaries for NSX, vCenter, and ESX to my SDDC manager. The download is faster than the validation. It took me about 30 minutes to get everything I needed.
Starting the upgrade
I start the upgrade with the SDDC for the management domain. To do this, go to Workload Domains —> Management Domain —> Updates in the SDDC manager and then click on the Plan Upgrades button. The process is actually exactly the same as for a normal VCF update.
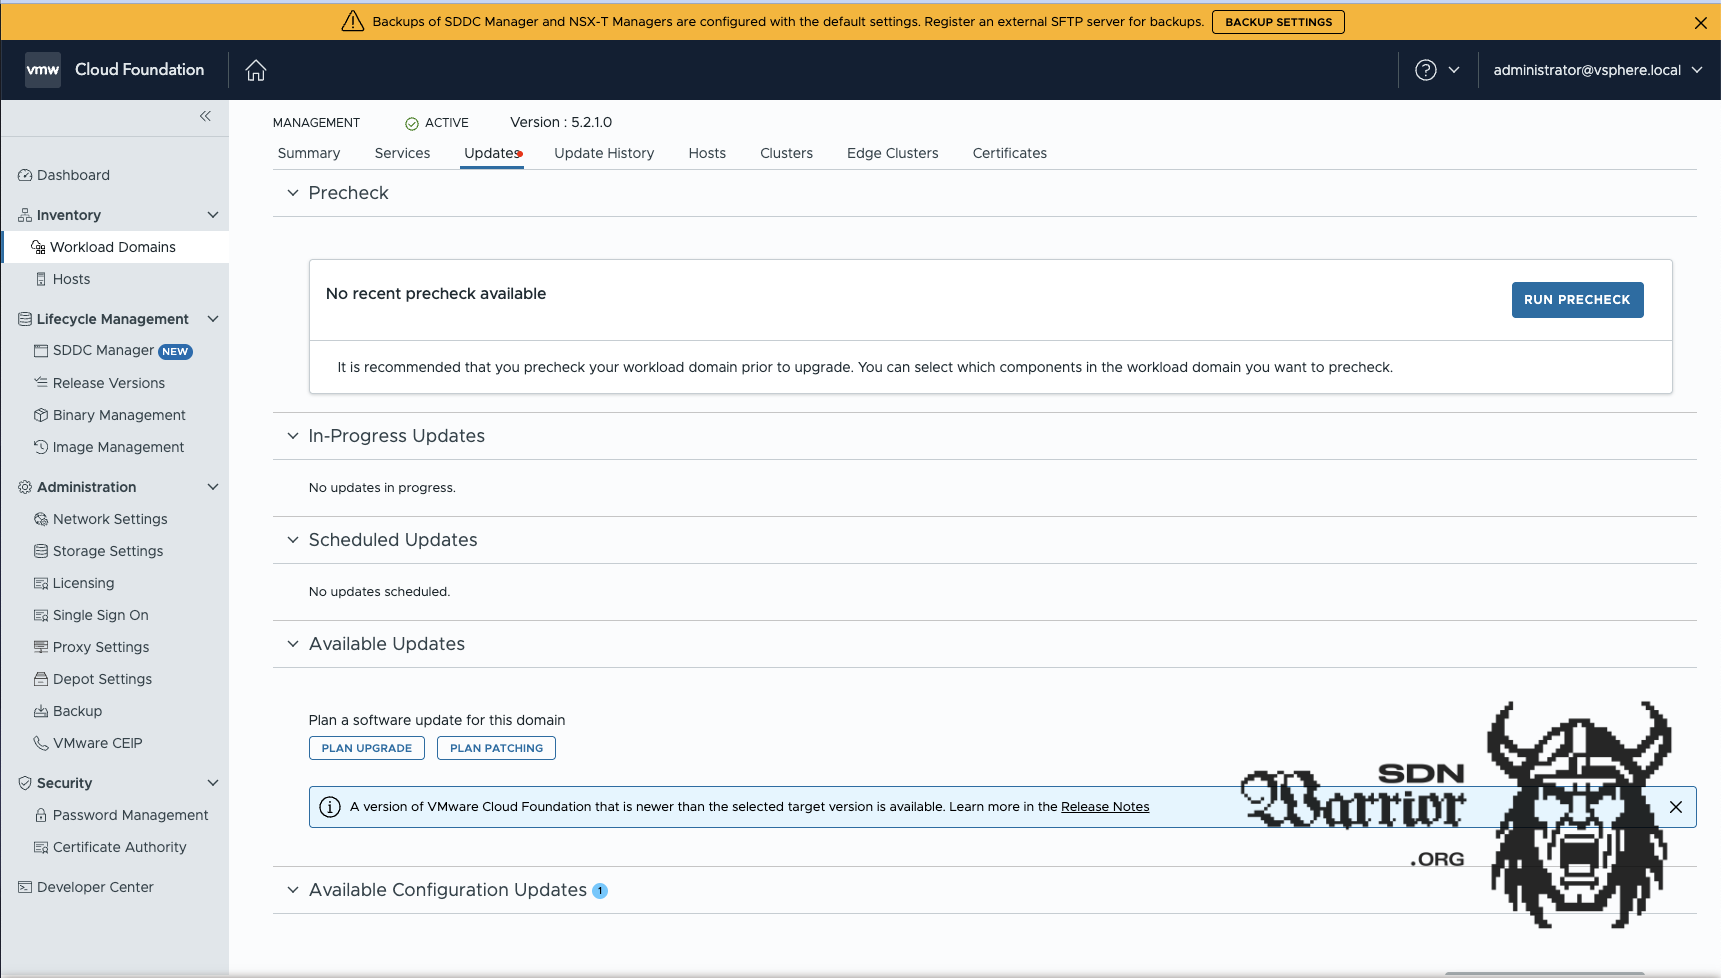
Plan Upgrade (click to enlarge)
I select VCF version 9.0.0.0 as the target version and confirm the version summary.
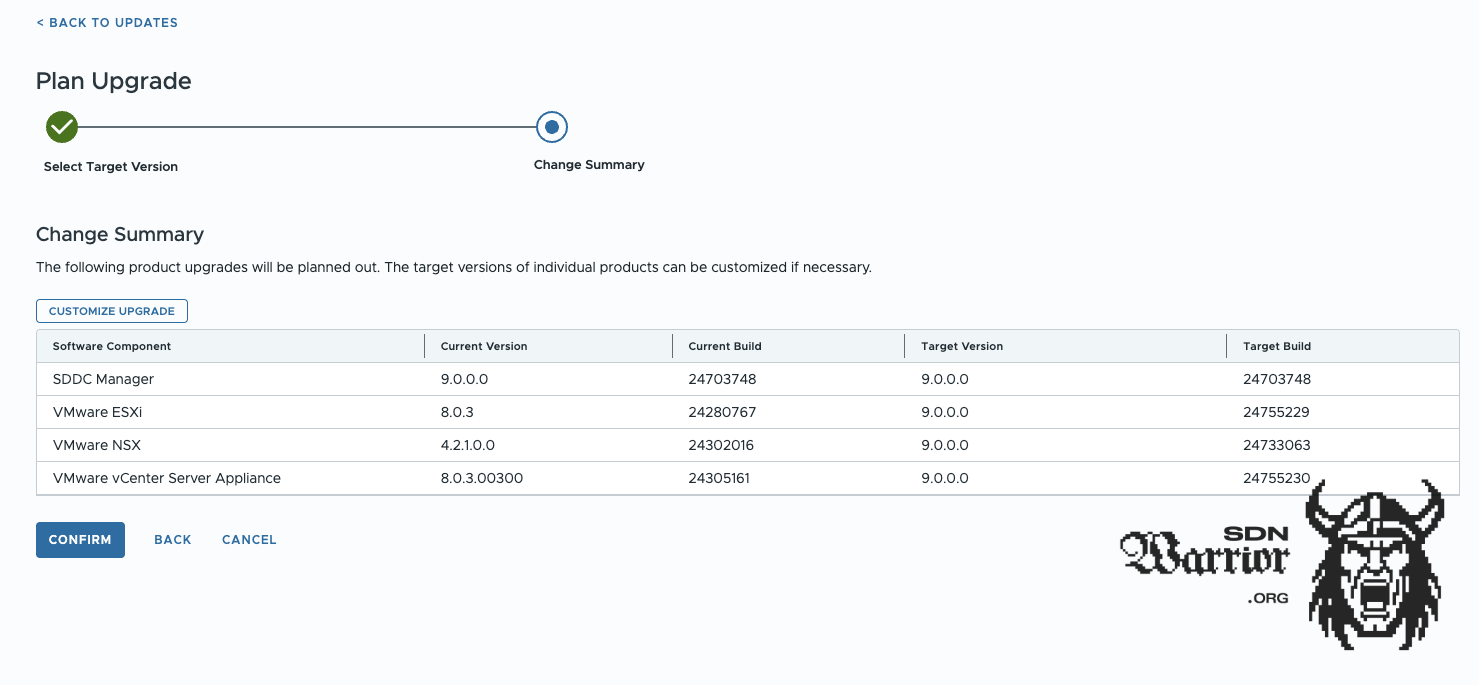
Version summary (click to enlarge)
This completes the upgrade plan. It is important to note that the SDDC will only start the upgrade once we have clicked Configure Update. The order of the components is as follows:
- NSX
- vCenter
- ESX hosts
- vSAN
You can only configure the update for one component at a time. Pre-checks must be performed before each update. Here, too, the process is no different from a normal VCF update.
NSX
Since I don’t have any edges deployed, the NSX upgrade runs without any problems. If I had edge VMs in my environment, I would have had to intervene because of the Ryzen processors, otherwise the edge upgrade would have failed. I explained why this is the case in my article on MS-A2.
vCenter
Next up is the vCenter. Here, the vCenter Reduced Downtime Update is used. This means that a second vCenter appliance is deployed in parallel and assigned a temporary IP address. There are two options here: either I assign a static temporary IP address or I use Auto.
I usually use IP addresses defined by my customers, as firewalls are usually involved in whatever form. Since I am working here in my lab without a firewall within the lab, I can use auto. This gives the old and new vCenter a temporary APIPA IP to communicate with each other. For the upgrade scheduler, I use Immediate and Automatic for the switchover.
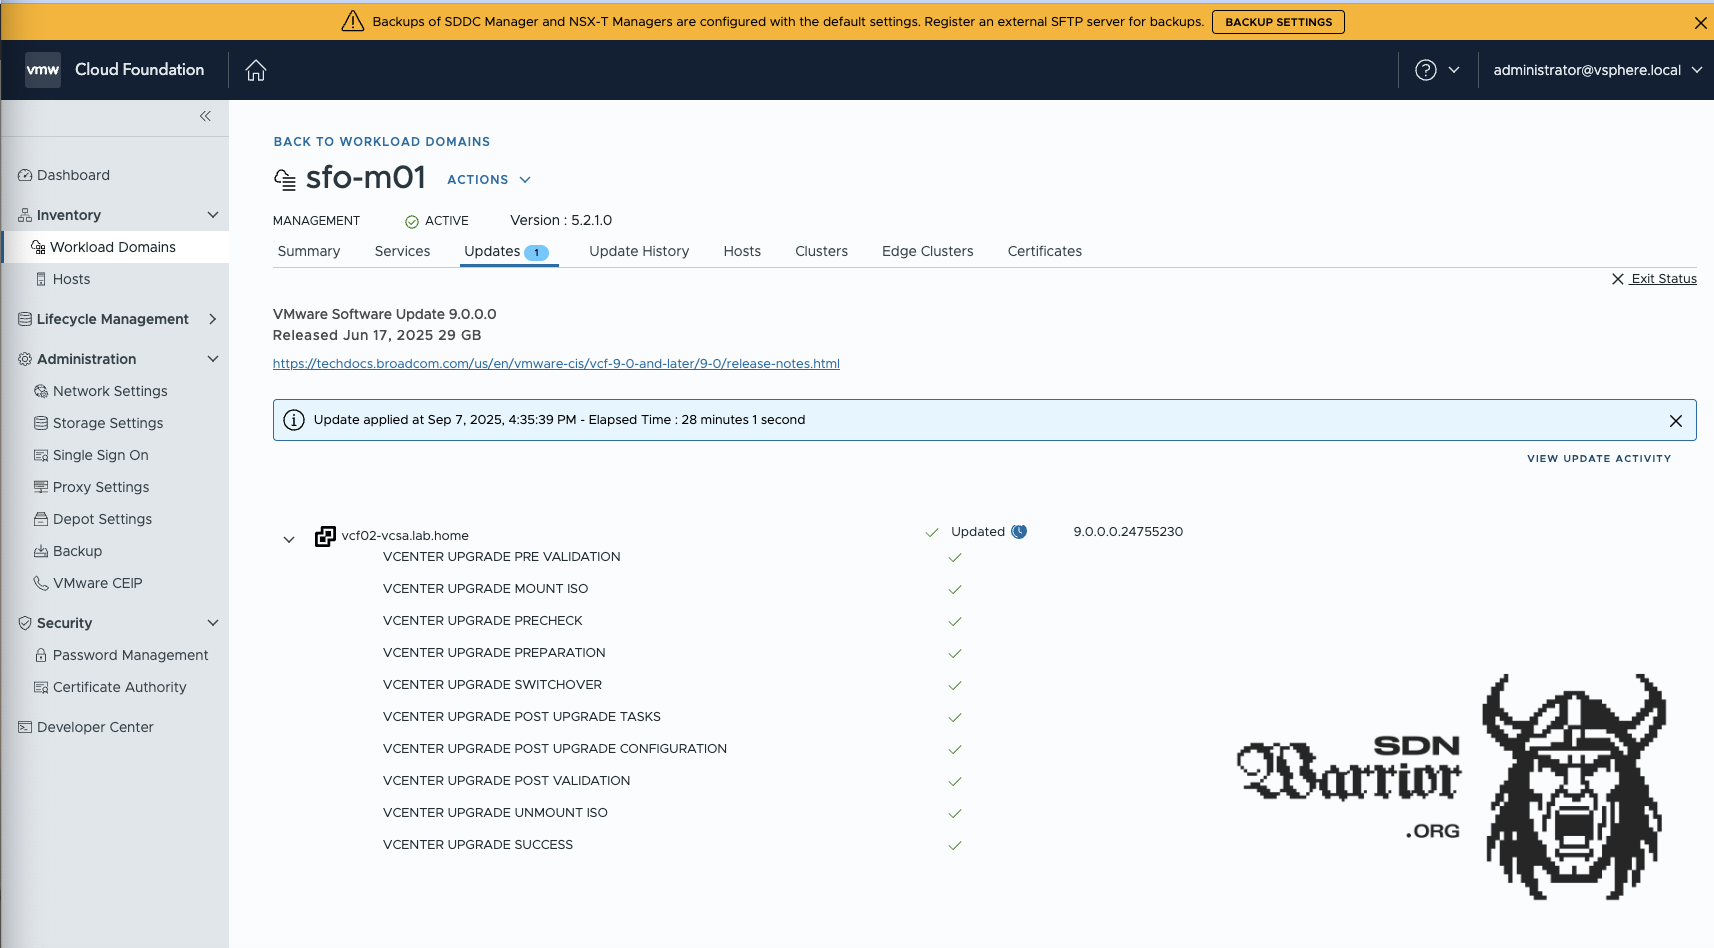
vCenter update (click to enlarge)
ESX - Houston, we have a problem!
The update ran successfully, but I have the problem that my vCenter simply does not want to display ESX9 images, which is essential because without ESX9 images, you cannot upgrade the ESX servers to 9. I thought I was being clever and forced the vCenter to search for new images. You can do this using the vCenter Lifecycle Manager and push Sync Updates.
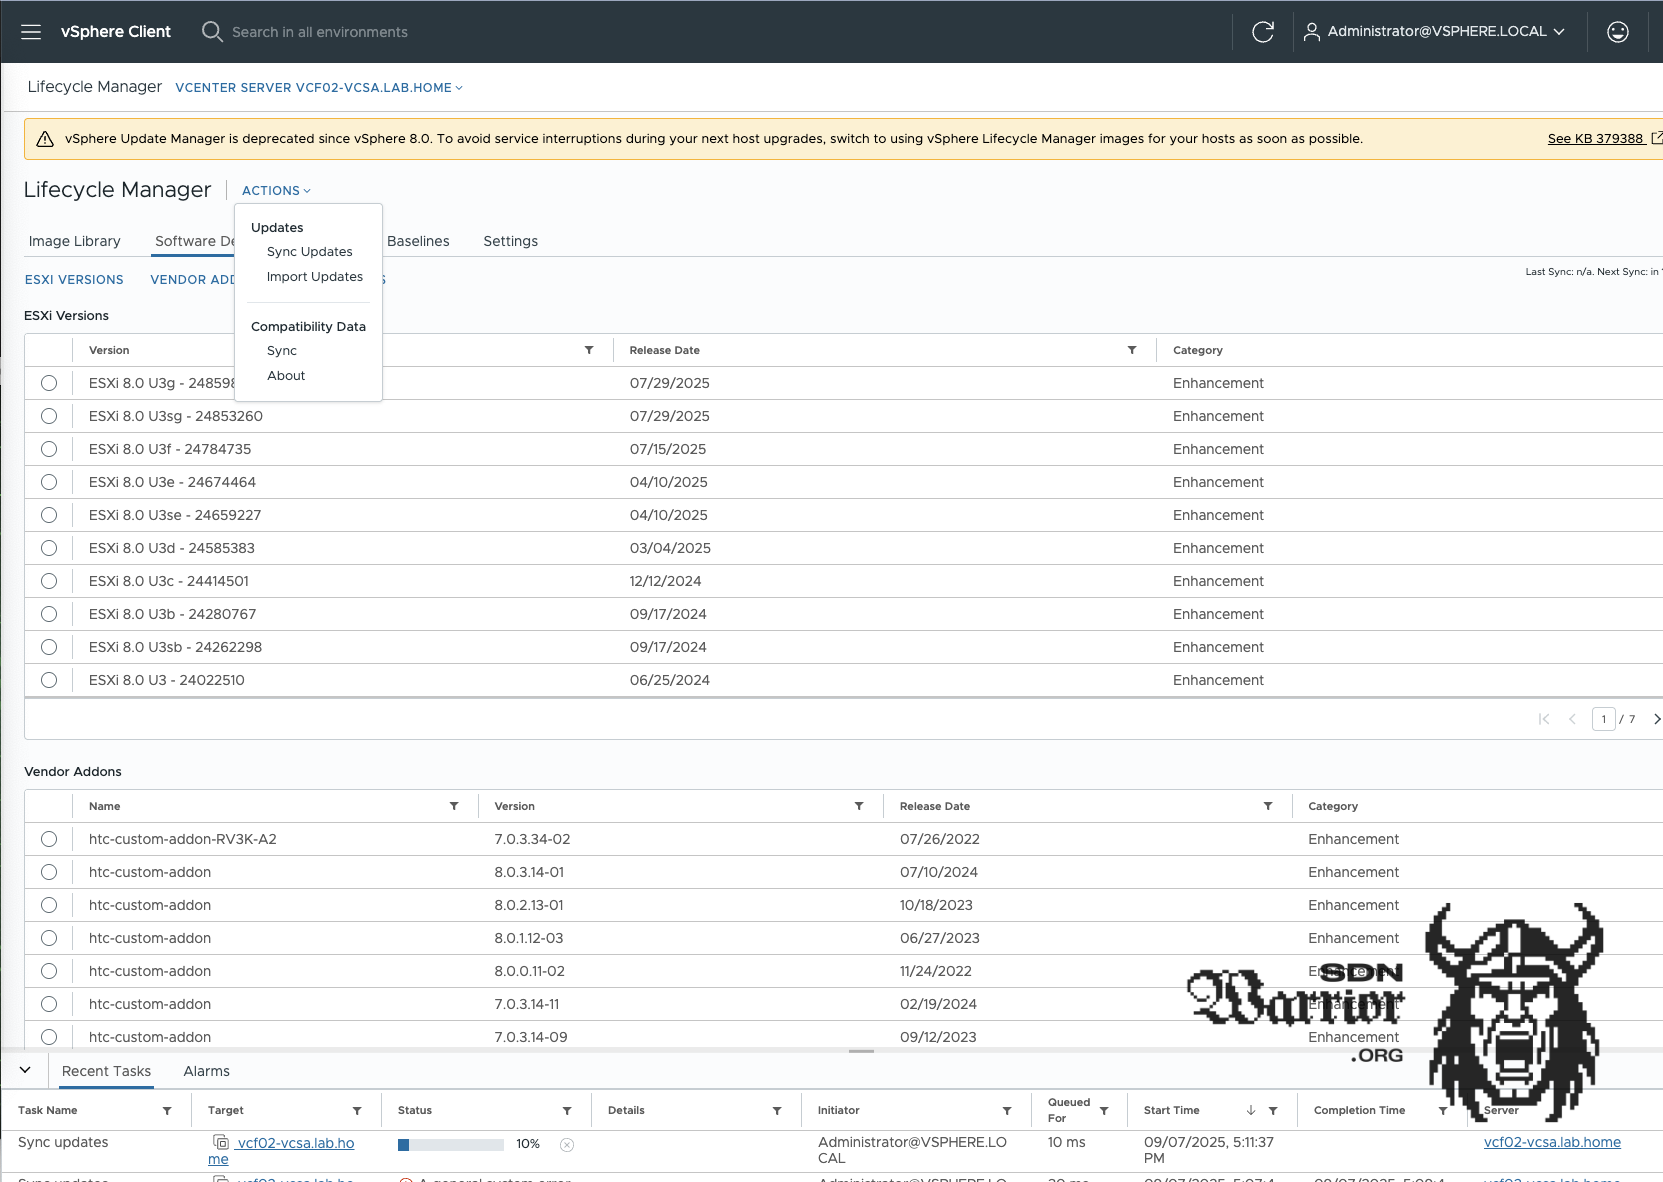
vCenter Lifecycle Manager (click to enlarge)
Interestingly, the process is not running correctly. I hadn’t encountered this before, and after a quick check in the task log in vCenter, I saw the following error message, which wasn’t really helpful.
A general system error occurred: Down load patch definitions task failed while synci ng depots.
Error: 'integrity.fault.Vclntegrityf ault: VMware Sphere Lifecycle Manager hi d an unknown error.
Check the events and I og files for details.

vCenter Tasks (click to enlarge)
Of course, there is nothing specific in the logs either. So Google research…Because the second most important skill in my IT career is knowing how to Google properly—maybe it’s even my most important skill.
Turns out it’s a known bug in vCenter 9 when performing a brownfield upgrade from 8 to 9. VMware has created a KB article on this topic. The solution is relatively simple: you need to delete metadata from the vCenter DB in the tables vci_updates and vci_update_packages.
vCenter workaround
- Lgin to vCenter as Root
- Stop updatemgr service
service-control --stop updatemgr
- Change to ‘updatemgr’ user.
su updatemgr -s /bin/bash
- Run psql command to patch the DB
psql -U vumuser -d VCDB -c "UPDATE vci_updates set deleted = 0, hidden = 0 where meta_uid like 'ESXi7%' or meta_uid like 'esxi7%' or meta_uid like 'ESXi_7%' or meta_uid like 'esxi_7%'; DELETE FROM vci_updates where id not in (select update_id from vci_update_packages);"
- Start updatemgr service
service-control --start updatemgr
After the changes and the restart of the service, vCenter automatically syncs the image data. Now a new image can be created.
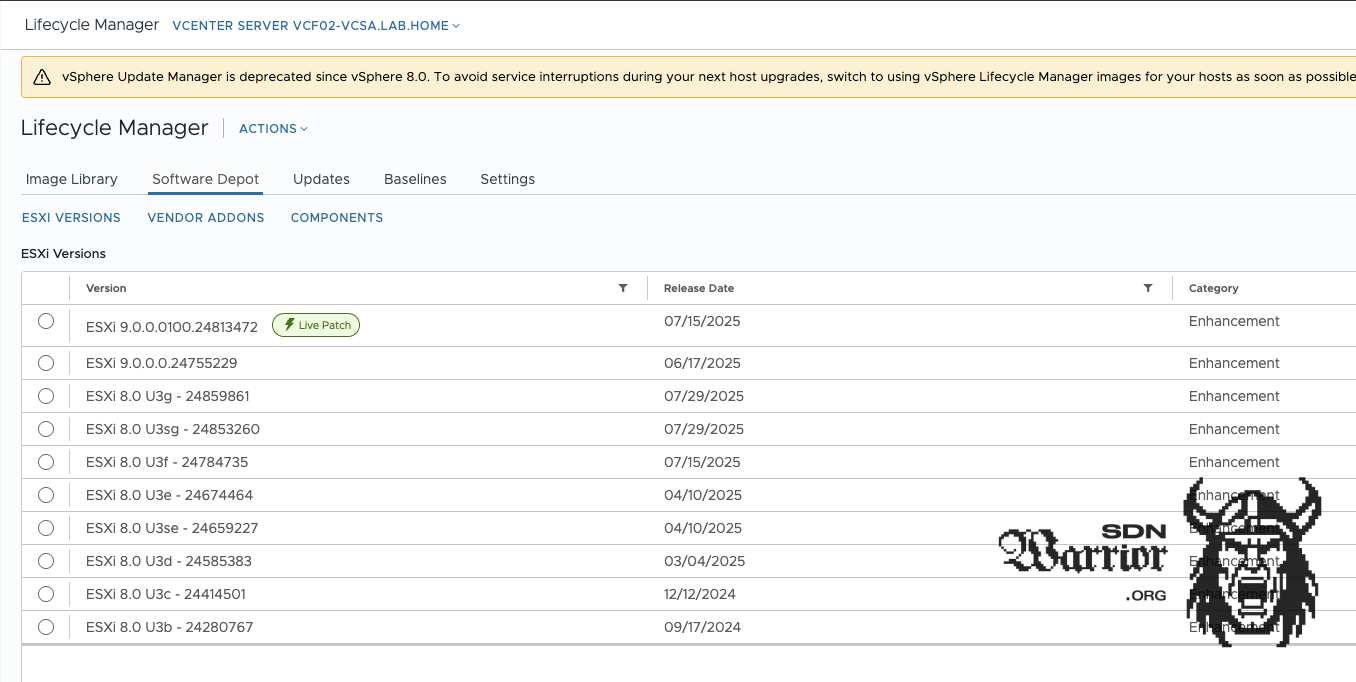
vCenter Lifecycle Manager after workaround (click to enlarge)
ESX Image
For Image Mode, we still need to import an image into the SDDC; without this, the ESX servers cannot be upgraded to 9. After fixing the vCenter, I create a dummy cluster in the vCenter and select the correct image for VCF9.
The image is then imported into the SDDC and the dummy cluster can be deleted again in vCenter. The image is assigned to the management domain cluster in the “Configure Update” step, and after the pre-checks, the ESX servers can be updated. The process ran smoothly - easy, that’s what I expected from the start.
vSAN
The final step in the actual upgrade process is to update the vSAN storage. The process is straightforward, and all you need to do is press the upgrade button under cluster –> configure –> vSAN. Depending on the hardware and size of the vSAN storage, this process can take a relatively long time.
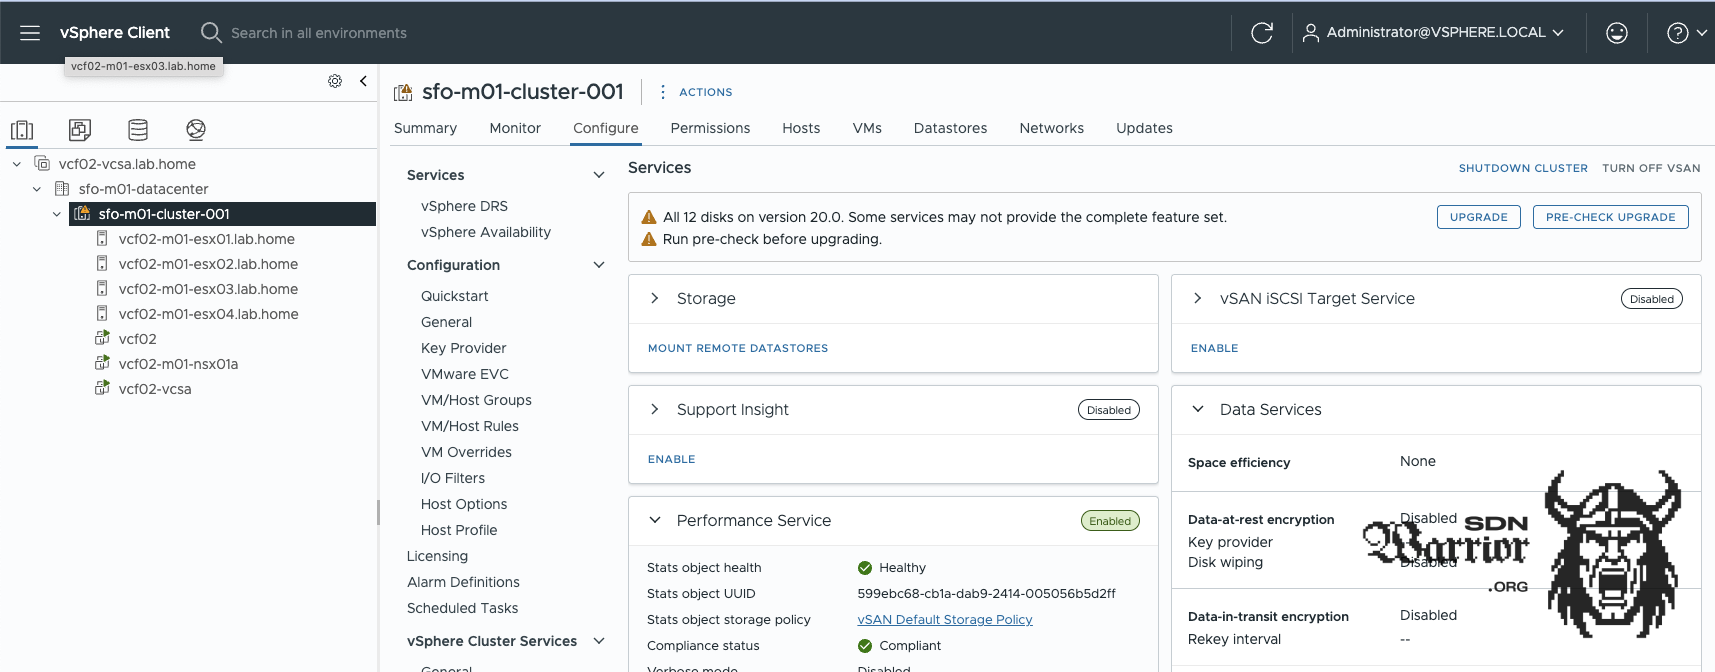
vSAN upgrade (click to enlarge)
Now everything is ready for me to start onboarding in Operations.
Onboarding in VCF Operations
I have a central VCF Operations because I don’t want to deploy an entire fleet every time I need a new nested lab. I described how I built it in this article. When onboarding in Operations, there are really only two things to keep in mind. I have to configure the new VCF environment as a deployment target, and I have to enable activate management, otherwise I cannot distribute licenses for the environment with my VCF Operations instance.
To onboard, I need to add the VCF instance to my Ops via VCF Operations —> Administration —> Integrations —> Accounts —> Vmware Cloud Foundation. Once the environment appears under Integrations, you can select it and press the Activate Management button. This allows you to assign a license to the VCF instance.
Finally, the VCF instance is set up as an deployment target under —> Lifecycle —> VCF Management —> Settings —> Deployment Targets.
The upgrade is now complete and the VCF 9 instance can be used as normal. Optionally, you can install the ESX patch under Lifecycle. To do this, you must create a new image in vCenter and import it via Ops. The process is more or less identical to the previous update.
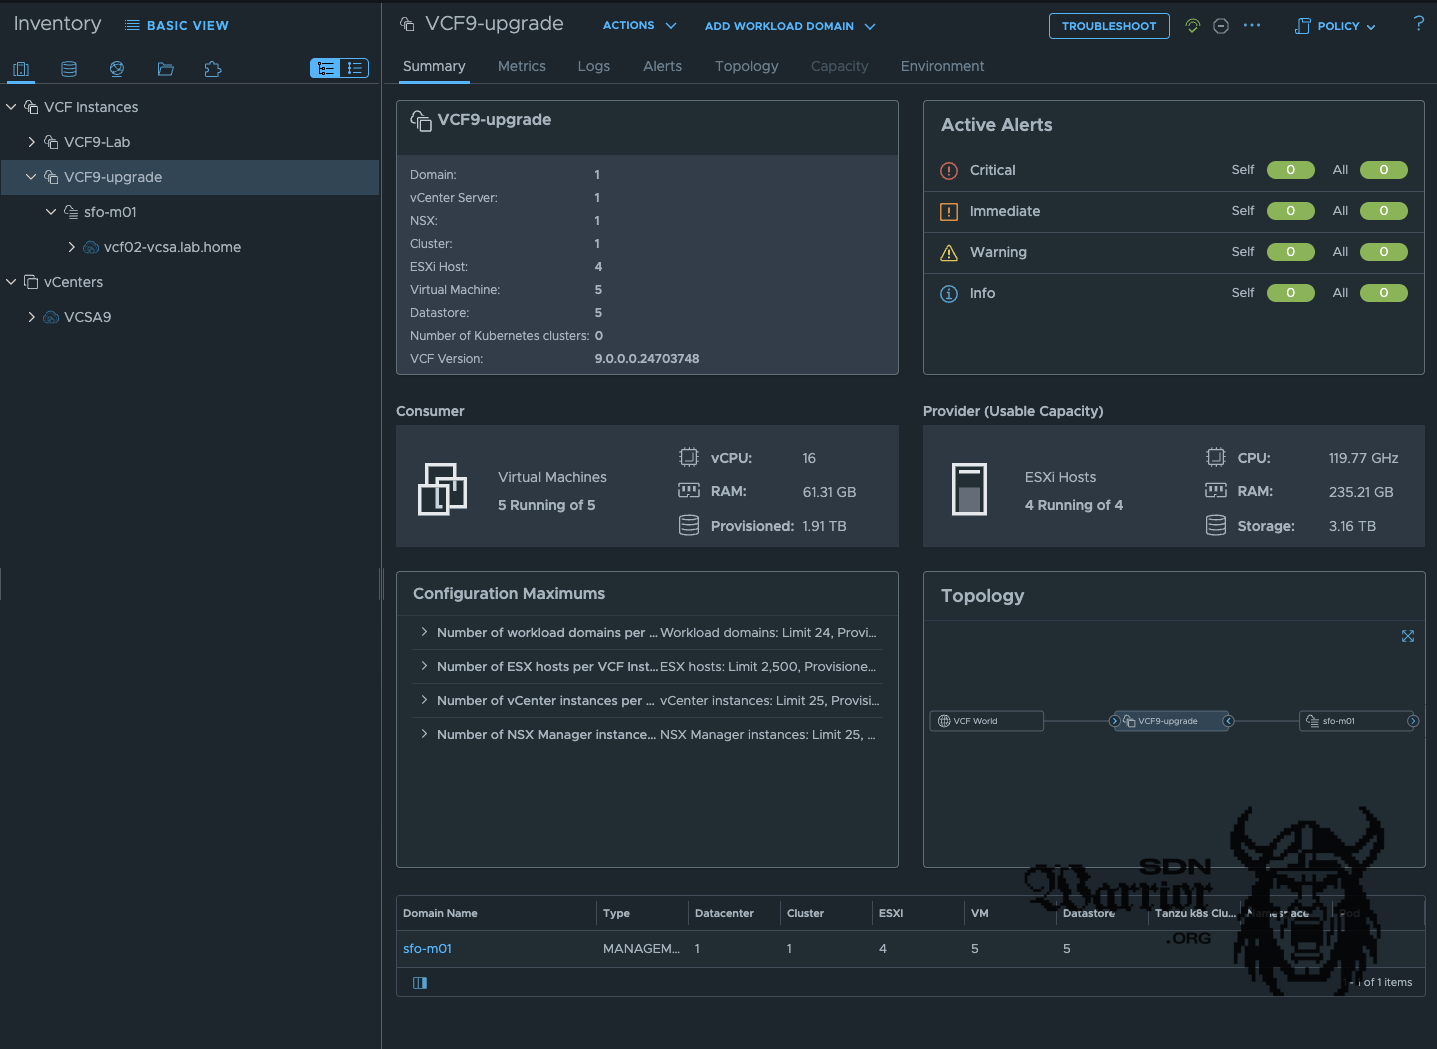
VCF Operations (click to enlarge)
Final thoughts
The upgrade was more difficult than expected. The missing images in particular took me longer than I would like to admit. To be honest, I thought it would be a straightforward process. My VCF 5.2.1 environment was completely new, with no previous updates or other legacy issues.
I think VCF 9.0.1 will remedy this, because in theory the upgrade process is very simple and doesn’t really differ much from a normal patch update in VCF5.X.
What I still want to test is an import, i.e., converting a standalone NSX installation into a workload domain. Unfortunately, the same applies here as with my old NSX Labs: when updating my physical lab, I destroyed most of my old setups (because I’m sometimes just stupid). Only labs that are unusable in this case have survived.
Well, I’ll do another NSX 4.2.1 deployment at some point. But that will be another blog post. If you have any questions or comments, please feel free to send me a message on LinkedIn or to my blog email address.
