VCF 9 - NSX VPC Part 1 - centralized Transit Gateway
A short article about VPCs in NSX 9 and VCF 9.
3000 Words // ReadTime 13 Minutes, 38 Seconds
2025-06-17 18:00 +0200
Introduction
Where to start? The VPC feature has been available in NSX for a long time, but it has often been somewhat under the radar. In VCF 9, VPC is now more than present and small spoiler - I say rightly so!
But wait, from the top, what are VPCs anyway? VMware says NSX Virtual Private Clouds is an abstraction layer that enables the creation of standalone virtual private cloud networks within an NSX project in order to use network and security services in a self-service usage model.
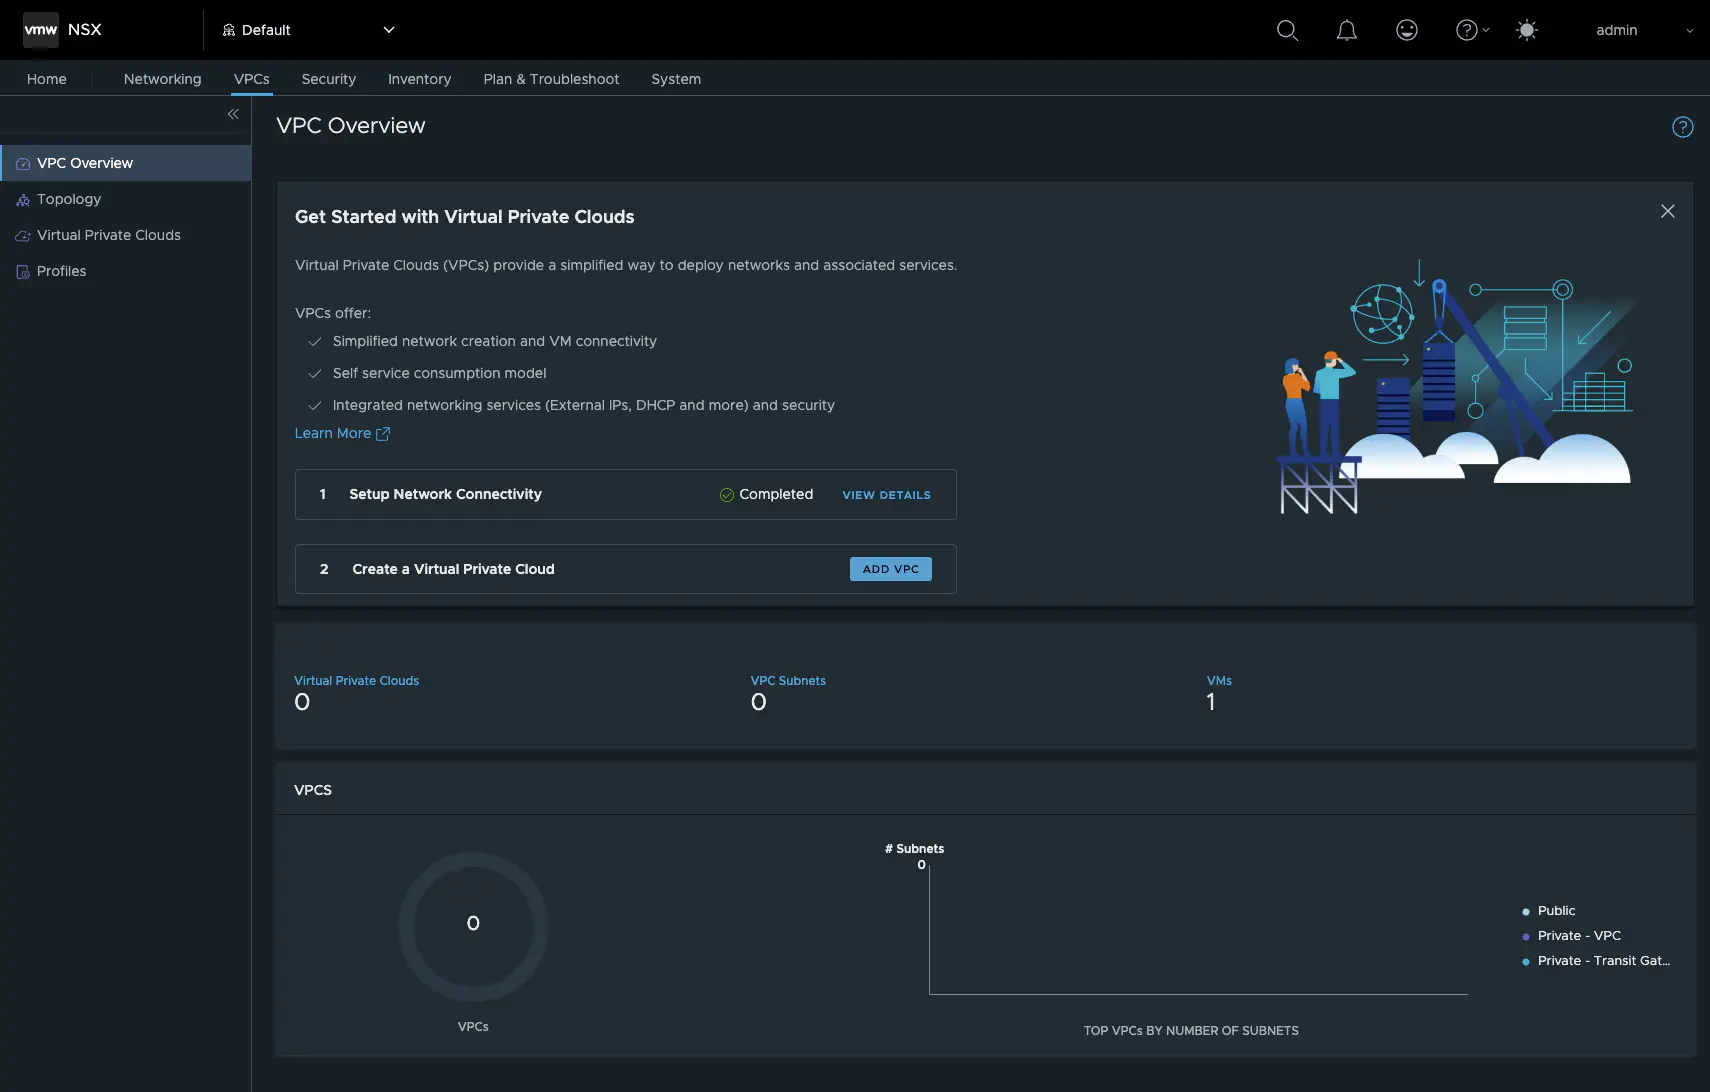
While in NSX 4.X VPCs were only visible in the GUI when an NSX project was created, VMware has now changed this completely. As soon as you open the NSX GUI, the VPCs tab immediately catches your eye.
NSX 9 VPC (click to enlarge)
As you can see here in the screenshot, VPC is very present in NSX and VCF 9, but before we can talk about VPCs, we need to talk about a new gateway in NSX 9 - the Default Transit Gateway.
Default Transit Gateway
What the hell is a Default Transit Gateway? Yes, that’s what I asked myself when I first tried out the beta of VCF 9. Whereas in NSX 4.X a VPC was attached directly to a T0 or a VRF, in VCF9 a Transit Gateway is connected upstream, or rather the default Transit Gateway. At present, you can only have one Transit Gateway per project. What is new in VCF 9 or NSX 9 is that the default project can now also have one or more VPCs.
The default Transit Gateway is present from the start and cannot be deleted. The configuration options are also very limited. I can specify the name, the External Connection and the VPC Transit Subnet. This network comes from the 100.64.x.x range and is normally assigned by NSX itself and does not need to be customized. The HA mode is taken over by the T0 to which my Transit Gateway is connected or, more precisely, my VPC connection profile determines whether the HA mode is taken over by my T0 or not.
However, this is only half the truth, because there is also the so-called distributed mode. However, this assumes that I have created my External Connection as a Distributed Connection and not as a Centralized Connection (with Edge Transportnodes). But that’s another story and I will work through the Distributed Connection in a separate article.
Let’s get started - Network Connectivity
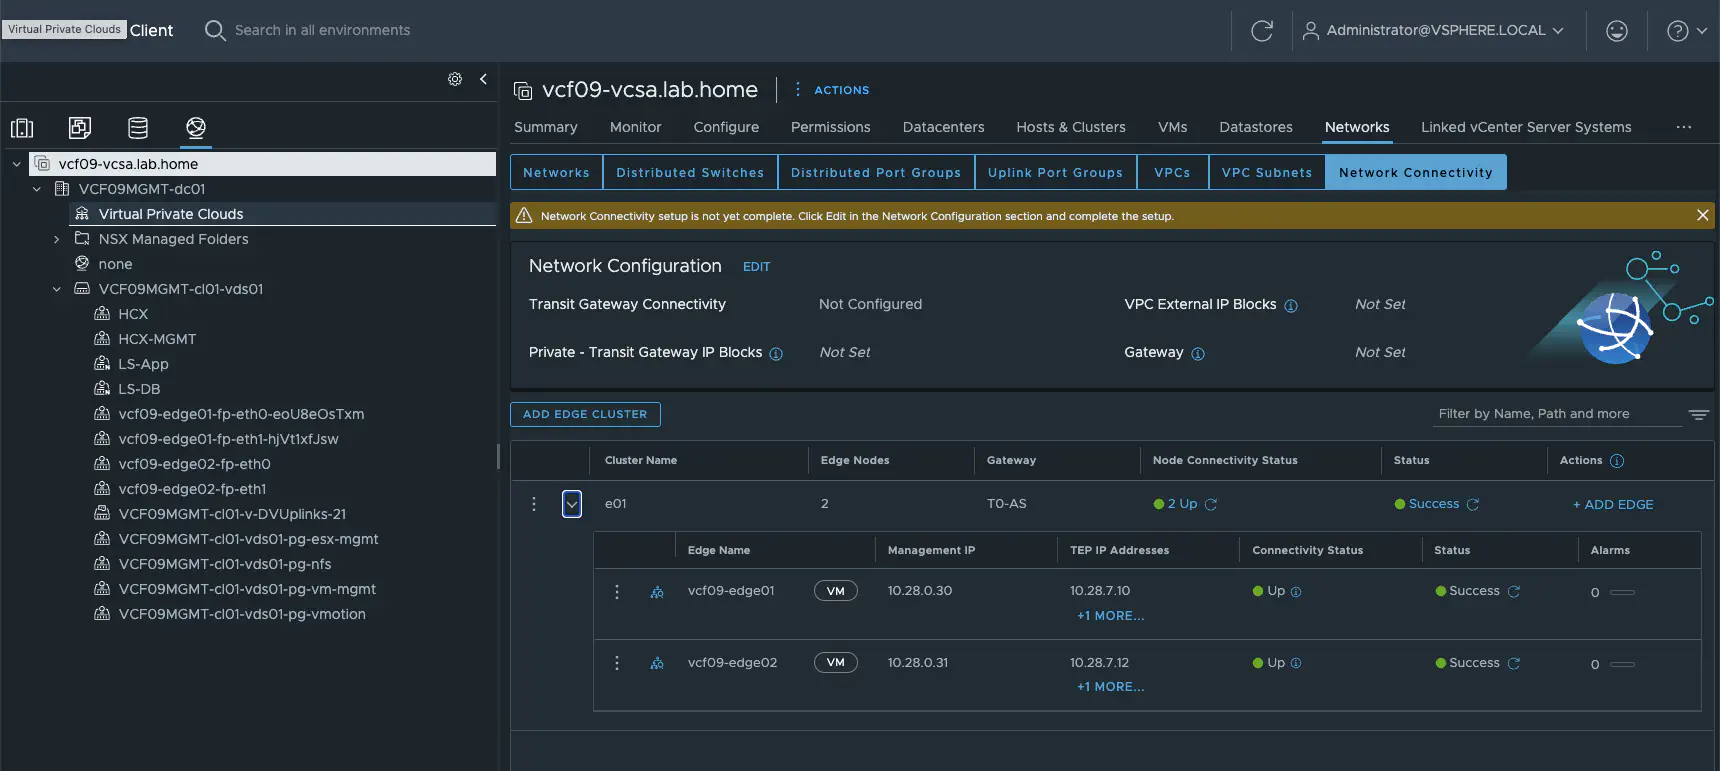
First we need to configure our network connectivity. There are two ways to do this. 1. in the vCenter or 2. in the NSX Manager under System -> Setup Network Connectivity. This point is new. In VCF9, edges are no longer deployed via the SDDC as in VCF 5.X, but via the network connectivity. Here I can also expand my Edge Cluster or deploy a new Edge Cluster. Fortunately, the deployment process has been optimized and is less error-prone and also has a few quality of life improvements.
vCenter Network Connectivity (click to enlarge)
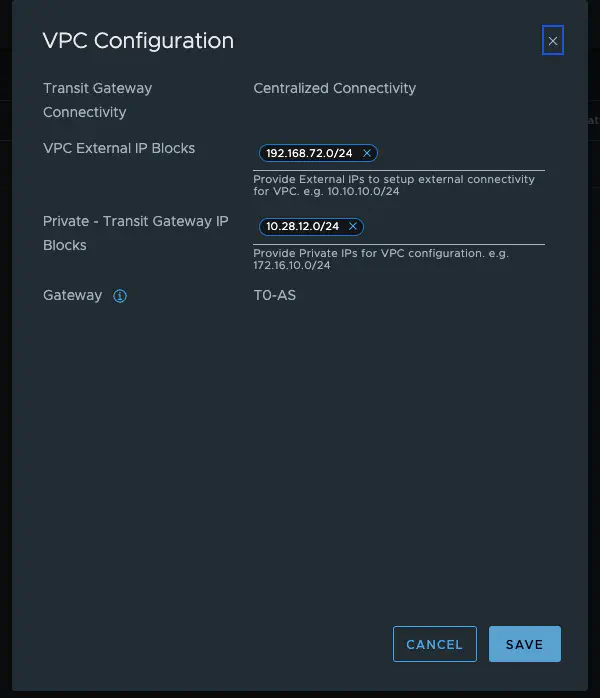
I now have to configure my VPC External IP Blocks in the Network Configuration. These IP blocks are then used for all public networks and must generally be routed by my network. This also means that these networks must not overlap. The Private - Transit Gateway IP Blocks are new. These are used so that the VPCs of the same project can communicate with each other. Which networks are used in VPCs will be explained in the course of the article. The Private - Transit Gateway IP Blocks do not have to be routed in the physical network. They are used exclusively for intra-VPC communication.
vCenter Network Connectivity (click to enlarge)
A few things are now happening in the background. Firstly, my VPC connectivity profile is being configured by NSX.
In addition, an external connectivity profile is created under Networking -> External Connections. This determines which T0 router the Transit Gateway is connected to. Finally, the External Connectivity Profile is assigned to my Transit Gateway. Can also be found under Networking -> Transit Gateway. Now that we have taken care of the external connection, we can concentrate on creating the actual VPC.
Create a Virtual Private Cloud
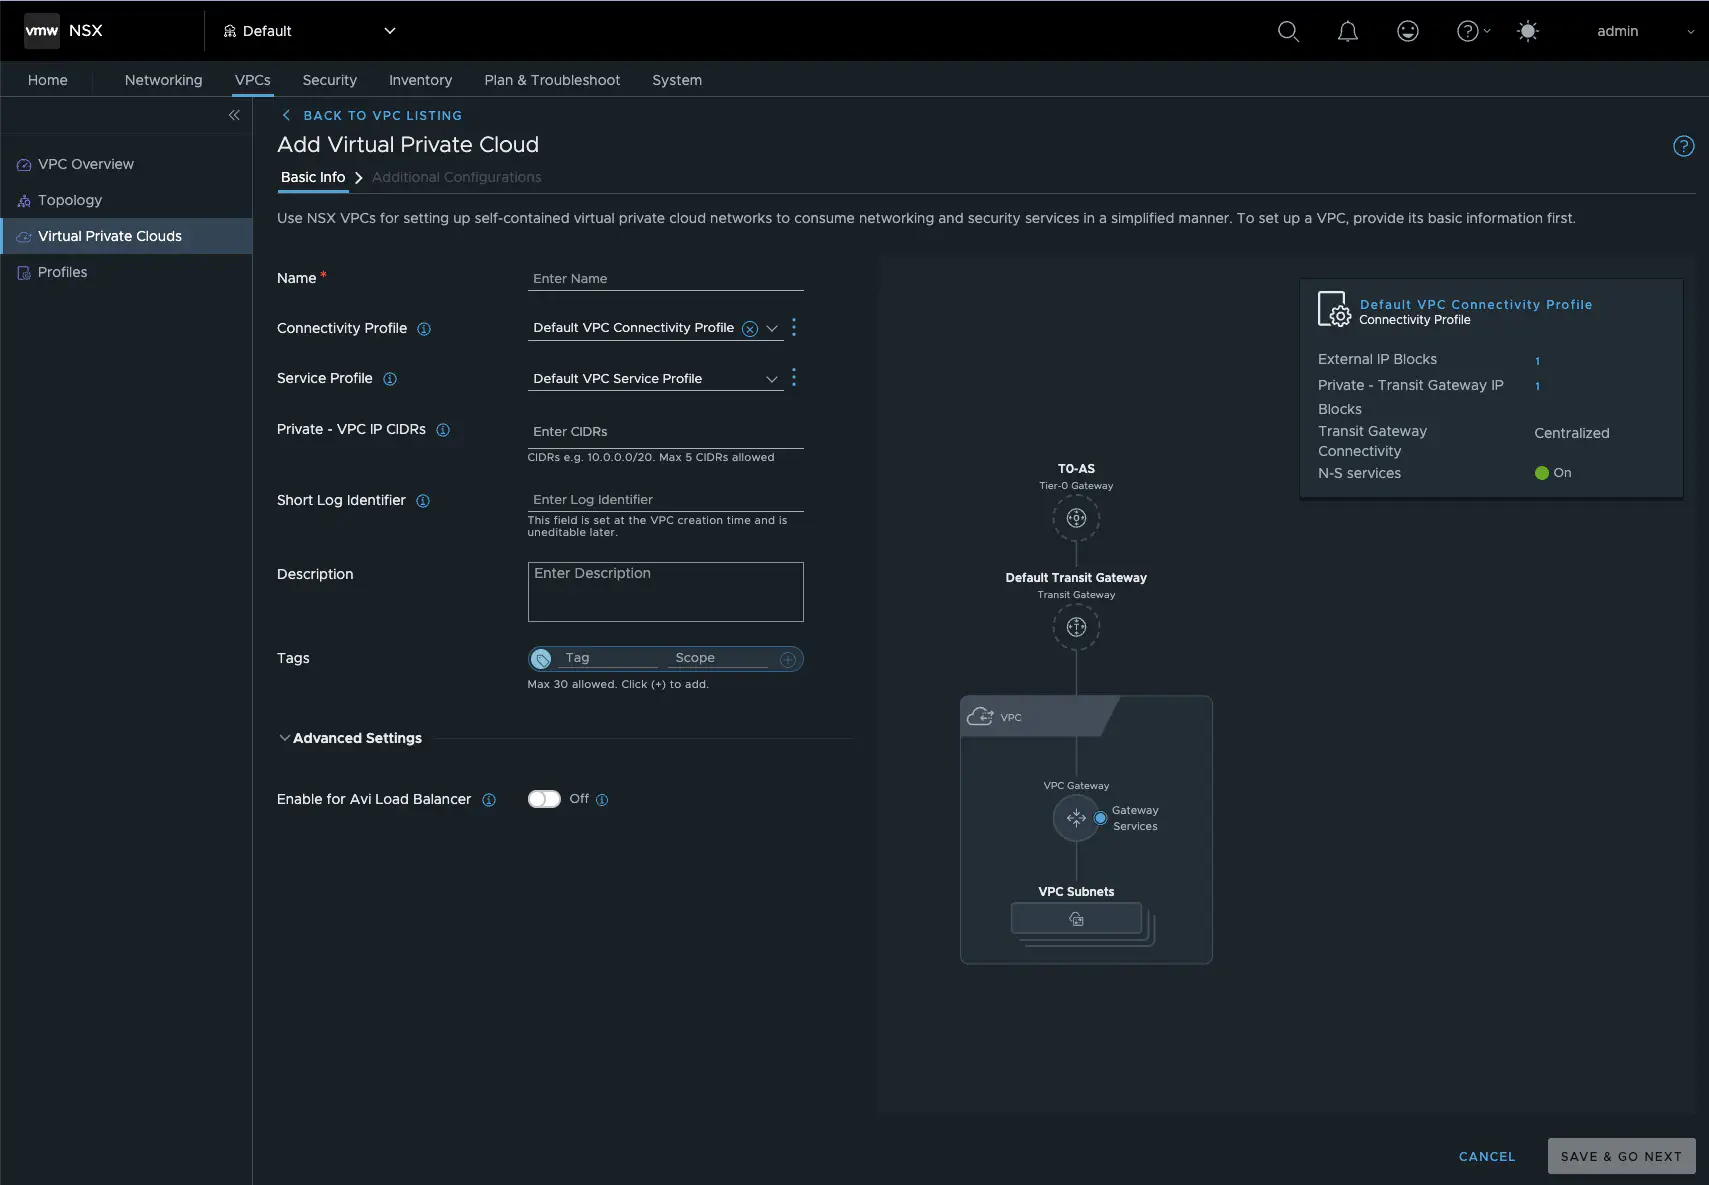
We are now about to create our first VPC. In VCF 9, there are two options. One is via vCenter and the other is directly via NSX. Since we have not yet configured a VPC service profile, we will create our first VPC via NSX. To do this, we go to Add VPC in the VPC menu and are greeted by this attractive dialog box.
New VCP in NSX (click to enlarge)
Here we assign a name to our VPC, select the previously created connectivity profile, and can select or create a service profile. In the VPC service profile, we can activate a DHCP server and assign profile-specific DNS servers. These must be accessible from the VPC. The same applies to the NTP server. We can also create subnet profiles. The standard profiles that every normal NSX segment has are stored here. Normally, we don’t need to worry about anything here. In my VPC setup, I have activated a DHCP server in the service profile for my default project and specified my LAB DNS and global NTP server.
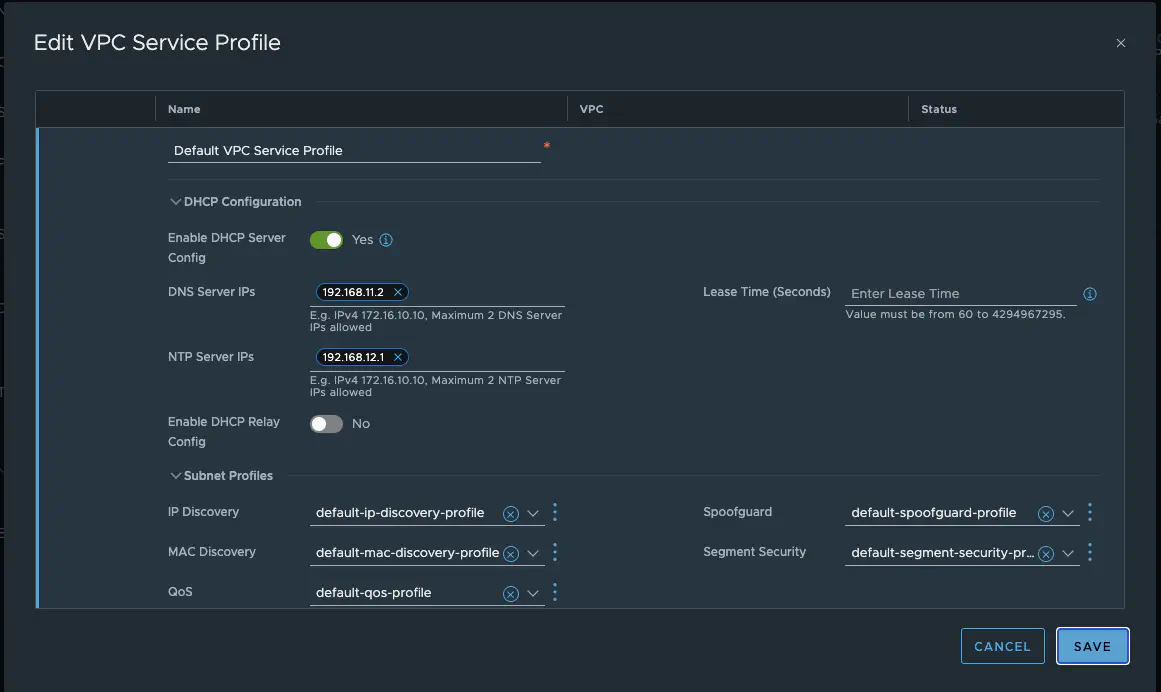
VPC Service Profile (click to enlarge)
Next, I define a private VPC IP CIDR (maximum of 5 per VPC). In my lab, this is 192.168.5.0/24. I will explain what these are and what they do in the next section. I also assign a short, descriptive log identifier and assign the VPC name.
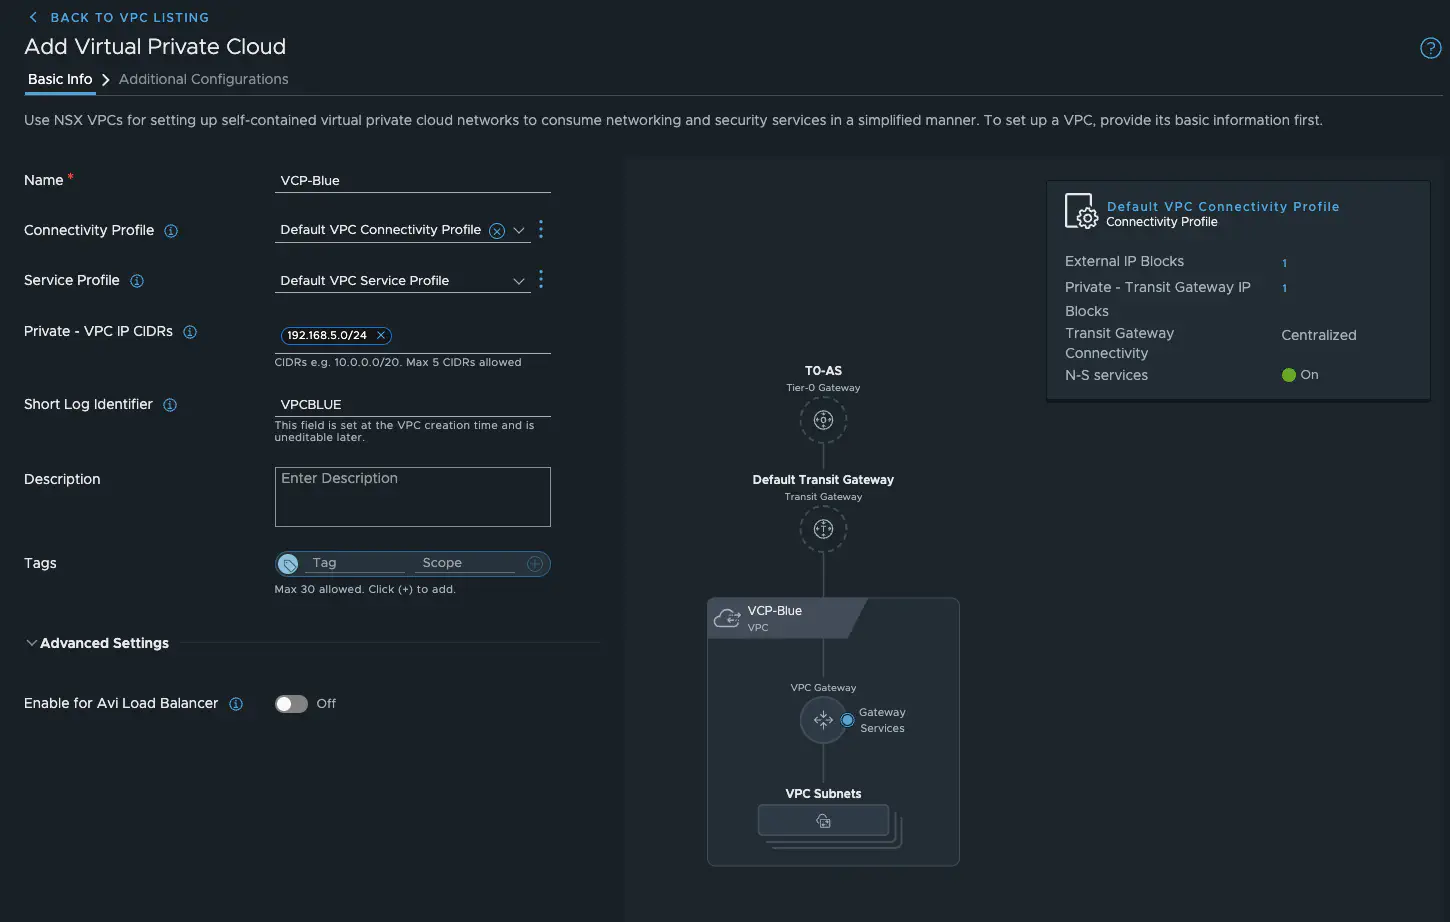
VPC Blue (click to enlarge)
After saving and creating the VPC, the additional configurations must be carried out. Here, we can authorize users/groups for the VPC and assign different roles. More importantly, however, we can create our actual subnets. I think now would be a good time to explain the different types of subnets.
VPC Subnets
In VCF 9, there are now three different types of VPC subnets. Actually, there are four, but the fourth is an AVI service subnet, which is actually only a automatic created private VPC subnet - so that doesn’t really count. This means that we actually have three subnet types.
- Private VPC
This subnet is the network that is only routed within the VPC. That is why it is private – makes sense so far. This subnet cannot be accessed outside the VPC and the network is assigned from the private VPC IP CIDRs.
- Private - Transit Gateway
This network is new in VCF9. Similar to the private network, the network is created from the defined private transit gateway IP blocks (VPC connectivity profile). However, it is routed via the default transit gateway, which allows you to access workloads in these networks from all VPCs connected to the same transit gateway. Since you can currently only have one transit gateway per NSX project, you should use these networks with caution. The useful thing is that even though the networks are routed via the transit gateway, they are only accessible to VPCs. VMs connected to a T1 or T0 router via segments cannot reach these networks because the T0 does not have routes for private networks.
- Public
The name says it all. These are subnets created from the previously defined external IP blocks. They must be routed, must not overlap, and are managed via the VPC Connectivity Profile, as with the Transit Gateway. Workloads in public networks are generally accessible from anywhere.
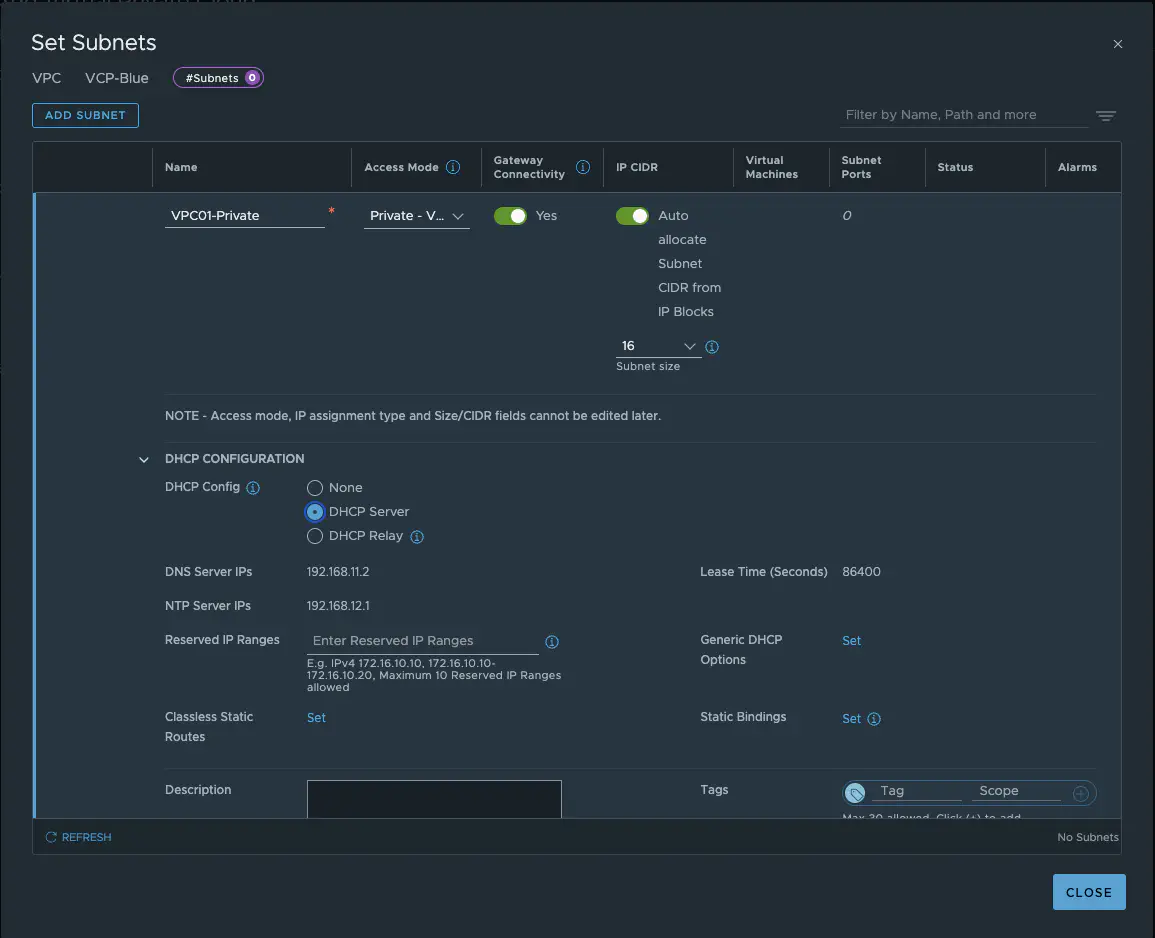
VPC Subnets (click to enlarge)
Additional Configurations
Now that we have clarified which subnets exist in VPC, we can move on to the final settings so that the VPC can be created. I create one for each subnet and let it be assigned automatically. Since Default Outbound NAT is specified in the VPC Connectivity Profile, NSX automatically creates an Outbound NAT Rule. In addition, a group containing all VPC subnets is automatically created. This can be used in the distributed firewall. We could also define additional firewall rules (requires a vDefend license – without a license, only stateless N/S rules can be defined). I will explain the topic of network services later in this article.
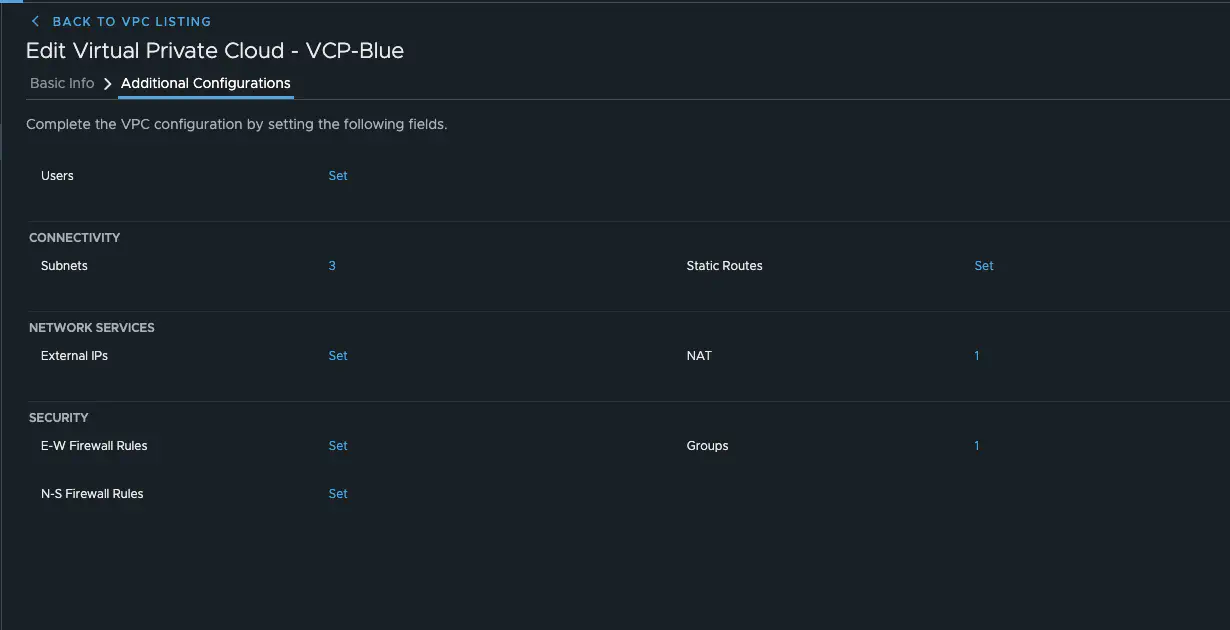
Additional Configurations (click to enlarge)
For my test, I create another VPC. My finished topology now looks like this. As always, I will use Alpine Linux VMs for testing.
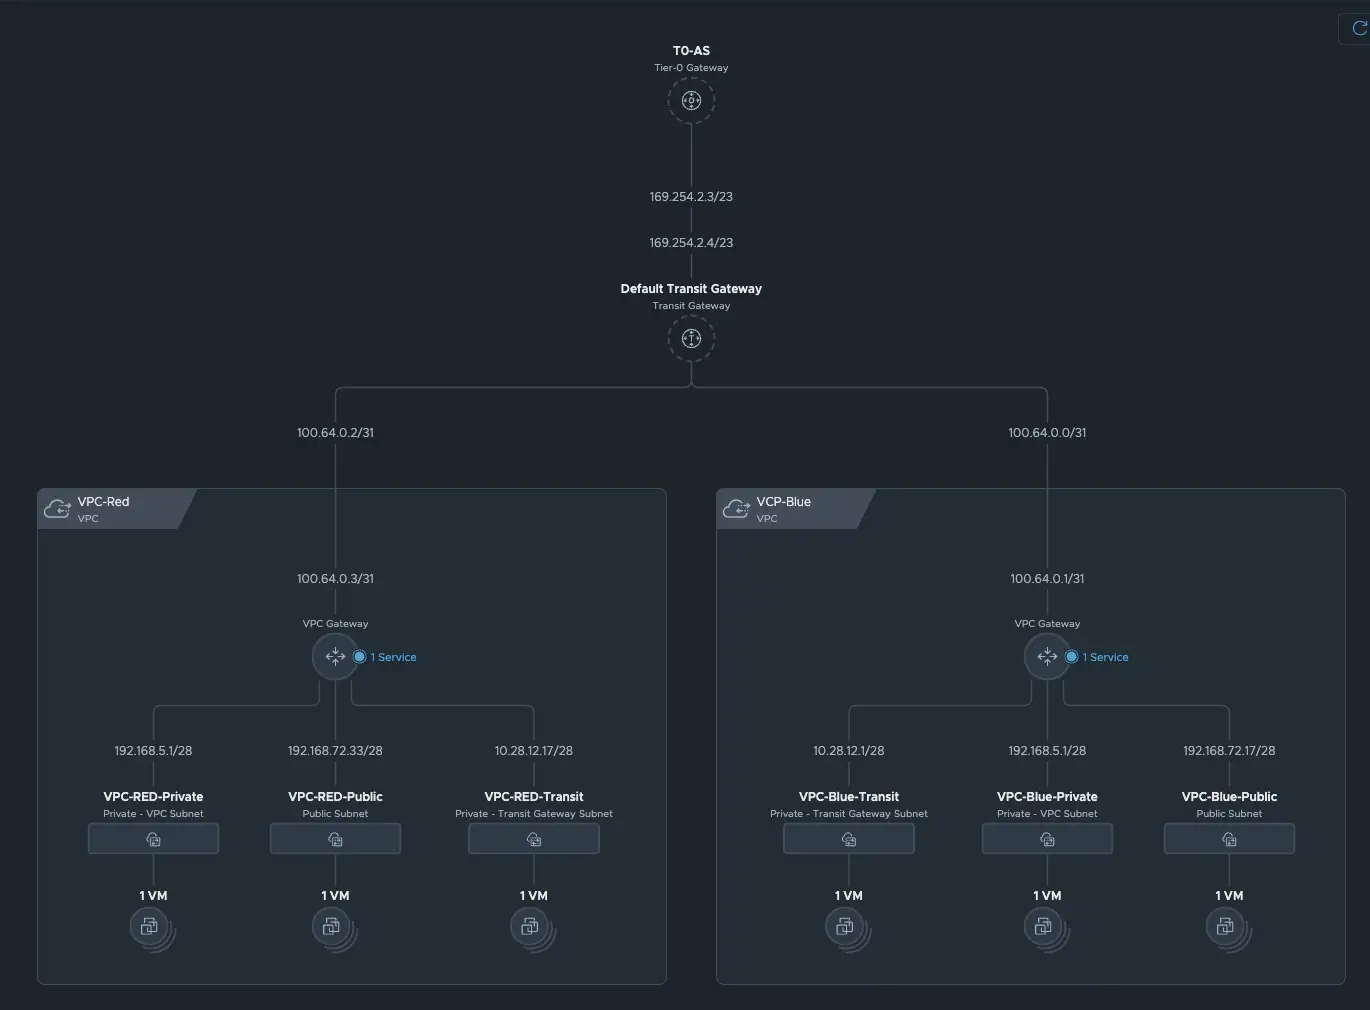
VPC Topologiy (click to enlarge)
I created a second VPC via vCenter. This option has been integrated into the network overview and is essentially the same as in NSX. This creation option can also be controlled via permissions or even completely disabled. There is only one difference compared to creation via NSX Manager. In vCenter, you can currently only manage VPCs from the default project. All VPCs from other projects are read-only. In addition, you cannot modify the profiles. This is reserved for the NSX administrator.
Initial tests with the VPC-Blue
For my test, I created six VMs (see table) and assigned them to the corresponding networks of the VPCs in vCenter. The table shows the gateways automatically created by NSX.
| VM Name | Network Type | Gateway | IP Adress |
|---|---|---|---|
| alpine01-blue-private | private | 192.168.5.1/28 | 192.168.5.3 |
| alpine02-blue-transit | transit | 10.28.12.1/28 | 10.28.12.3 |
| alpine03-blue-public | public | 192.168.72.17/28 | 192.168.72.19 |
| alpine04-red-private | private | 192.168.5.1/28 | 192.168.5.4 |
| alpine05-red-transit | transit | 10.28.12.17/28 | 10.28.12.19 |
| alpine06-red-public | public | 192.168.72.33/28 | 192.168.72.35 |
As you can see, the public and transit networks do not overlap and are created consecutively. Since I have enabled DHCP in every VPC subnet, the first and second IP addresses are occupied. The first is the gateway, the second is the DHCP server.
Test scenarios
I will perform certain tests for each VM from VPC-BLUE. First, I will test Internet connectivity, then intra-VPC connectivity, i.e., communication with all VMs in VPC-BLUE, and finally inter-VPC connectivity, i.e., communication with all VMs in VPC-RED. Finally, I will perform a connectivity test from outside the NSX environment. I will do all of this with simple ICMP tests. To do this, all firewalls on NSX and the VMs have been disabled.
alpine01-blue-private
Internet connectivity
In my first test, I would like to see where the alpine01-blue-private can communicate. The VM has been assigned the IP address 192.168.5.3 by the DHCP. Since N-S Services and Default Outbound NAT are enabled in the VPC Connectivity Profile, alpine01-blue-private reaches the Internet and is nat-ed to the first public IP address of the public network IP for VPC SNAT.

VPC-Blue Auto SNAT Rule (click to enlarge)
Intra VPC connectivity
Next, I test the connectivity to the alpine02-blue-transit vm. This test is also successful, as the transit VM can also be accessed via the VPC gateway. Even though you might think that the SNAT rule applies here, it does not, because NAT takes place on the transit gateway and not on the VPC gateway. The traffic is also distributed routed between the two subnets. This can also be seen very clearly in the NSX Traceflow. The same applies to the connectivity to the alpine03-vpc-blue-public VM.
Inter VPC connectivity
In this test, I first try to reach the VM alpine04-red-private. This is not possible because private networks are not routed via the Transit Gateway. In addition, the private networks overlap.
Next, I perform a connection test to alpine05-red-transit. This is successful, but the traffic is nated via SNAT on the transit gateway. This also means that the traffic is not distributed routed and must run via the edge VM.
The same applies to traffic to alpine06-red-public.
TCPDUMP on alpine05-red-transit (click to enlarge)
External connectivity
The VM cannot be accessed externally. My core router also does not have a route for the 192.168.5.0/28 subnet. The routes are not announced to the T0 and therefore cannot be accessed by my physical test client on which I am currently writing this blog. To avoid writing a lengthy explanation, I will present the results in table form.
| Test # | Source | Destination | Connect | NAT | Dist. Routing |
|---|---|---|---|---|---|
| 1 | blue-private | Internet | Yes | Yes | No |
| 2 | blue-private | blue-transit | Yes | No | Yes |
| 3 | blue-private | blue-public | Yes | No | Yes |
| 4 | blue-private | red-private | No | - | - |
| 5 | blue-private | red-transit | Yes | Yes | No |
| 6 | blue-private | red-public | Yes | Yes | No |
| 7 | External | blue-private | No | - | - |
alpine02-blue-transit
| Test # | Source | Destination | Connect | SNAT | Dist. Routing |
|---|---|---|---|---|---|
| 1 | blue-transit | Internet | Yes | Yes | No |
| 2 | blue-transit | blue-private | Yes | No | Yes |
| 3 | blue-transit | blue-public | Yes | No | Yes |
| 4 | blue-transit | red-private | No | - | - |
| 5 | blue-transit | red-transit | Yes | No | No |
| 6 | blue-transit | red-public | Yes | Yes | No |
| 7 | External | blue-transit | No | - | - |
alpine03-blue-public
| Test # | Source | Destination | Connect | NAT | Dist. Routing |
|---|---|---|---|---|---|
| 1 | blue-public | Internet | Yes | Yes | No |
| 2 | blue-public | blue-private | Yes | No | Yes |
| 3 | blue-public | blue-transit | Yes | No | Yes |
| 4 | blue-public | red-private | No | - | - |
| 5 | blue-public | red-transit | No | - | - |
| 6 | blue-public | red-public | Yes | No | No |
| 7 | External | blue-public | Yes | - | No |
I think I was able to clearly explain how VPC and the various subnets work. It opens up exciting possibilities. However, I would like to discuss one more feature, namely the option of assigning an external IP address to a VM from a private VPC subnet. This can be done via NSX as well as via vCenter.
Assign External IP
With this feature, you can make a VM from a private VPC network available with just two clicks via vCenter. You can think of it a bit like Elastic IP.
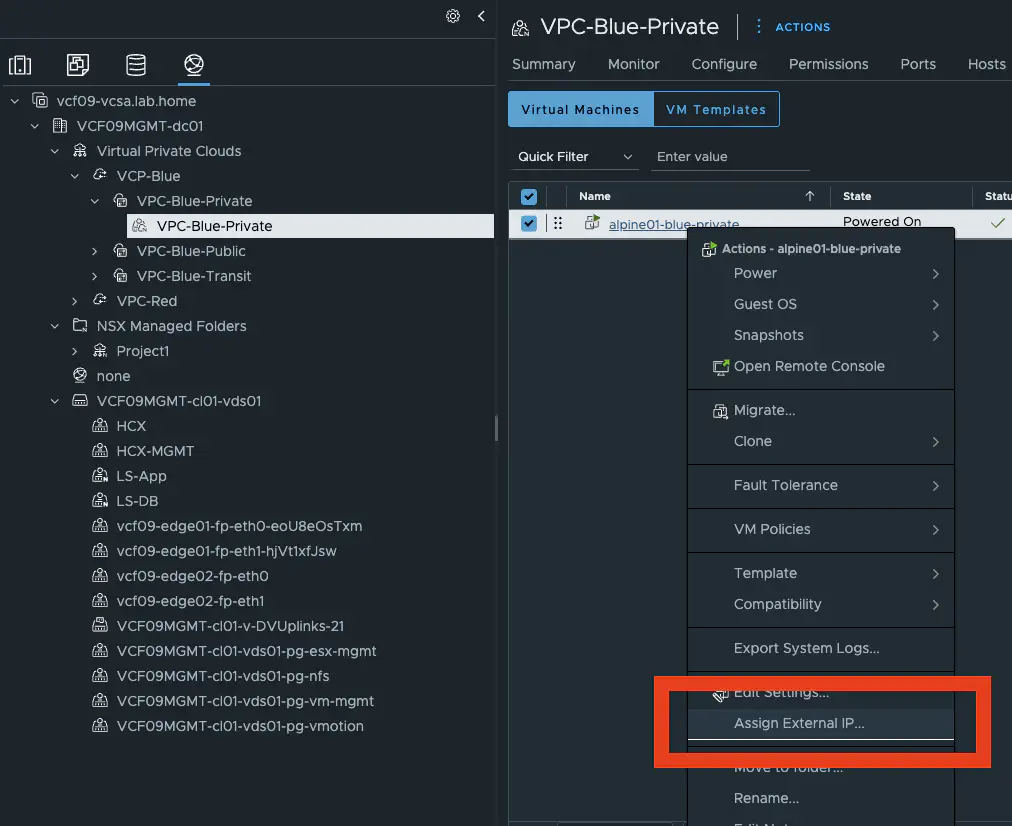
Assign External IP (click to enlarge)
All you have to do is select the VM’s network adapter and confirm. The magic happens in the background. But let’s take a closer look. An external IP was created in NSX under VPC / Network Services. If we take a closer look, we see that an IP address from the public subnet of VPC Blue was assigned.
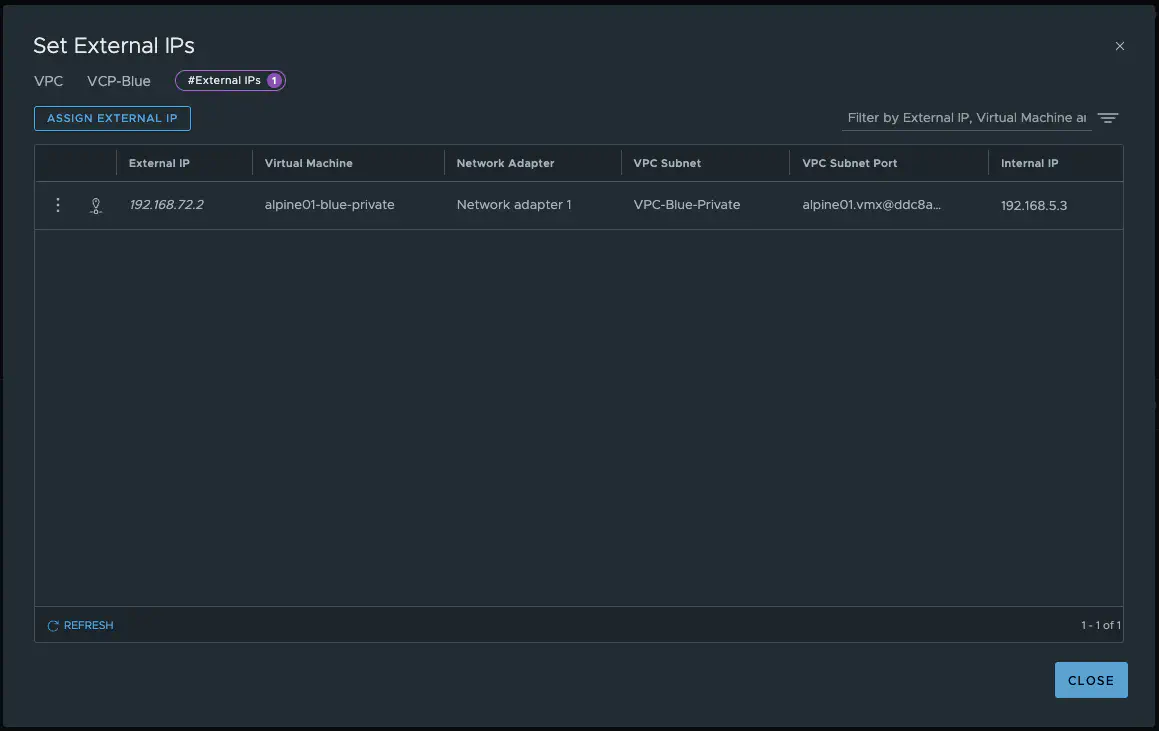
Assign External IP VPC-Blue (click to enlarge)
The vm alpine01-blue-private is now accessible from anywhere via the IP address 192.168.72.2. Pretty cool. You can also cancel the assignment at any time, and the public IP will be returned to the IP address pool and can be used elsewhere.
This is implemented via a DNAT, which cannot be found in the NSX GUI. You can check this on the Active Edge by selecting the relevant interface with the command get firewall Interfaces and then displaying the NAT rules with get firewall < uuid > ruleset rules.
vcf09-edge01> get firewall 0bbcf4b5-1321-40b4-9325-f8023c06bdf2 ruleset rules
Tue Jun 17 2025 UTC 16:10:06.440
DNAT rule count: 1
    Rule ID   : 536875009
    Rule      : in inet protocol any postnat from any to addrset {192.168.72.2} dnat EIP table id: b1274d77-e09e-4cf5-8377-4501f54e296e

SNAT rule count: 2
    Rule ID   : 536875008
    Rule      : out inet protocol any prenat from addrset {192.168.5.3} to any snat EIP table id: b1274d77-e09e-4cf5-8377-4501f54e296e

    Rule ID   : 536873996
    Rule      : out protocol any prenat from ip 192.168.5.0/24 to any snat ip 192.168.72.1 port 37001-65535

Firewall rule count: 0
Here we see that a DNAT is being performed, making our VM accessible from outside the network. And the best part is that it’s all completely simple and requires no network knowledge.
Conclusion
VPCs are more prevalent than ever, and VMware is pursuing a clear path toward multi-tenancy in VCF9 and NSX9. Many familiar mechanisms have now been combined in NSX 9, and exciting developments are still on the way. In this article, I have only discussed centralized deployment. Distributed deployment is perhaps even more exciting, but it would have made this article too long. I also haven’t talked about security or NSX projects, because both deployment options can be combined to bring significant added value to an on-premises cloud. I will therefore be publishing further articles on VCF 9, NSX 9, and VPCs in the near future. I look forward to many more exciting topics with VCF9. In my opinion, VCF 9 is a really big leap forward, and a lot has really happened in NSX 9 in particular. One thing is clear: the next few weeks and months will not be boring.
One more thing
Perhaps a little fun fact. Anyone who has read my article on MS-A2 will know that I wrote that I run a VCF installation on it – well, now I can reveal that my VCF 9 lab is currently running nested on my single Minisforum MS-A2 server.
