Migration with HCX
Live Migration of Workloads with VMware HCX: A Customer Story
2629 Words // ReadTime 11 Minutes, 57 Seconds
2025-01-28 20:00 +0100
Introduction
I was brought in to help with a customer project that involved a VCF setup and migrating the workload domains to a new VCF deployment. The challenge of this project was that we had to adopt the existing networks without making any changes while also reducing the downtime of the workloads to an absolute minimum. We used HCX and network extension to solve this problem.
What is HCX?
VMware HCX is an application mobility platform designed to simplify application migration, workload redeployment, and disaster recovery in data centers and clouds.
HCX covers several use cases:
-
Extend Networks with HCX Seamlessly extend vSphere and NSX network segments and retain the IP and MAC addresses of migrated VMs to accelerate consumption of modernized resources. Network Extension minimizes the need for complicated networking changes.
-
Migrating Virtual Machines Select from multiple HCX mobility technologies for optimized migrations at scale for both VMware and non-VMware workloads.
-
Virtual Machine Disaster Recovery Protect data center applications and workloads through asynchronous replication and recovery of virtual machines, as well as integration with the VMware’s Site Recovery Manager suite of features and tools.
In short, HCX is the answer to my customer problem.
First things first: what are the requirements for HCX?
Since HCX has been part of VCF since version 5.1.1, many customers have the opportunity to benefit from HCX. For those who want to test VCF, here is the good news: an eval license comes with HCX.
-
For environments requiring NSX virtual networking, you must install and configure NSX, including integration with the vCenter Server, before deploying HCX Manager.
-
In the destination environment, the NSX Manager must be installed and connected to the vCenter Server.
-
The NSX Manager must be registered during the HCX Manager install with the admin user.
-
If the NSX Manager IP or FQDN uses self-signed certificates, it might be necessary to trust the NSX system manually using the Import Cert by URL interface in the HCX Appliance Management interface.
-
HCX requires an NSX configured with an Overlay Transport Zone.
-
When NSX-T is registered, both Overlay and VLAN segments can be used during the Network Profile creation.
-
In NSX-T deployments, the HCX supports integration with networking objects created with the NSX Simplified UI/API only.
HCX Connector and HCX Cloud Installations
In HCX, there is a notion of an HCX source and an HCX destination environment. Depending on the environment, HCX provides a separate installer.
-
HCX Connector: Use the HCX Connector with the vCenter Server containing the virtual machines that will be migrated. The HCX Connector is always an HCX source that connects to an HCX Cloud.
-
HCX Cloud: Use the HCX Cloud installer with the vCenter Server that is the target of site pairing requests, network extensions, and virtual machine migrations.
The HCX Cloud can also serve as the source of a site pair in HCX cloud-to-cloud installations.
Compute Ressources
| Appliance | vCPU | Memory | Disk Space/IOPS |
|---|---|---|---|
| HCX Manager | 4 | 12 GB | 60 GB |
| HCX Interconnect (HCX-IX) | 8 | 6 GB | 2 GB |
| HCX Network Extension (HCX-NE) | 8 | 3 GB | 2 GB |
Network Ressources
I need one HCX appliance per workload domain. This needs access to the respective vCenter and the associated NSX manager. In addition, the HCX appliance must be placed in the vMotion network of the respective workload domain. This can be done by routing or the HCX appliance can be given an IP address directly in the vMotion network. I also need at least one uplink VLAN for the HCX appliances to communicate via. This could be done via WAN, for example. For my customer, this is a VLAN in the underlay network.
Deploying and configuring HCX appliance
After deploying the HCX appliance, it must be initially configured. To do this, you have to log in to the management interface via (https://hcx-ip-or-fqdn:9443) using the configured admin credentials. The HCX appliance must have access to the NSX manager, the vCenter must be configured, the public access URL (in my case only internally resolvable) and the SSO domain (vCenter). After successful configuration, you can log in to the HCX appliance with the vCenter credentials. The local admin account only works on the HCX management interface.
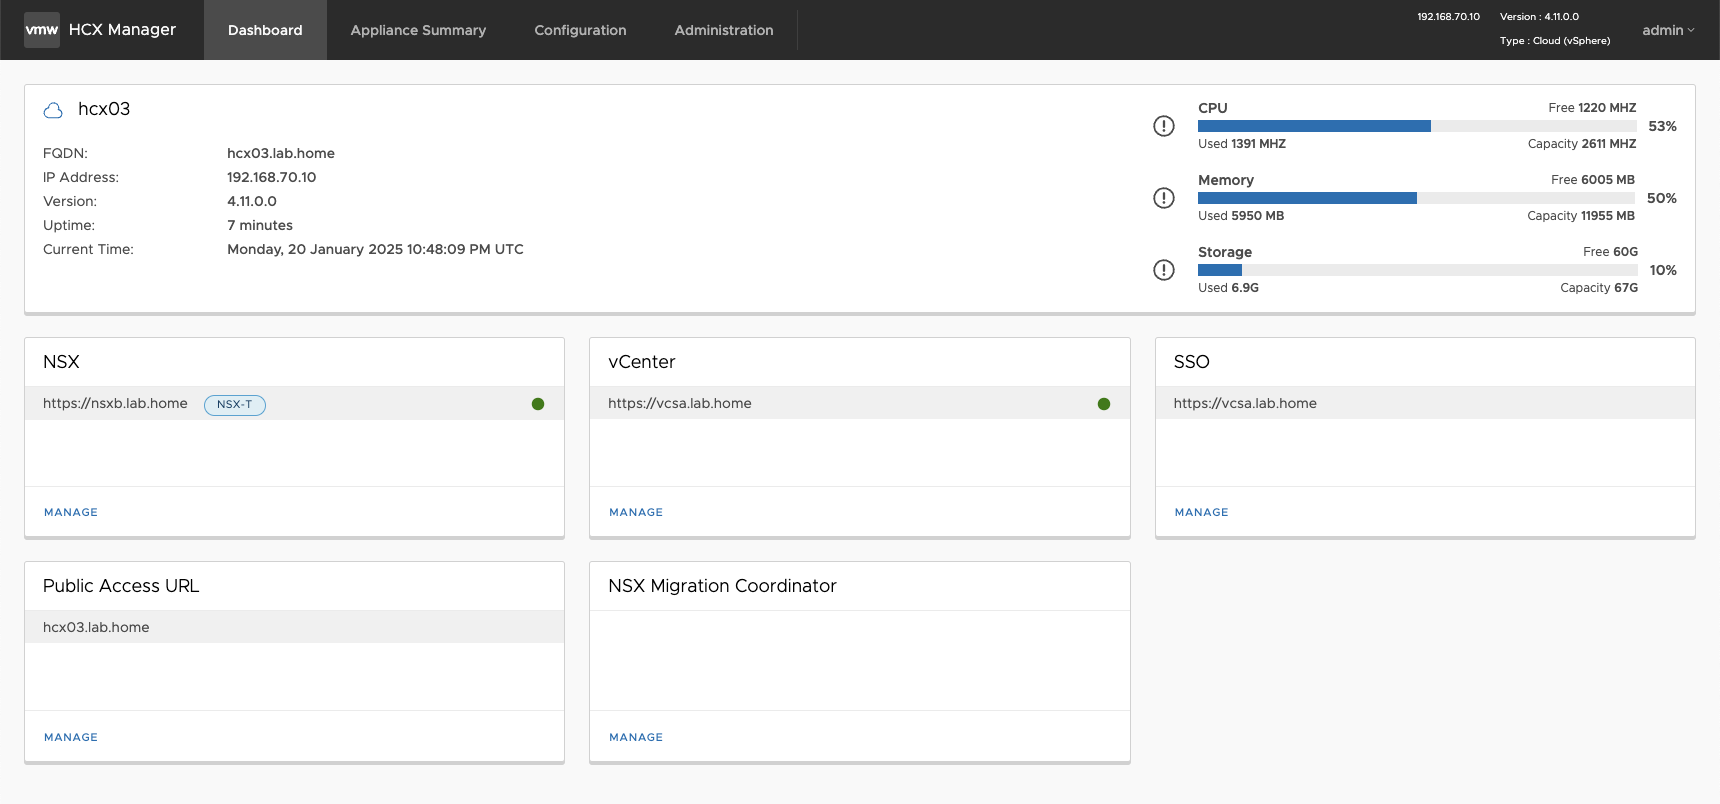
HCX settings (click to enlarge)
Get started with HCX
HCX requires the following: at least one network profile, one compute profile, one or more service mesh and one or more site pairs.
Site Pair
A Site Pair establishes the connection needed for management, authentication, and orchestration of HCX services across a source and destination environment. To create a new site pair, we need the remote HCX URL, which was configured when deploying the HCX appliance. This must be resolvable via the management network. You also need a vCenter user in the target environment who has sufficient permissions. In my lab I use the vsphere.local administrator. This is of course not best practice and should be adapted in a productive environment.
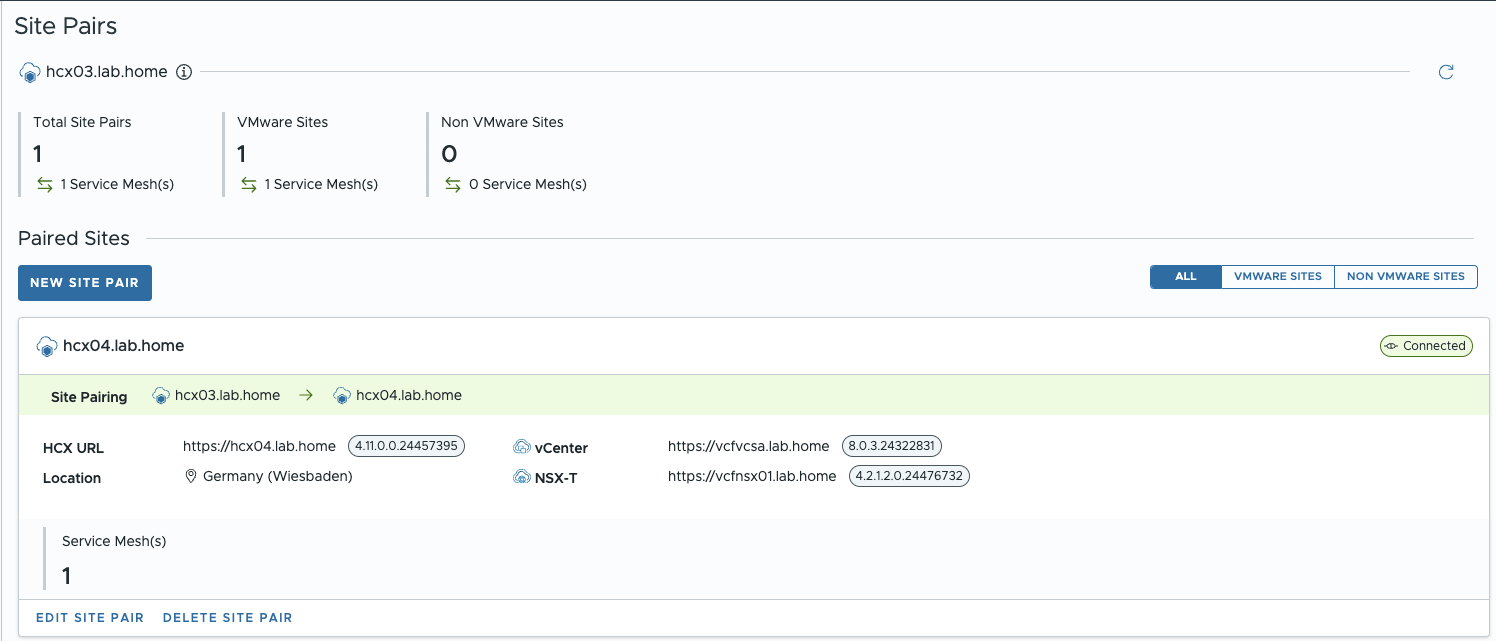
HCX Site Pair (click to enlarge)
Network profiles
After the Site Pair, I set up the network profiles for the interconnect. These profiles allow me to determine the IP addresses and networks. Depending on the setup and service, you need different networks here. In my customer scenario, I can manage with two networks. One profile for management traffic, which I use to access the vCenter and the NSX Manager from environment A. The second network is for the actual uplink connection. In my lab I have 2 uplink networks for testing, so the screenshots may differ slightly. I select the appropriate distributed port group and assign a free IP range. You can define the HCX traffic type, but this is only used as a suggestion in the compute profile. Just because I mark a network profile as an HCX uplink doesn’t mean it has to be used as an uplink. It only serves to mark the networks for easier configuration in the compute profile. The vMotion network is routed in my lab. If this is not possible, you can also configure direct access to the vMotion network for the HCX appliance via the network profiles. This is necessary if the vMotion network cannot be routed.
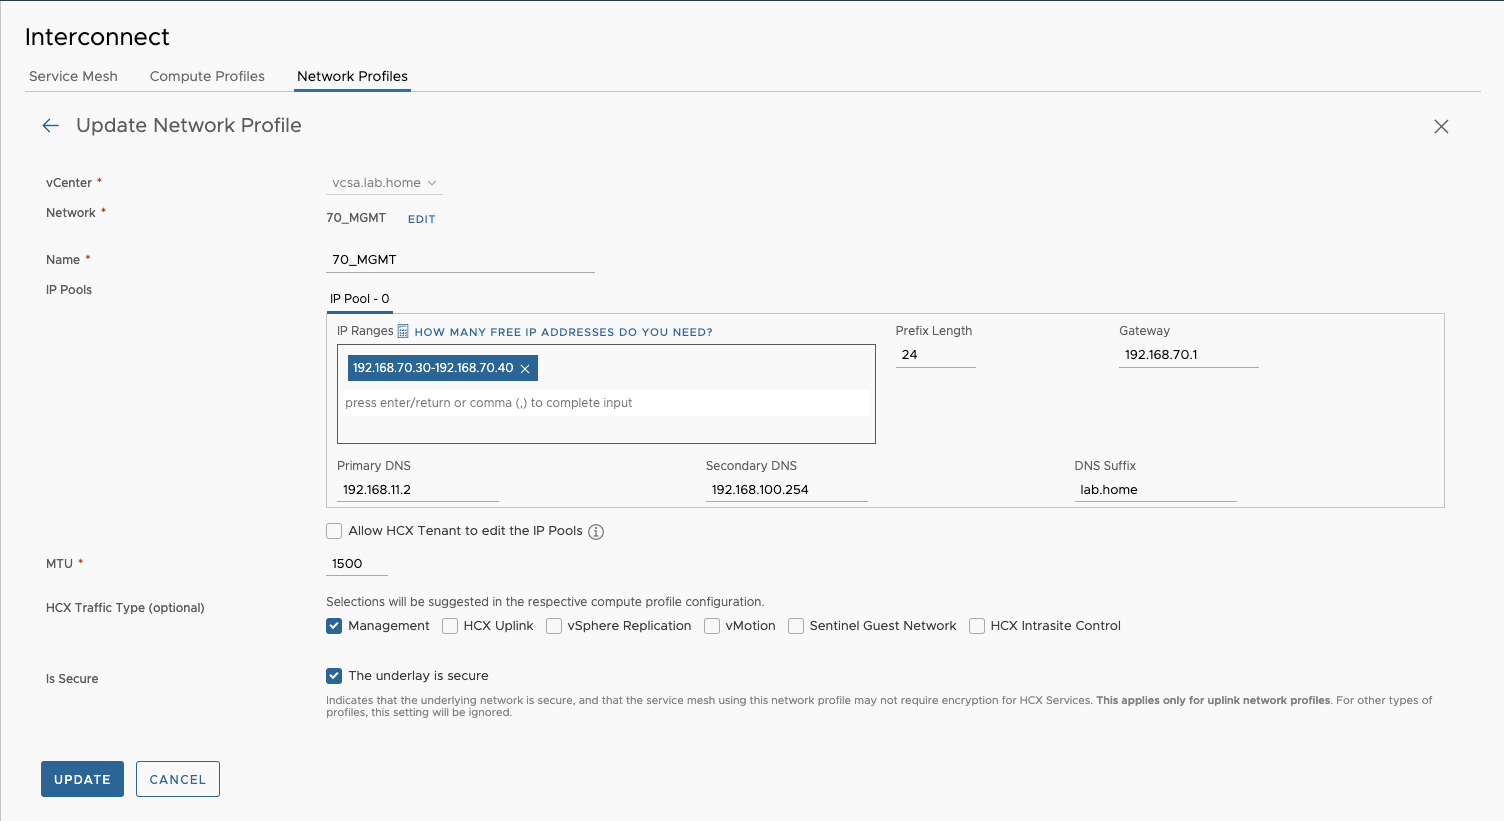
HCX network profiles settings (click to enlarge)
Compute Profiles
The compute profiles in HCX are used to specify which HCX services, compute resources such as clusters or resource pools or networks are connected. You can also set CPU and memory reservations for the interconnect appliance. Depending on the HCX service, you have to assign several networks, e.g. management network, uplink networks, vMotion network and the network container. In my case, the network container is the overlay transport zone from my source NSX, as I want to migrate machines from one NSX environment to another NSX environment.
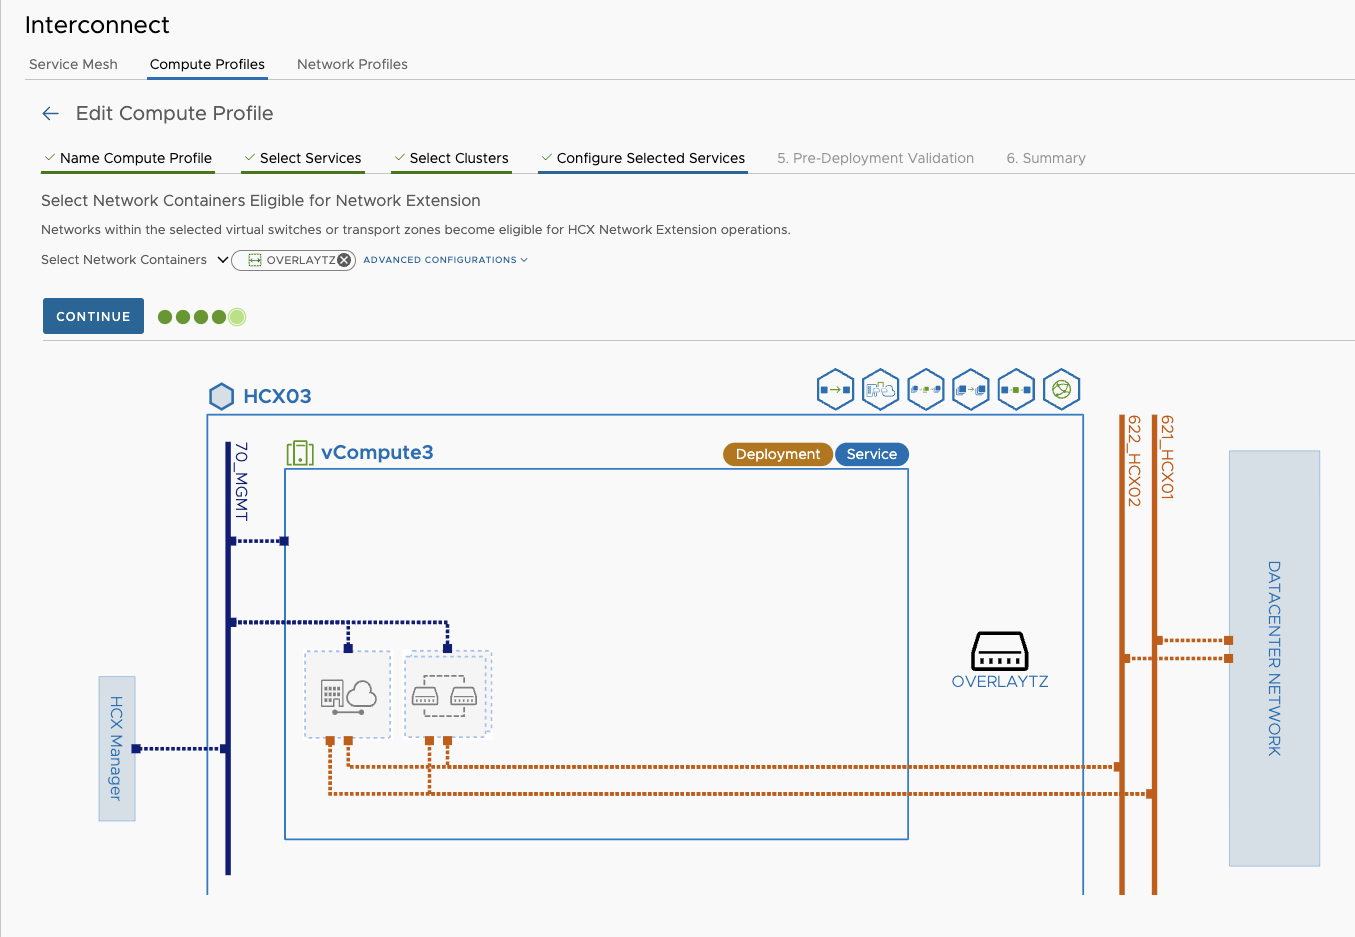
HCX Compute profiles settings (click to enlarge)
The screenshot shows very clearly how the Interconnect appliance is later connected. The uplinks can be VLAN connections within a data center, public WAN connections, MPLS or VPN. There are very few restrictions here. The uplink networks only need to reach each other between the locations. It does not matter whether it is via Layer2 or Layer3.
Service Mesh
In the service mesh, compute profiles, HCX services and advanced configurations such as MTU for uplink links or the number of appliances for the network extension are defined and assigned. After I have configured the service mesh, the interconnect VMs are automatically deployed at both HCX locations.
HCX Service Mesh (click to enlarge)
Firewall Settings for HCX
After successfully setting up the interconnect compute profile, a firewall port matrix is created that you can easy copy and export over the HCX gui. Here is an example from my lab.
| Source | Destination | Services |
|---|---|---|
| ANY | ANY | UDP(3784) |
| 192.168.70.30-192.168.70.40 | 192.168.70.30-192.168.70.40 | UDP(3784), TCP(8182) |
| 192.168.70.30-192.168.70.40 | 192.168.70.10 | TCP(9555) |
| 192.168.70.30-192.168.70.40 | 192.168.12.100 | TCP(443) |
| 192.168.70.10 | 192.168.70.30-192.168.70.40 | TCP(9443) |
| 192.168.70.10 | 192.168.12.100 | TCP(443) |
| 192.168.70.10 | 192.168.12.203, 192.168.12.204 | TCP(902), TCP(80), TCP(443) |
| 192.168.12.203, 192.168.12.204 | 192.168.70.30-192.168.70.40 | TCP(31031), TCP(32032), TCP(44046) |
| 192.168.70.30-192.168.70.40 | 192.168.12.203, 192.168.12.204 | TCP(902), TCP(80) |
| 192.168.12.203, 192.168.12.204 | 192.168.70.30-192.168.70.40 | TCP(8000) |
| 192.168.70.30-192.168.70.40 | 192.168.12.203, 192.168.12.204 | TCP(8000) |
| 192.168.70.10 | 192.168.70.30-192.168.70.40 | TCP(443), TCP(8123), TCP(9443) |
| ANY | 172.21.22.10-172.21.22.100, 172.21.21.10-172.21.21.100 | TCP(5201), UDP(4500), UDP(5201) |
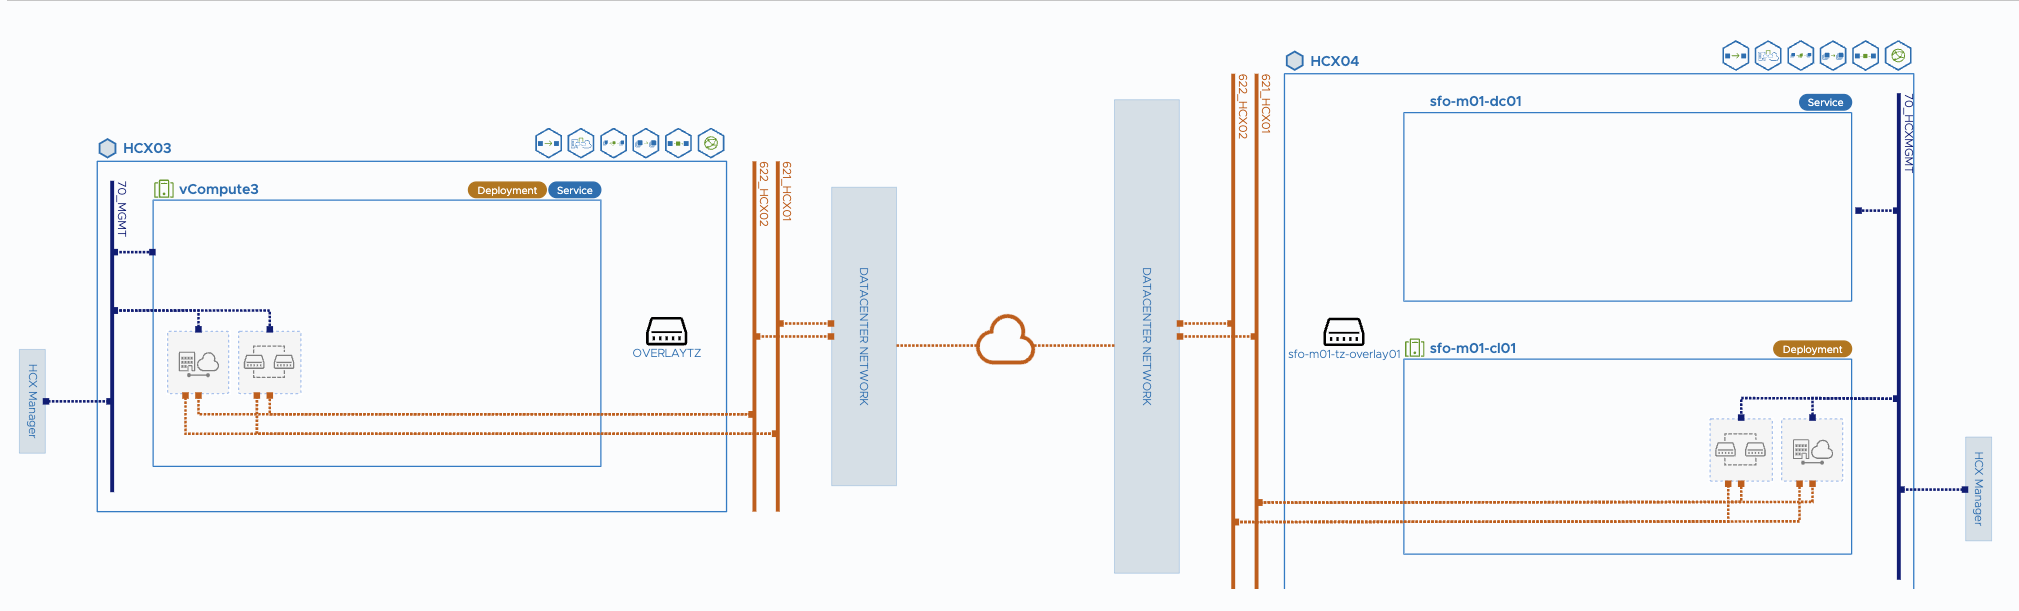
Network Extension
With the network extension in HCX, layer-2 networks can be extended between the source and target environments without having to change the IP addressing of the workloads. This allows virtual machines to be seamlessly migrated while maintaining their existing network connection and connectivity, and is a prerequisite for a “zero” downtime migration. To create a layer 2 stretch via the network extension, I just have to click on Network Extension » Create a Network Extension and select my network that I want to stretch to the other location via HCX. Here I can only choose from networks in my previously configured network container. In my case, these are the networks from my NSX.
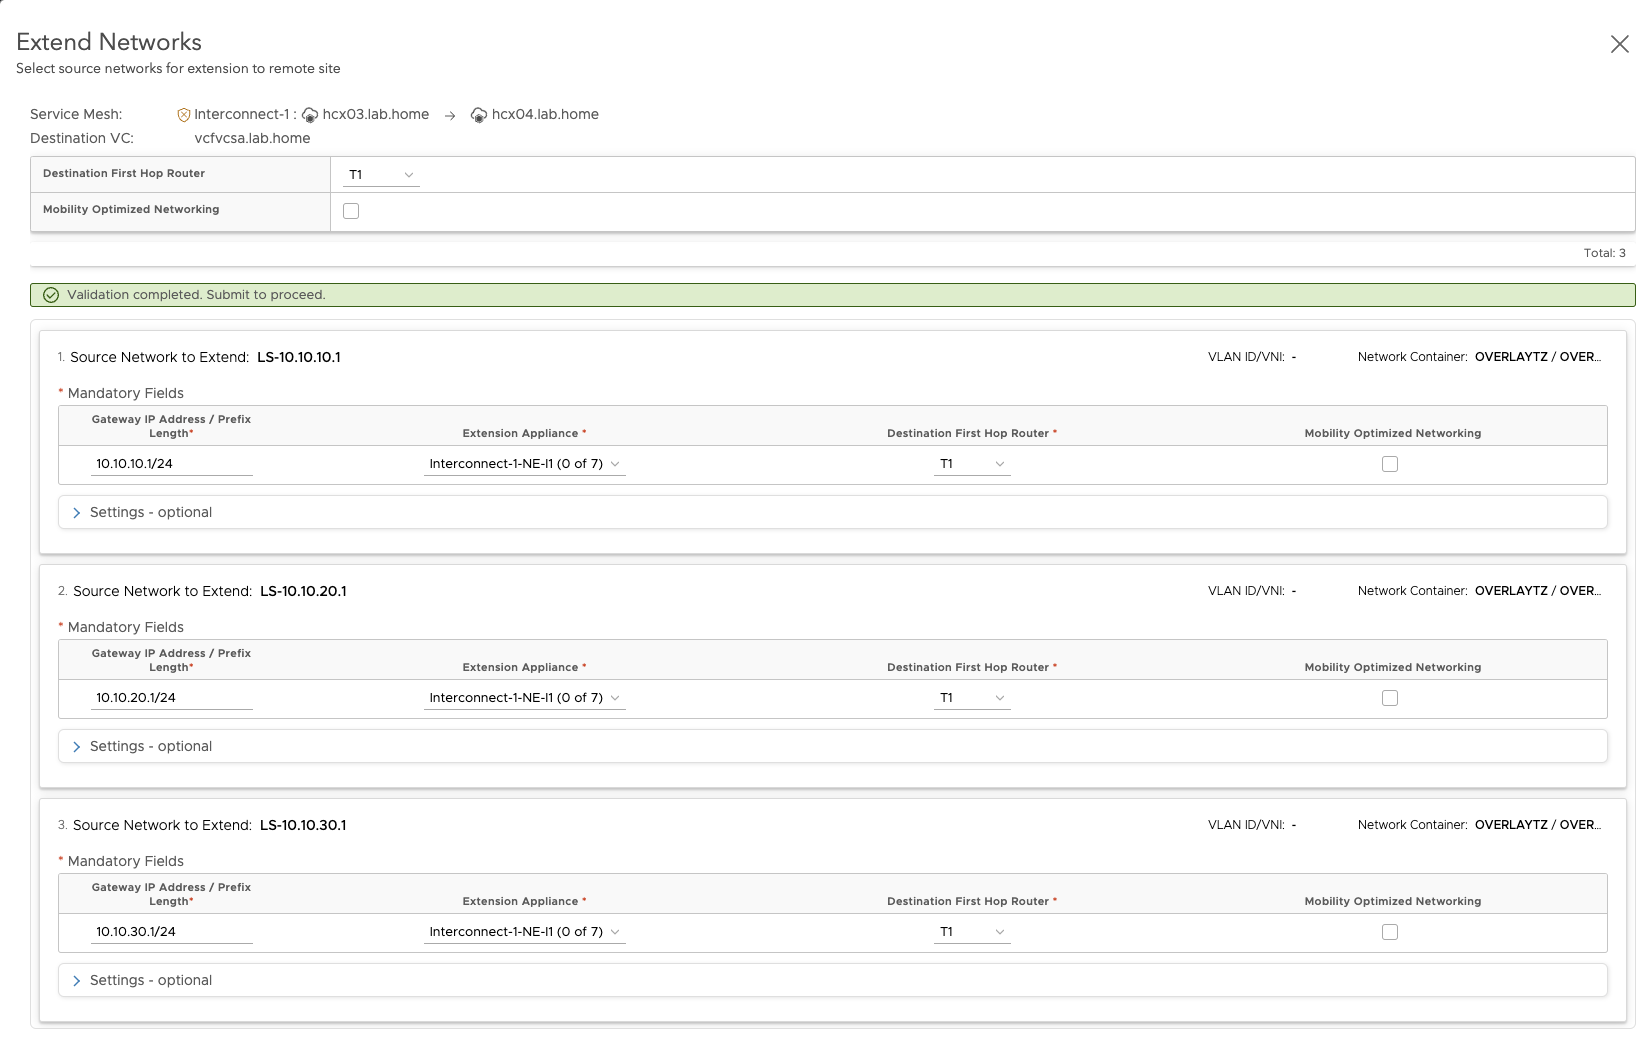
HCX Network Extension (click to enlarge)
The stretched networks are created at the selected T1 router in the target environment and given a prefix. However, the segments are not connected to the T1. The north/south connection is via the T1 and T0 in the source environment. This ensures that no traffic for the VMs is routed into a black hole.
How does Network Extension work?
The sink port on the HCX Network Extension serves as the endpoint for the extended Layer 2 traffic between the source and target environments. It is configured on the source and target sides to receive and send the incoming traffic from the extended network. This can be easily seen on the segment ports in the NSX of the HCX appliance. This is where MAC/IP bindings are exchanged between VMs. If you look at the destination side, you will see (provided that the source VMs are generating traffic) the IP/MAC bindings of the VMs on the source segment on the sink port and vice versa for VMs that have already been migrated to the destination side.
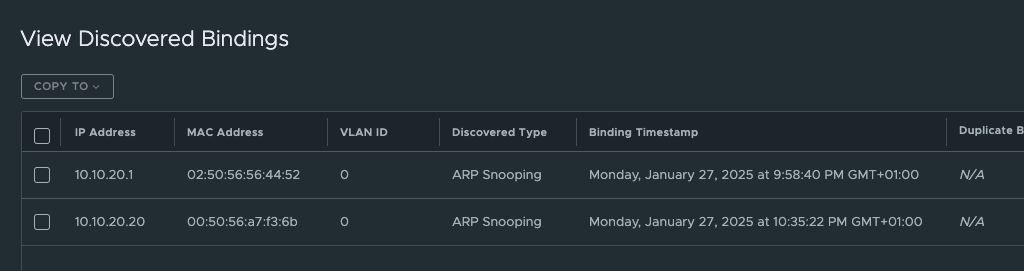
HCX Network Extension Bindings (click to enlarge)
For this to work, special port profiles are created for the segment ports of the HCX Network Extension appliance that allow MAC learning, MAC changing and unknown unicast flooding. By default, the NSX segment profile would prevent this and block it.
Migrating VMs
HCX supports a wide range of migration options. Since I aim for zero downtime, I use vMotion as my migration method. For less critical VMs with a maintenance window, a bulk migration with short downtime is also an option. Here you can plan a mass migration and make a controlled switchover at a certain point in time. To do this, a replica of the VMs is created and incrementally synchronized. During the cutover, the final delta data is synchronized and the VM is switched on again. After the migration, the VM is switched on again at the destination. Of course, there are several variants and not every variant is suitable.
vMotion migration in VMware HCX allows me to migrate virtual machines live and without downtime from a source environment to a target environment. HCX uses the vMotion technology but extends it to include the option of migrating workloads in a scheduled manner and across geographically separate data centers.
To plan the migration, I go to Services » Migration and create a NEW Mobility Group. Here I can set all the relevant migration settings.
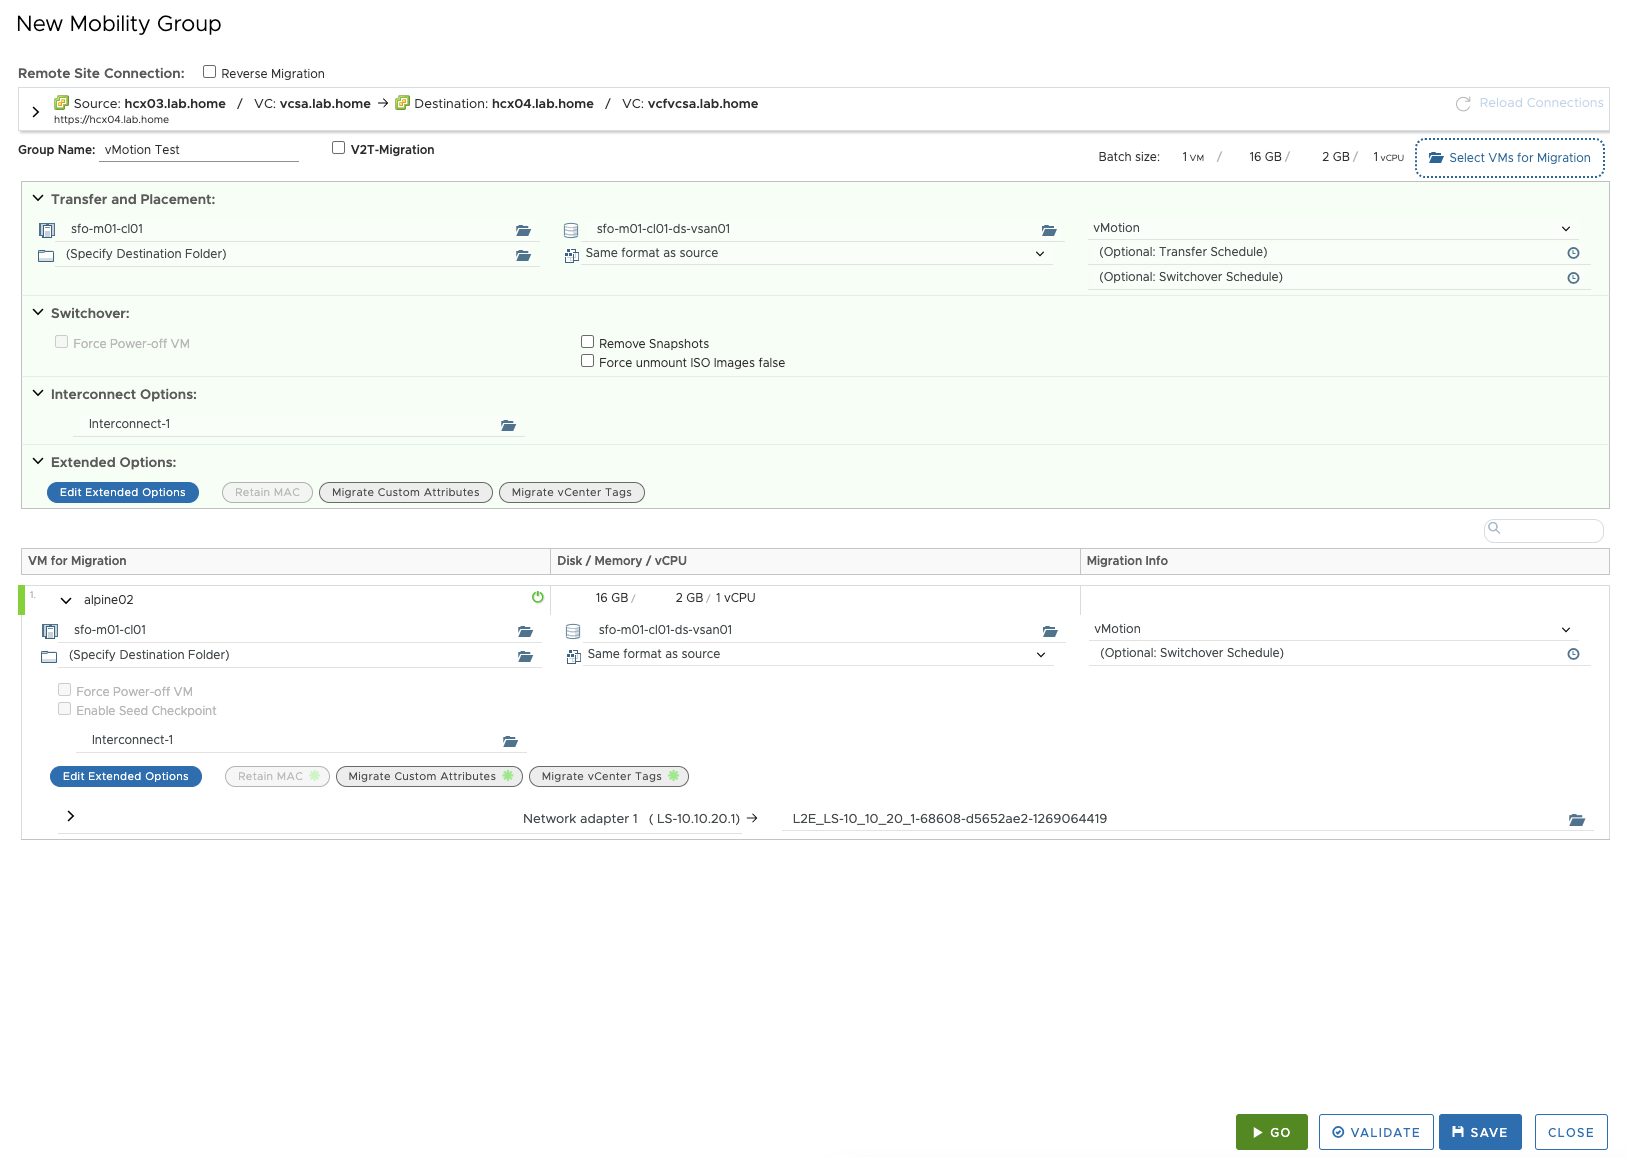
HCX New Mobility Group (click to enlarge)
The settings are relatively self-explanatory. I select my VMs, choose the target cluster, storage and switchover time, and select my migration method. If the VM comes from a network stretched with the Network Extension, the target network is already preselected. I just have to perform the validation and the migration can start. It is also possible to perform a reverse migration.
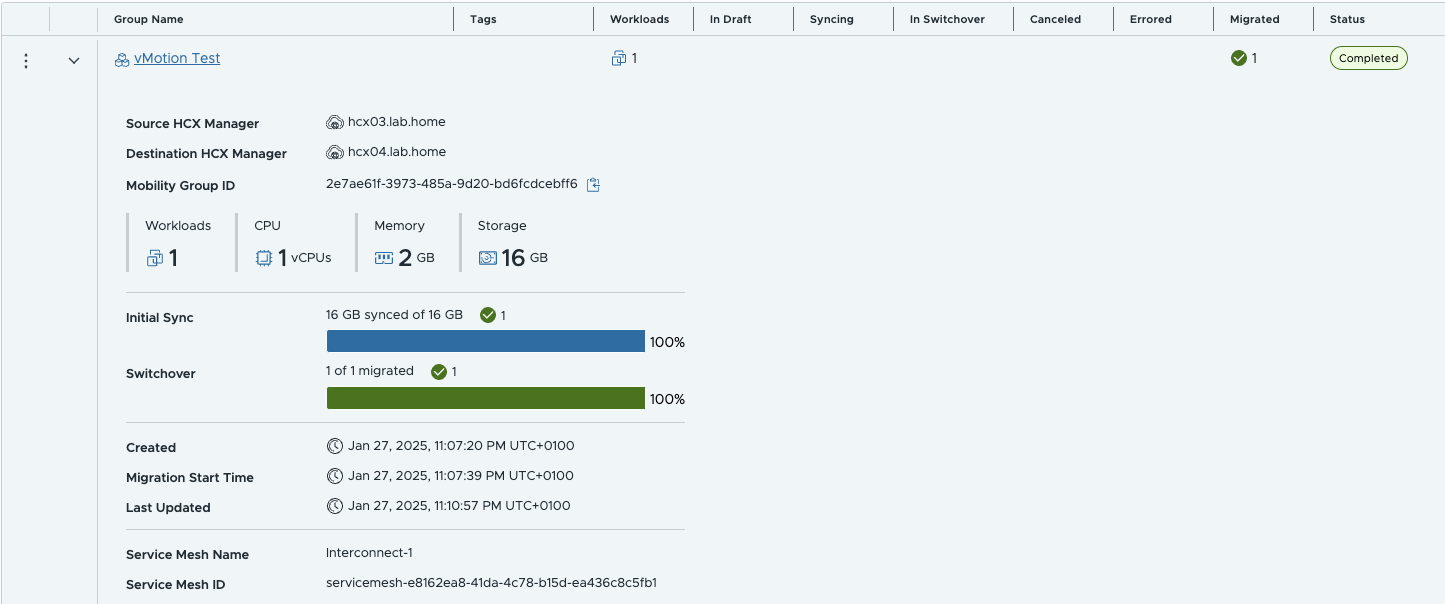
HCX New Mobility Group (click to enlarge)
The migration was successful and there was only one ping interruption during the entire migration. The VM was functional and accessible the whole time. Thanks to the network extension, both east/west and north/south traffic works.
64 bytes from 10.10.20.20: icmp_seq=34 ttl=60 time=6.854 ms
64 bytes from 10.10.20.20: icmp_seq=35 ttl=60 time=2.144 ms
Request timeout for icmp_seq 36
64 bytes from 10.10.20.20: icmp_seq=37 ttl=60 time=11.416 ms
64 bytes from 10.10.20.20: icmp_seq=38 ttl=60 time=4.916 ms
64 bytes from 10.10.20.20: icmp_seq=39 ttl=60 time=3.661 ms
64 bytes from 10.10.20.20: icmp_seq=40 ttl=60 time=3.842 ms

--- 10.10.20.20 ping statistics ---
57 packets transmitted, 56 packets received, 1.8% packet loss
After all VMs have been migrated from the source to the target, the network extension for the network via HCX can be removed. If desired, HCX can automatically connect the segments at the target to the T1 router. The segments at the source must then be manually disconnected from the source T1. As long as the same segment subnet is connected to the source and target at the local T1, routing problems may occur. This can be successfully prevented with local preference and AS-Path prepend, by making the segments on the source side less favorable if BGP is used. This only affects north/south connectivity. East/west connectivity is not affected.
Conclusion
I am aware that I have not even touched on all the functions of HCX. The tool is extremely powerful and you always have to look at the scenario for which you are using the right HCX use case. So I have not addressed the WAN optimization or the MON feature, nor have I gone into detail about the other migration options. The whole thing would go beyond the scope by far and I wanted to write about a scenario that I have already implemented for a customer. I can advise everyone to take a closer look at HCX. With HCX, you have a powerful migration tool that can help you out of unpleasant situations or simply simplifies mass migrations from A to B. Since HCX is now part of the VCF product portfolio, there is no reason not to use the tool.
