Nutanix - Flow 7: virtual networking
In this blog post, I’ll explain how Nutanix Flow 7 works, how to set up and use virtual networking, take a look at VPCs, and highlight the differences from NSX.
3512 Words // ReadTime 15 Minutes, 57 Seconds
2026-04-13 23:30 +0200
Introduction
As you know, I like to look beyond my own product ecosystem, and my real passion lies in SDN—software-defined networking. Who would have guessed that from the blog’s name? That’s why I find Flow to be one of the most exciting aspects of Nutanix. Specifically, today I’m looking at Flow version 7.
But perhaps I should briefly explain what Nutanix Flow actually is. Flow is Nutanix’s solution and an alternative to VMware NSX. Among other things, it offers two core features: virtual networking and network security. So far, this all sounds familiar and strongly resembles NSX. Nevertheless, Nutanix does things quite differently here than its well-known competitor—whether for better or worse, we’ll see as we go through the article. But I’d like to approach this from a neutral standpoint first. It wouldn’t be entirely fair otherwise, since I’m still on the Community Edition and my VCF stack is at 9.0.2 (though only because there’s no Community Edition available, and as a Knight, I have more opportunities to obtain licenses than others).
But I stray from the point. In this article, I’ll start by looking at the installation of Flow and, primarily, virtual networking. Security will certainly be covered in a separate article. Virtual networking offers standard features such as overlay networks, VPCs, NAT, VPN, routing, and much more. Furthermore, just like NSX, it relies on a three-tier architecture. I’d say buckle up—here comes the wild ride!
Flow Virtual Networking Architecture
I know, I know, nobody likes theory, but luckily you can skip chapters. But I don’t think a little theory will hurt, and I’ll keep it brief.
Management Plane
As mentioned earlier, Flow consists of three planes, the first of which is the management plane—and this is where the first difference from NSX comes in. While NSX requires the deployment of an NSX Manager, in Nutanix, Prism Central takes on the role of the Flow management plane and serves as the interface between you and the management interface. Here, the roles of vCenter and NSX Manager are essentially combined. Prism Central can be deployed as a cluster or a single VM, and while Nutanix can be used quite effectively with Prism Element, Flow is not possible without Prism Central.
Control Plane
Next up is the control plane, which is provided by the network controller. Here, too, there are some minor differences from NSX: in NSX, the central control plane runs on the NSX managers, whereas Nutanix offers two deployment options. You can either deploy the network controller as a container within the Prism Central cluster (even a single-node deployment counts as a cluster) or in so-called standalone mode, which, however, requires additional resources. For labs, I would always prefer the integrated option. The network controller manages the network services configured via Prism and must be manually activated (except in extra-large Prism Central deployments).
Data Plane
Last but not least, we have the data plane, where packets are actually transferred from point A to point B. And just like with NSX, the data plane runs on the hypervisor. In my case, that’s AHV. The data plane is implemented via Open vSwitch, which deploys a collection of bridges on the AHV. In my setup, I use the default virtual switch vs0 with the default bridge br0. I’ve set up an LACP bond over the bridge, but I don’t really want to go into the architecture of Open vSwitch here—that’s a whole other story. One more thing: you don’t necessarily have to use br0; you can also build your own bridge for flow.
Features of the virtual network
Like NSX, Flow supports a wide range of features. Here is a short list (not a comprehensive list):
- VPCs
- VLAN / Overlay Subnets
- Routing
- NAT based external networks
- Routed external networks over Vyos Appliance
- VPN
- VxLAN Extension (Layer 2 over Layer3)
- Dynamic Routing with BGP
But so as not to get too carried away with theory, let’s now take a look at how flow is put into practice.
Deployment of the Network Controller
This article assumes that Prism Central is deployed and functioning properly. I am using the Nutanix CE edition as my base. You can read about exactly how I set it up here.
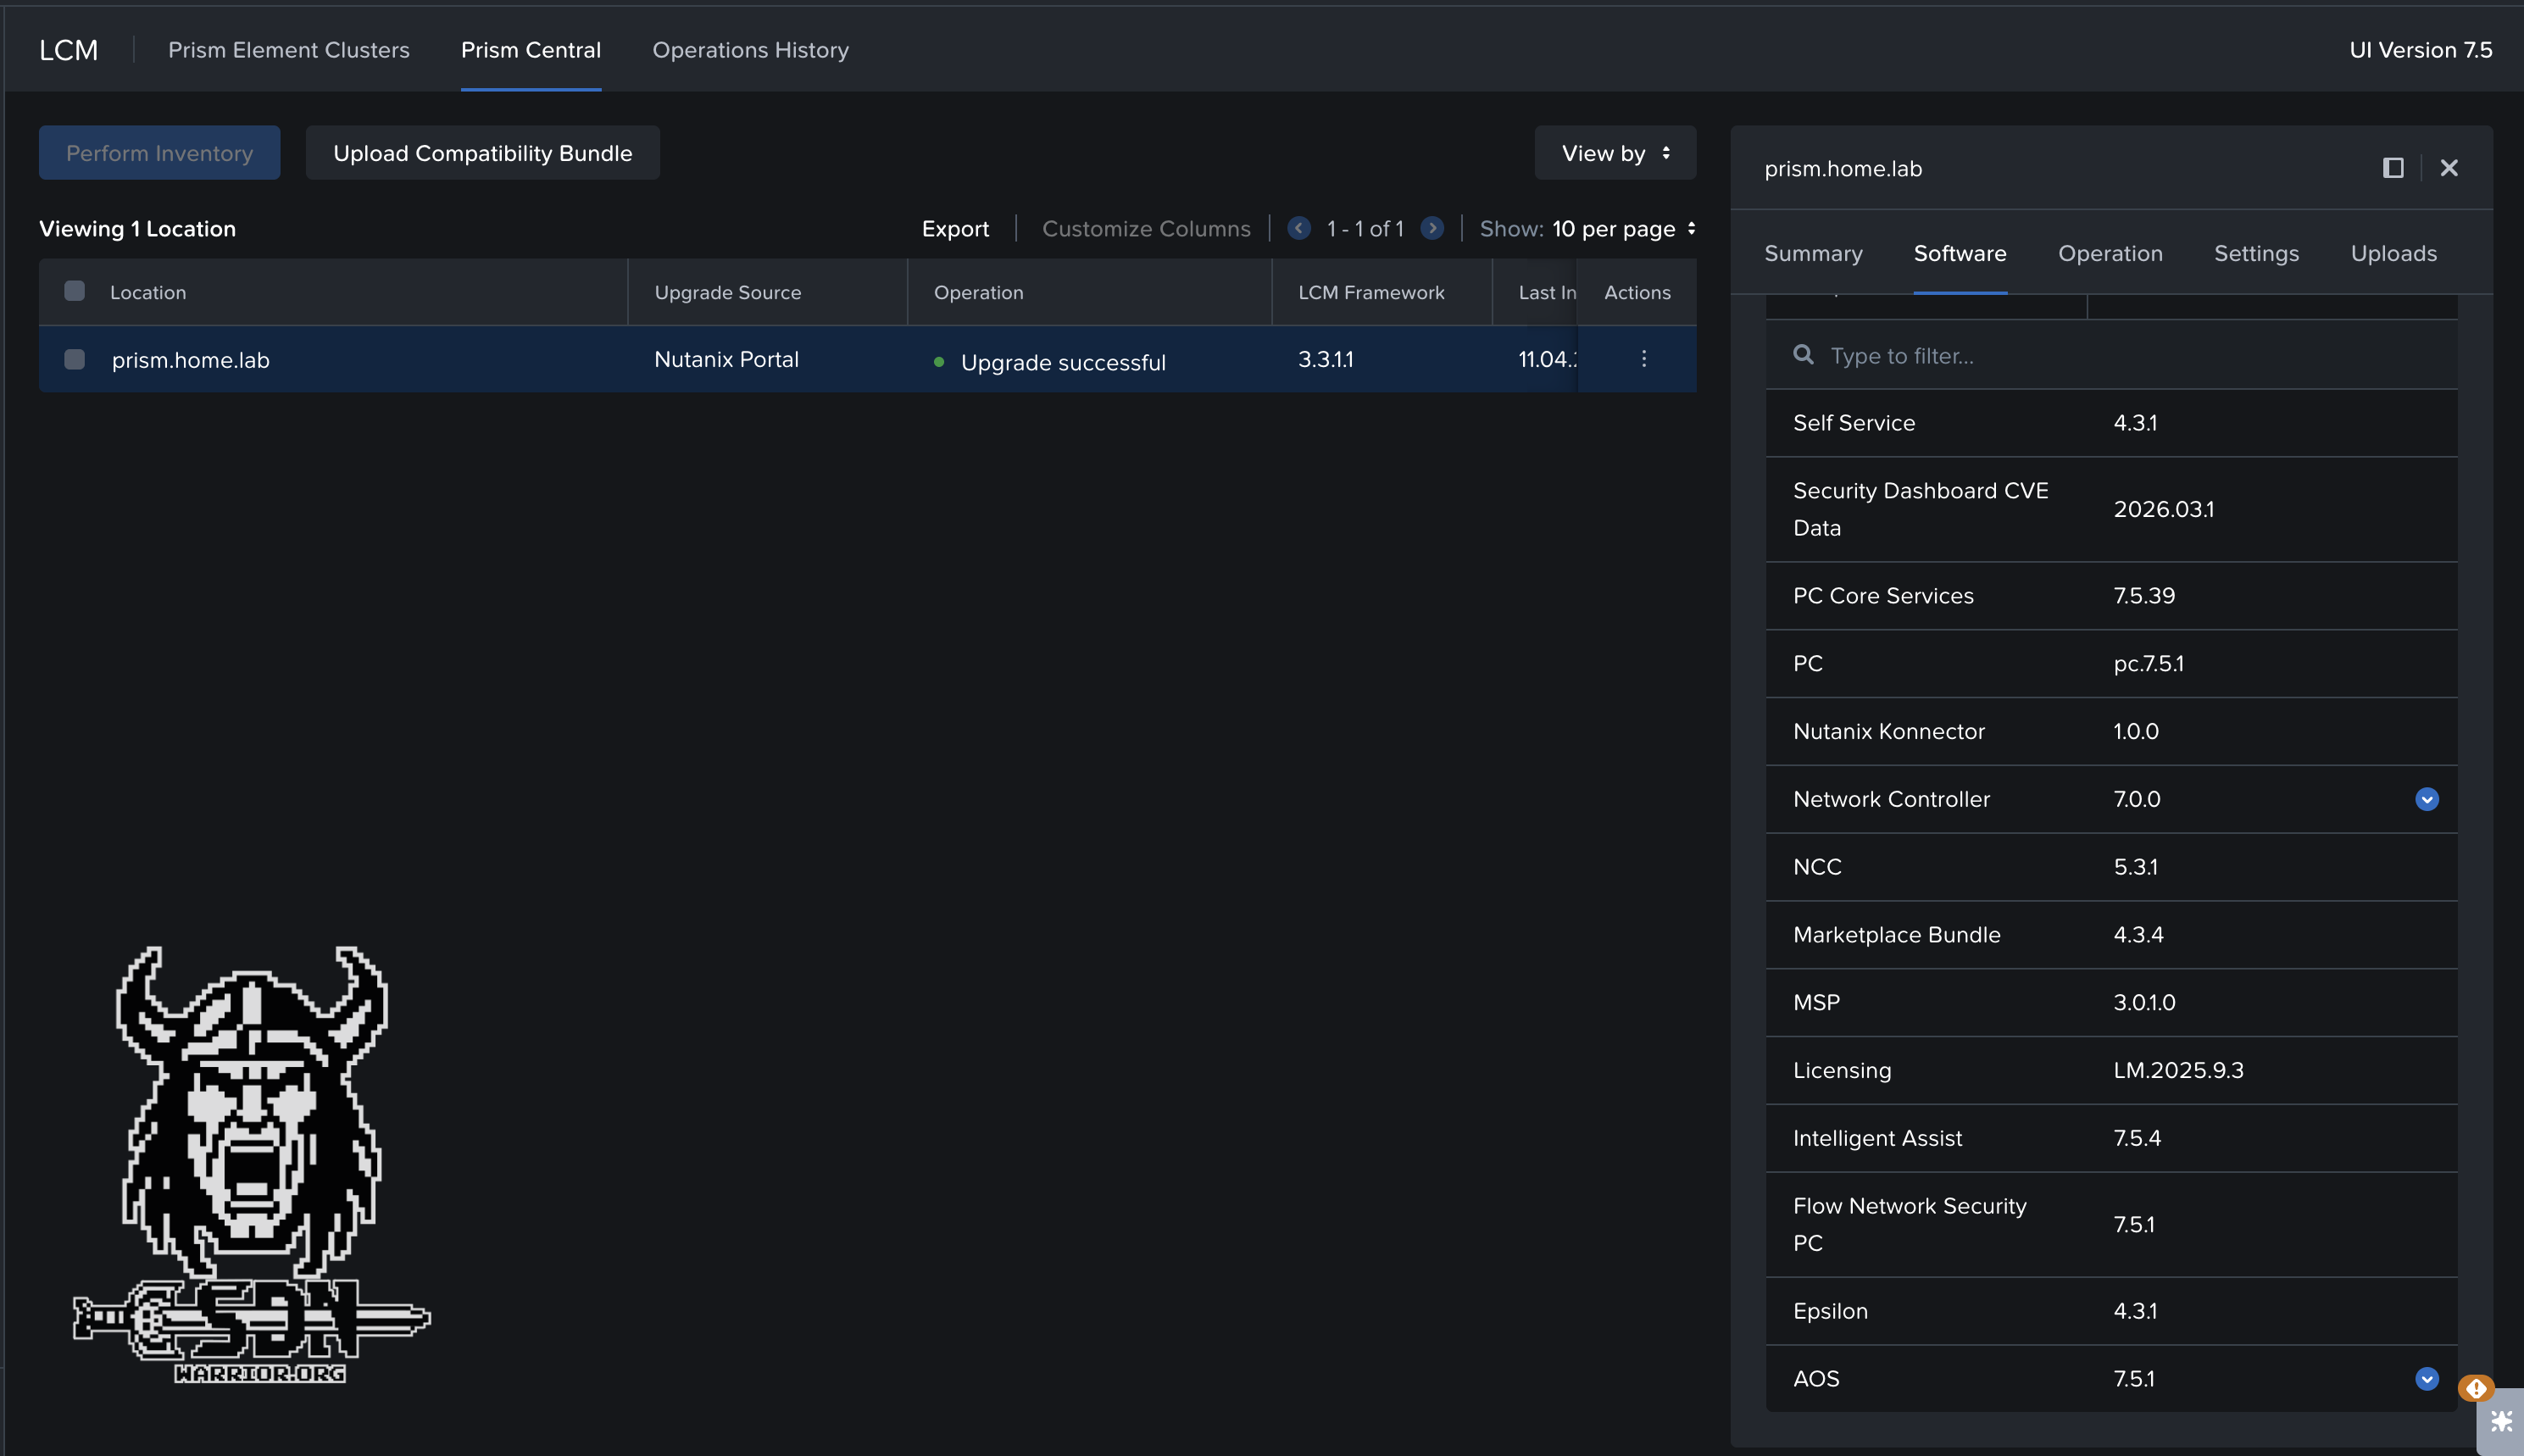
Software Components
Once the patching is done—and yes, I know it’s not as convenient as being able to update everything online—we can finally start enabling Flow. P.S.: Flow 7 is supposed to be included in the next release of the CE Edition—at least that’s what I was told, so take that with a grain of salt.
To enable Flow, navigate to Flow Management via Prism Central -> Infrastructure -> Prism Central Settings -> Flow Management. There, you can enable Flow with the click of a button. The only thing left to select is the deployment mode, and if you look at the resources required for the standalone deployment, it should be clear that I chose the Integrated with Prism Central option. And to be honest, that’s pretty much it. The deployment happens completely automatically in the background, and no interaction is necessary. For me, it took about 10 minutes for everything to be ready.
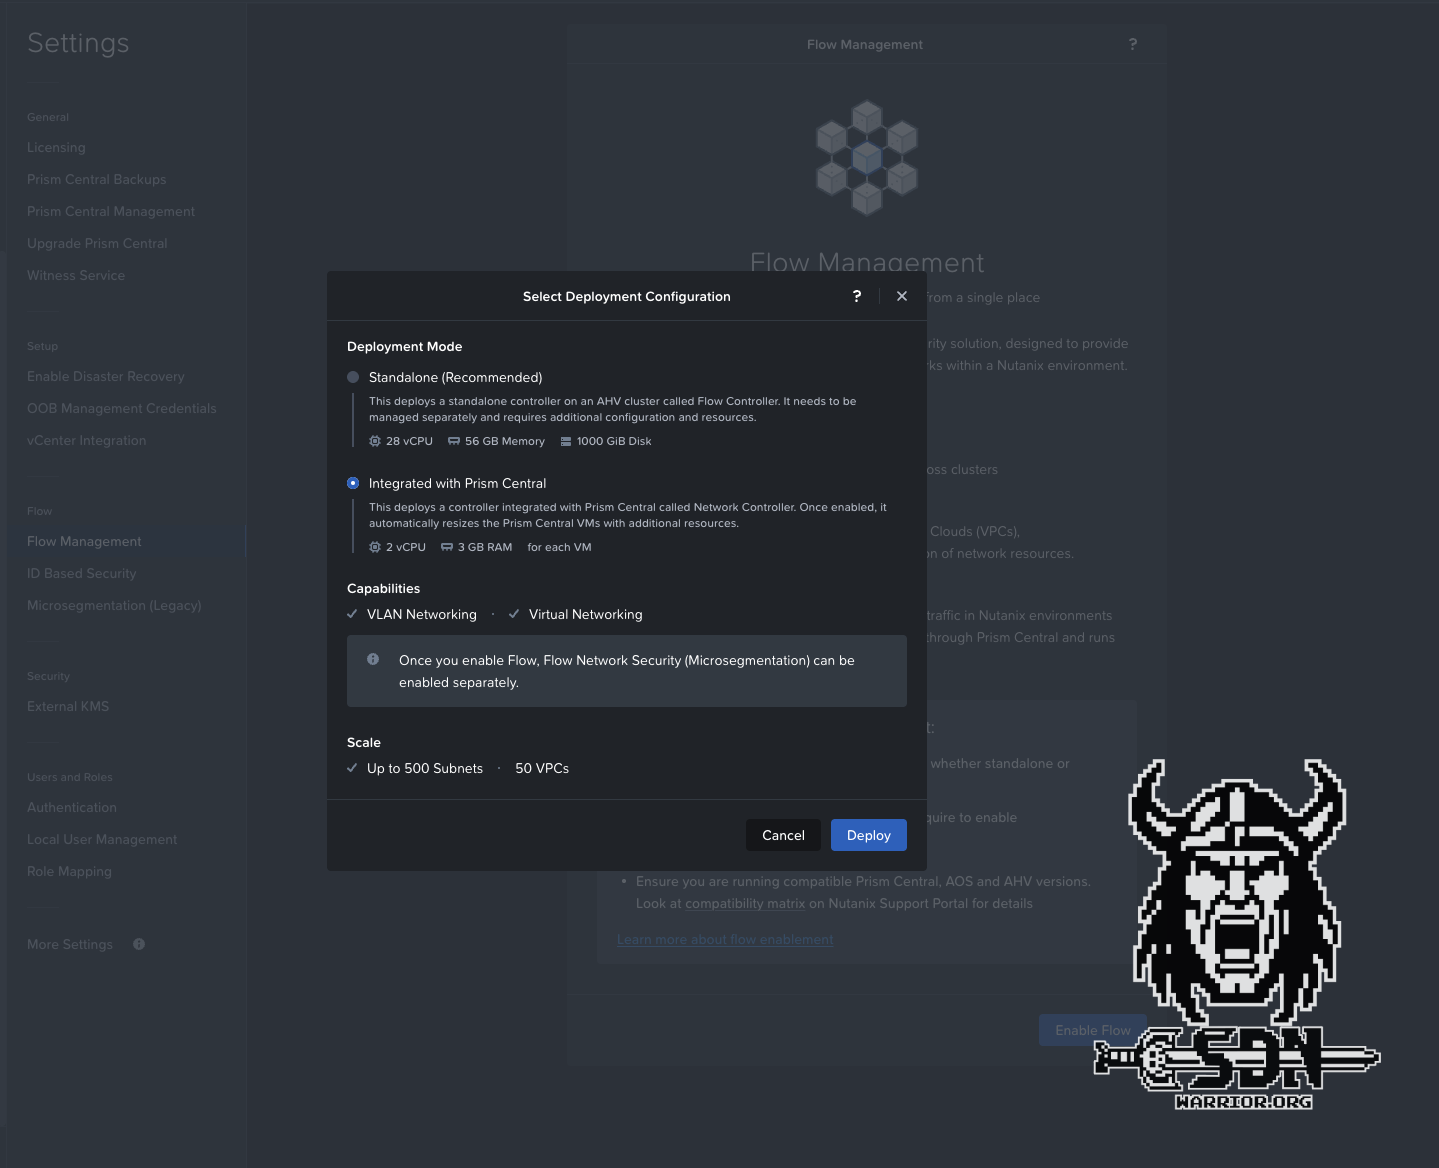
Flow deployment
I really have to give Nutanix credit here—that was truly a great user experience. I wish NSX were this easy to deploy. Sure, I don’t have as many options for designing my environment as I do with NSX, though VCF’s approach is pretty rigid anyway, but everything here actually feels like it’s all part of a single solution. Flow integrates seamlessly into Prism Central, so no additional UI is needed.
Of course, this all assumes that I set my MTU to somewhere between 1,500 and 9,000 bytes.
By default, the Nutanix Controller VMs use the standard Ethernet MTU of 1500 bytes for all the network interfaces. The system advertises the MTU of 1442 bytes to guest VMs using DHCP to account for the extra 58 bytes used by Generic Network Virtualization Encapsulation (Geneve). However, some VMs ignore the MTU advertisements in the DHCP response. Therefore, to ensure that Flow Virtual Networking functions properly with such VMs, enable jumbo frame support on the physical network and the default virtual switch vs0.
| Feature | Encapsulation | Effective MTU |
|---|---|---|
| VPC | Regular Geneve | 1442 |
| VPC + Subnet Extension | Geneve + VXLAN | 1392 |
| VPC + VPN | Geneve + IPSec | 1356 |
| VPC + VTEP + VPN | Geneve + VXLAN VTEP + IPSec | 1306 |
Just a quick side note: Flow Network Security is disabled by default after installation. Since it doesn’t really matter for this blog, I still wanted to mention it. Network Security can be enabled in Flow Management.
Congratulations to all of us—Flow is now available for use. With my Prism Central deployment size, up to 500 subnets and up to 50 VPCs are supported. That should be enough for everything. You might see a message saying that the CVMs aren’t the right size. In my experience, you can ignore that as long as you’re not concerned with performance and limits in the lab. In production, of course, everything should be correct. My next goal is to set up a VPC, connect a VM to a private overlay network, and ensure that north-south traffic is possible.
VPCs - a slightly different approach than with NSX
Nutanix operates somewhat differently here than VMware does with NSX. This is because Flow does not have anything like EdgeVMs. There is a VyOS-based network gateway appliance required for VPN, BGP, and VxLAN configurations, but it is not comparable to the T0/T1 concept or the central transit gateway. For the VPC, I’m not looking into that for now. Furthermore, Nutanix follows the concept of NAT gateway services or No-NAT gateway services. No-NAT/NAT Gateway Services require AHV and are the default when creating a VPC. The service is automatically created on an AHV host. By default, two hosts are automatically selected from the cluster and act as No-NAT/NAT Gateway Service hosts. This can be expanded to up to four hosts. The advantage of this approach, compared to NSX, is that it supports stateful SNAT without requiring the deployment of additional edge VMs, since the entire solution runs automatically as a service on the AHV host. Nutanix automatically determines which VPC uses which AHV host with the NAT Gateway service.
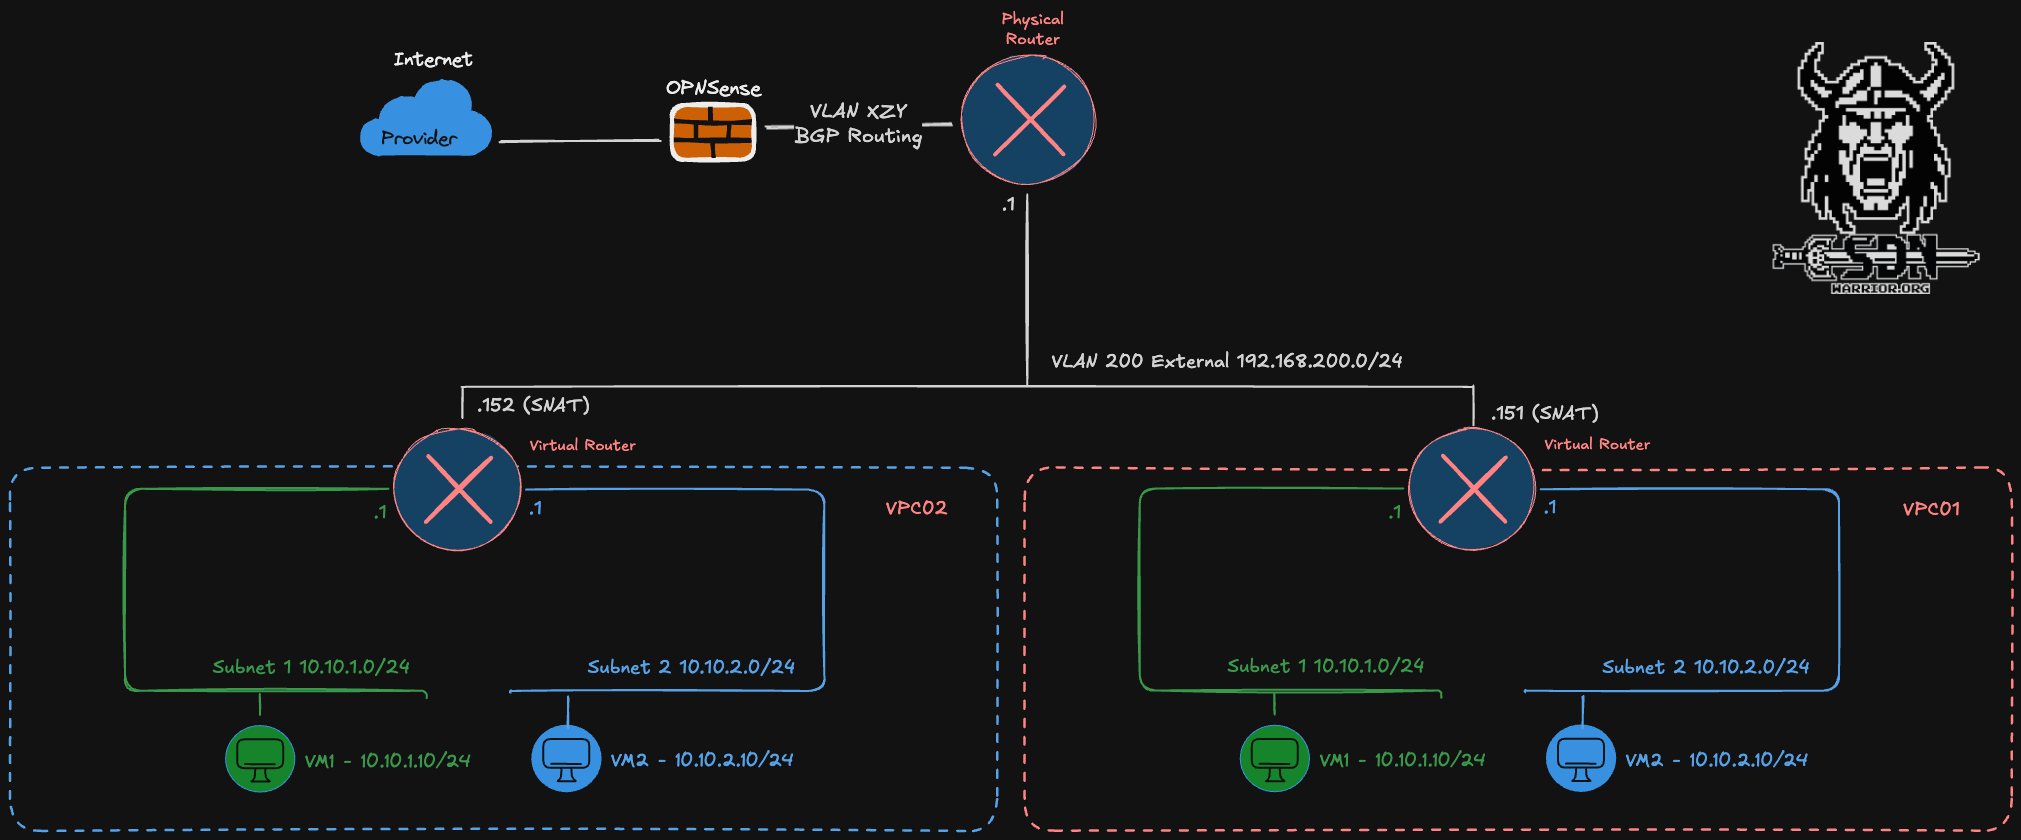
VPC
Every VPC automatically includes a virtual router, which is connected to at least one but no more than two external networks. An external network is the primary way traffic enters and exits a VPC. There are two types of external networks: NAT and Routed (NoNAT). A VPC can have a maximum of one network of each type. This explains the limit of two external networks. VPCs can share the external network, as I showed in my example diagram.
NAT
Each VPC has SNAT IP addresses that are randomly selected from the external network pool. This corresponds to the number of active gateway hosts I select when creating the VPC (minimum 2, maximum 4). Which gateway host is used is determined by randomly and cannot be influenced. Therefore, all SNAT IPs used for the VPC should be allowed through a (physical) firewall. Because SNAT is used, the internal VPC networks can overlap.
Routed
Routed or NO-NAT networks allow VMs within the VPC to be accessible without using NAT. To achieve this, the VPC router is assigned an IP address from the external No-NAT network, and the internal VPC networks are then accessible via routing; however, this also means that these internal networks must not overlap and must be unique per VPC. Routing can be configured either statically or using a BGP gateway. Unlike with NSX, the BGP gateway is only part of the control plane and, unlike the Edge VM, is not part of the data plane; in other words, no north-south VM traffic passes through the network gateway. Due to its complexity, a routed VPC will be covered in a separate article. I will also leave out other topics, such as VPN/VXLAN for VPCs, in this article.
Multiple External Networks
Of course, all of this can be combined. For example, you could provide Internet access via NAT and connect the corporate networks via NO-NAT. However, this requires at least two routing destinations—that is, two physical routers, VRFs, or similar. Naturally, the routed networks must not overlap. But I don’t want to make the setup too complicated, so I’ll just touch on the topic briefly.
Creating a VPC
Let’s finally get to the fun part.
External Subnet
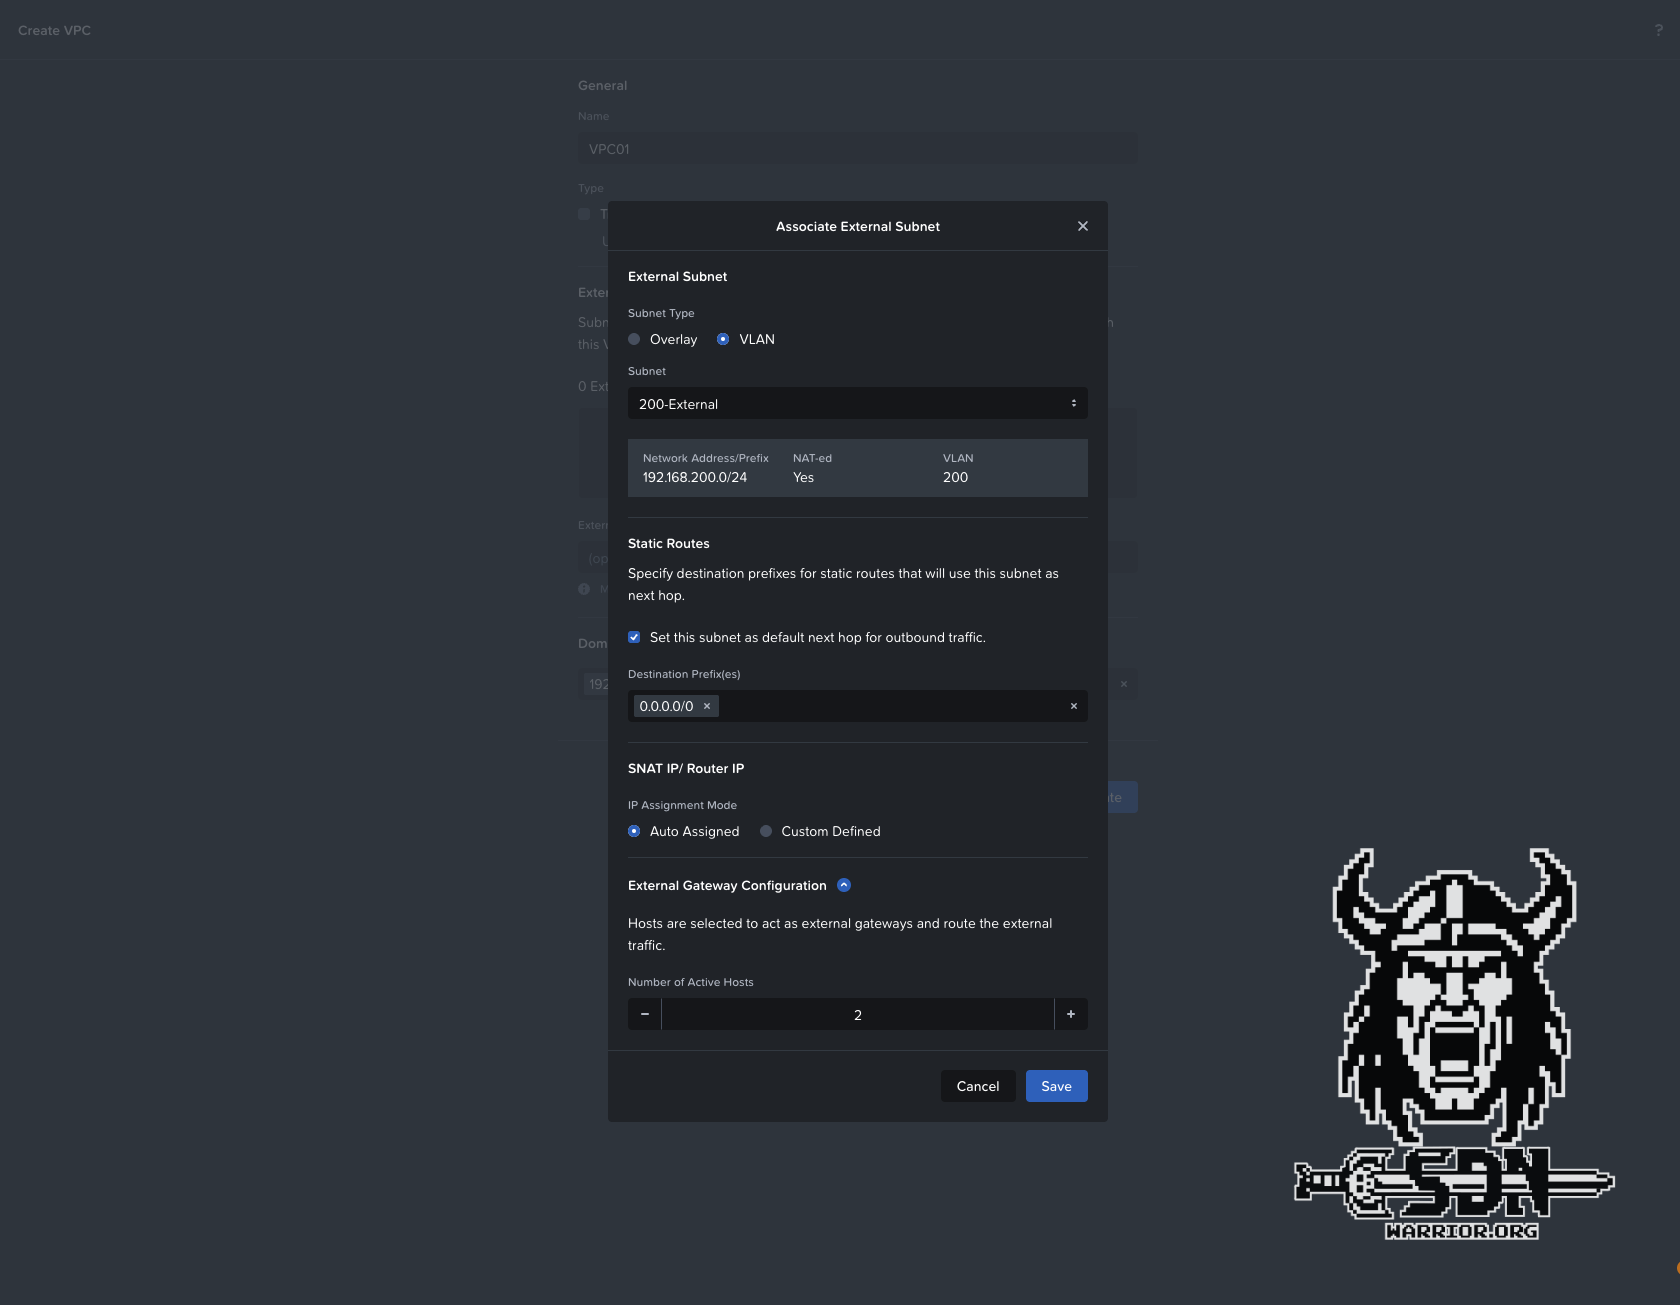
To create a VPC, you must first define and configure an external network. To do this, navigate to Infrastructure -> Network & Security -> Subnets -> Create Subnet in Prism Central. Of course, the VLAN must be connected to every AHV host, but I think that goes without saying; if not, go back and review the theory section.
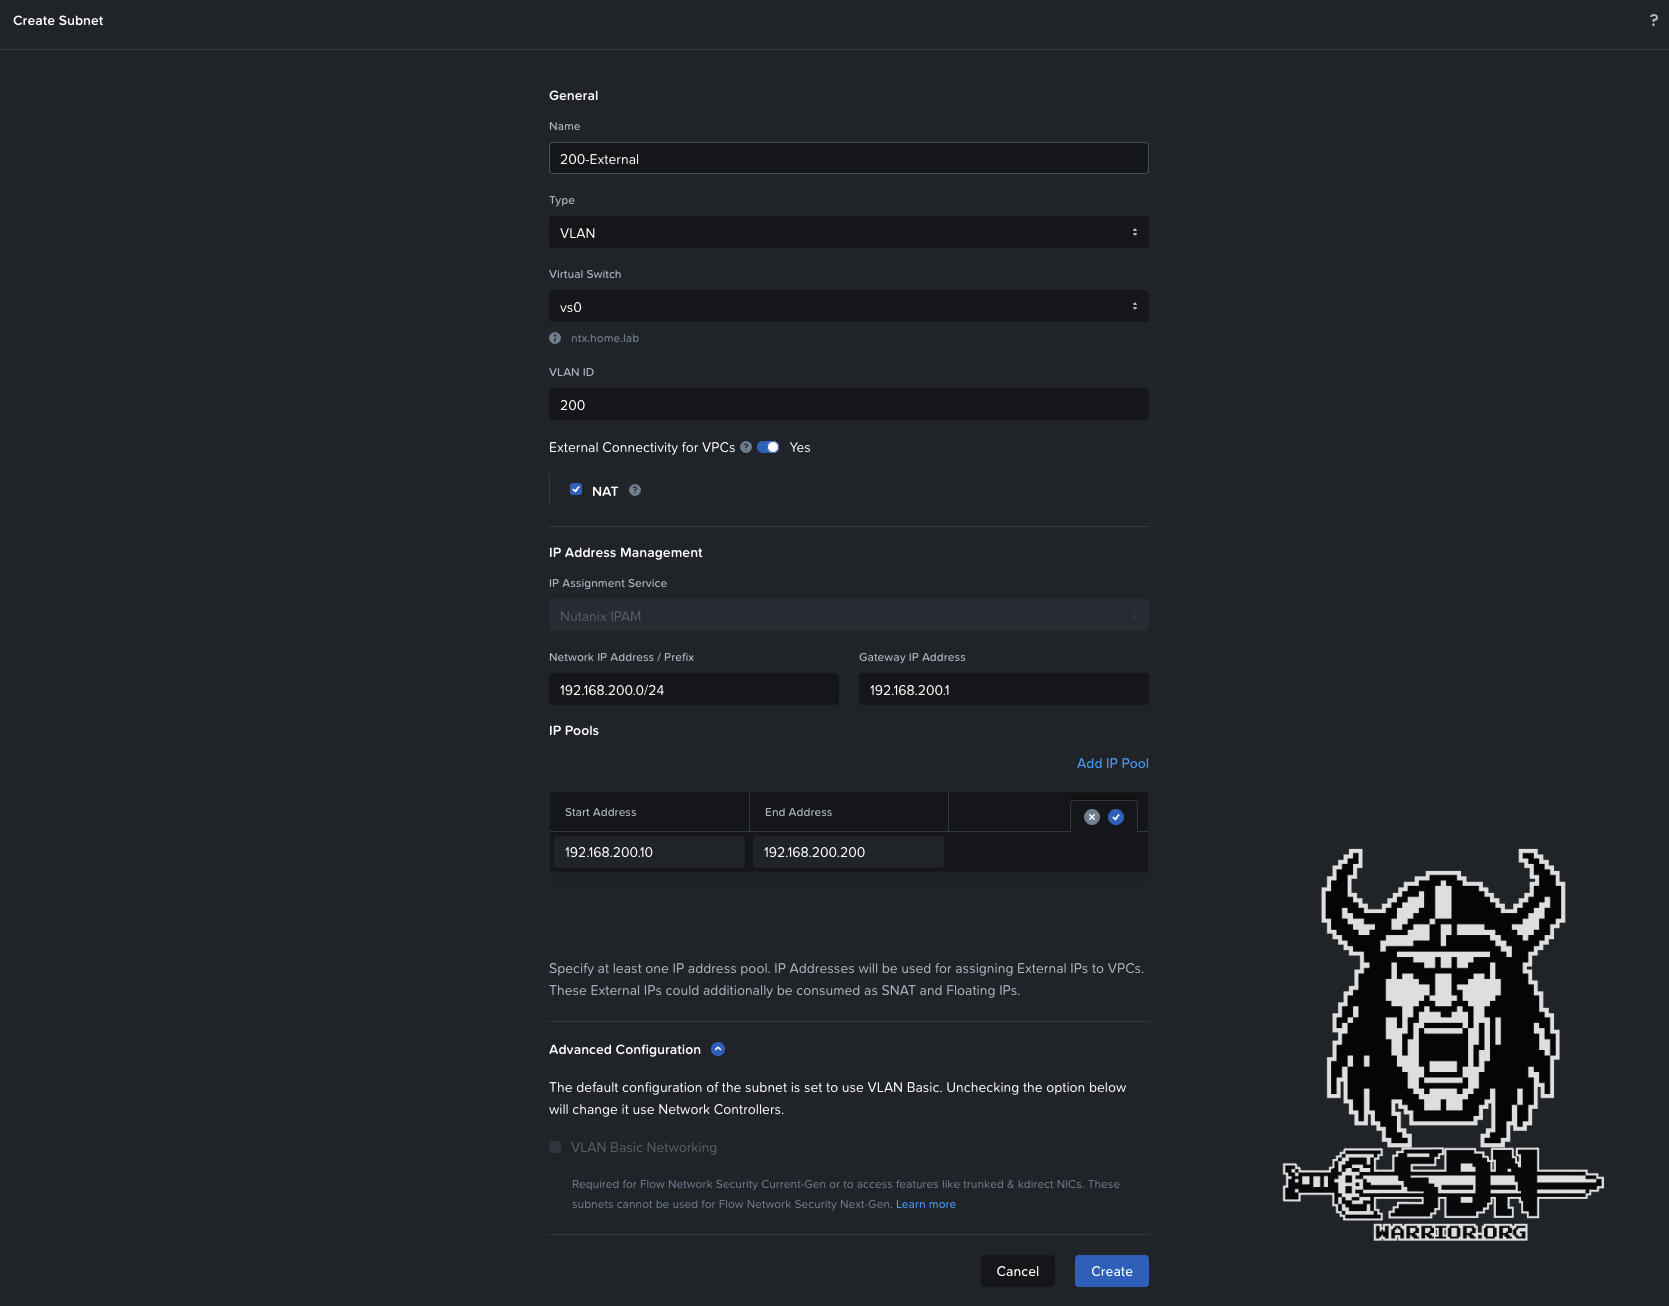
External Subnet
External subnets for VPCs cannot be of the VLAN Basic networking type and are therefore automatically managed by the network controller. In this setup, VLAN must be selected as the subnet type (Overlay would only be possible if we wanted to connect a transit VPC). NAT is selected by default. When creating a No-NAT external subnet, you must uncheck the box next to “NAT”. For automatic IP address assignment to work, an IP pool must be created. Additionally, the network requires a gateway in the physical network. In my example, I am using the 192.168.200.0/24 network as the external subnet, and my gateway is my lab router with the IP address 1. Once the network has been created using Save, you can proceed to create a VPC.
New VPC
To create the VPC, navigate to Infrastructure -> Network & Security -> Virtual Private Clouds -> Create VPC.
The settings are fairly self-explanatory.
VPC Setuo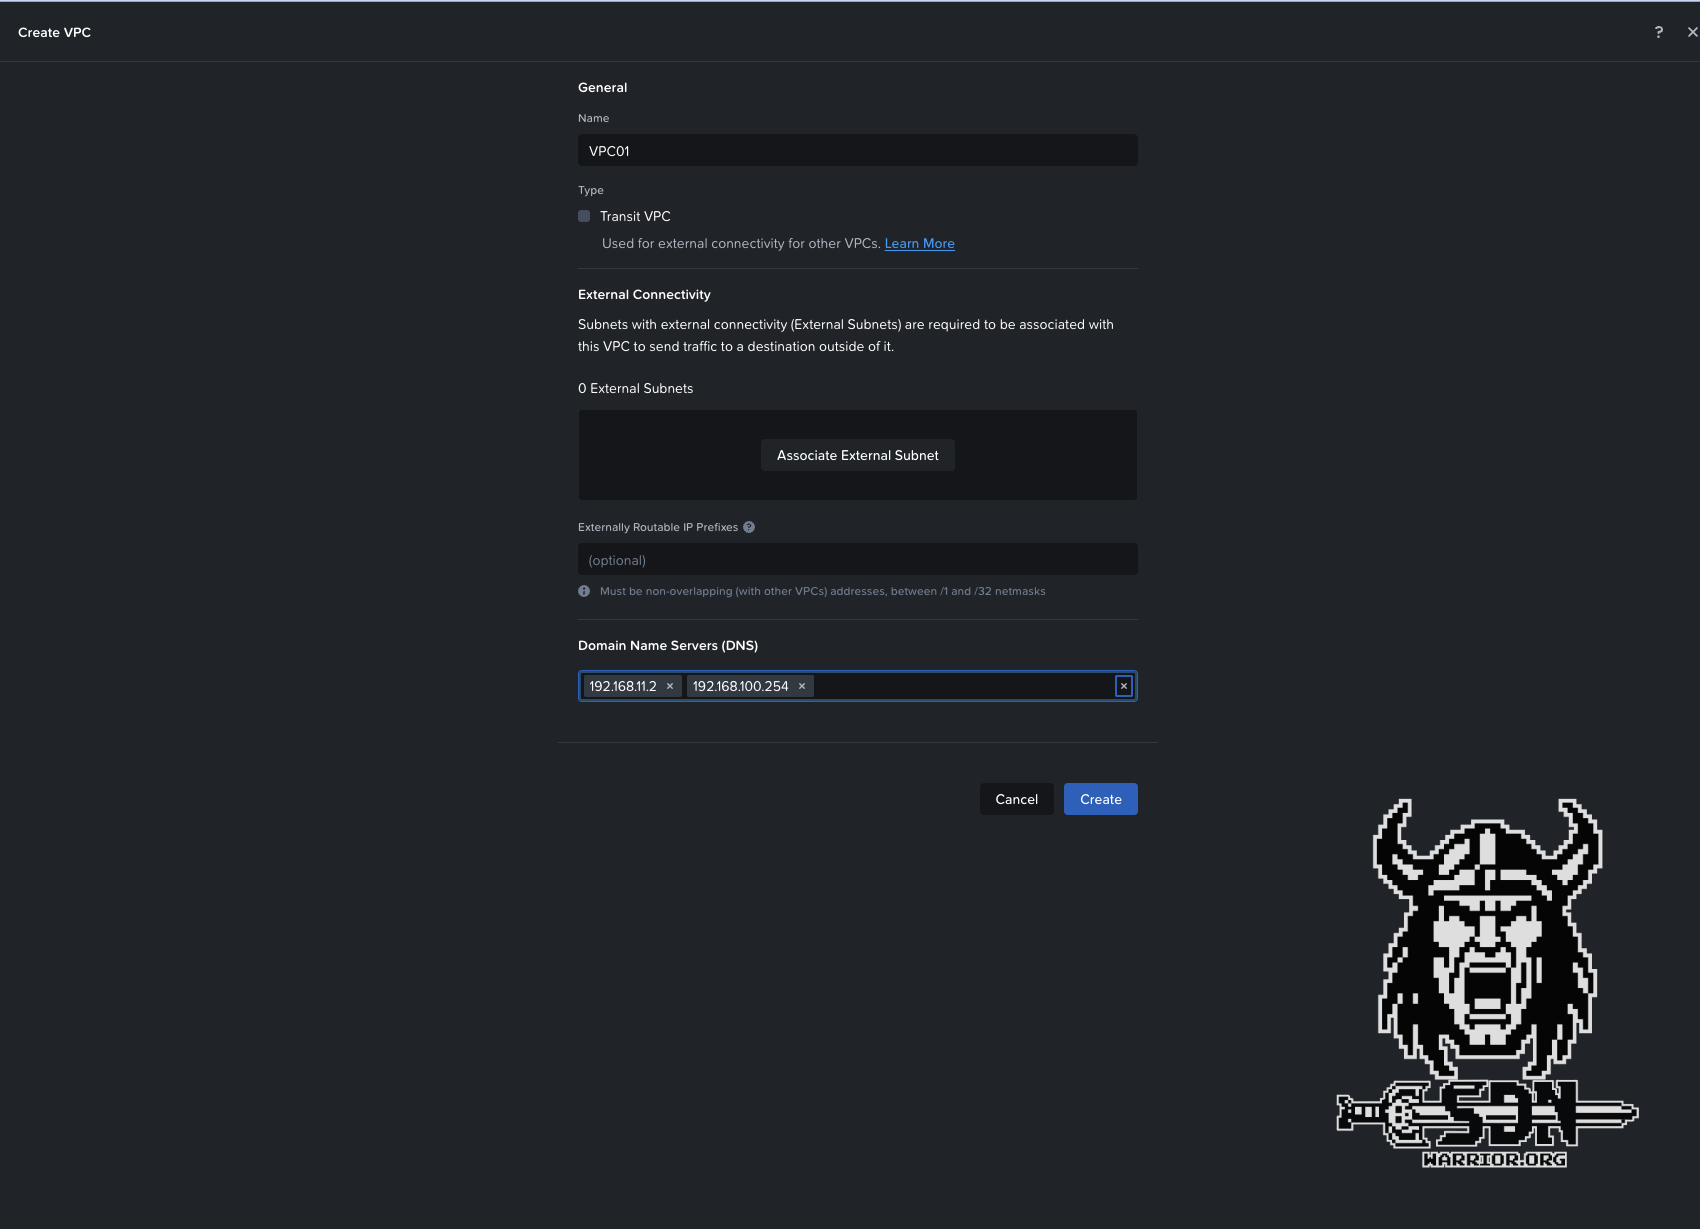
VPC External Subnet
As a last option, you can configure one or more DNS servers in the VPC. These settings are then automatically applied when creating new VPC subnets, but can also be overridden on a per-subnet basis. We’re almost there, I promise. Now all that’s left is to create a VPC subnet.
VPC Subnet
This subnet is a private network, meaning that subnets with the same network address can be created across multiple VPCs, since they can only communicate within the VPC and rely on SNAT from the gateway service host for external communication. As long as they are unique within the VPC, everything is fine. To create such a subnet, navigate to Infrastructure -> Network & Security -> Subnets -> Create Subnet.
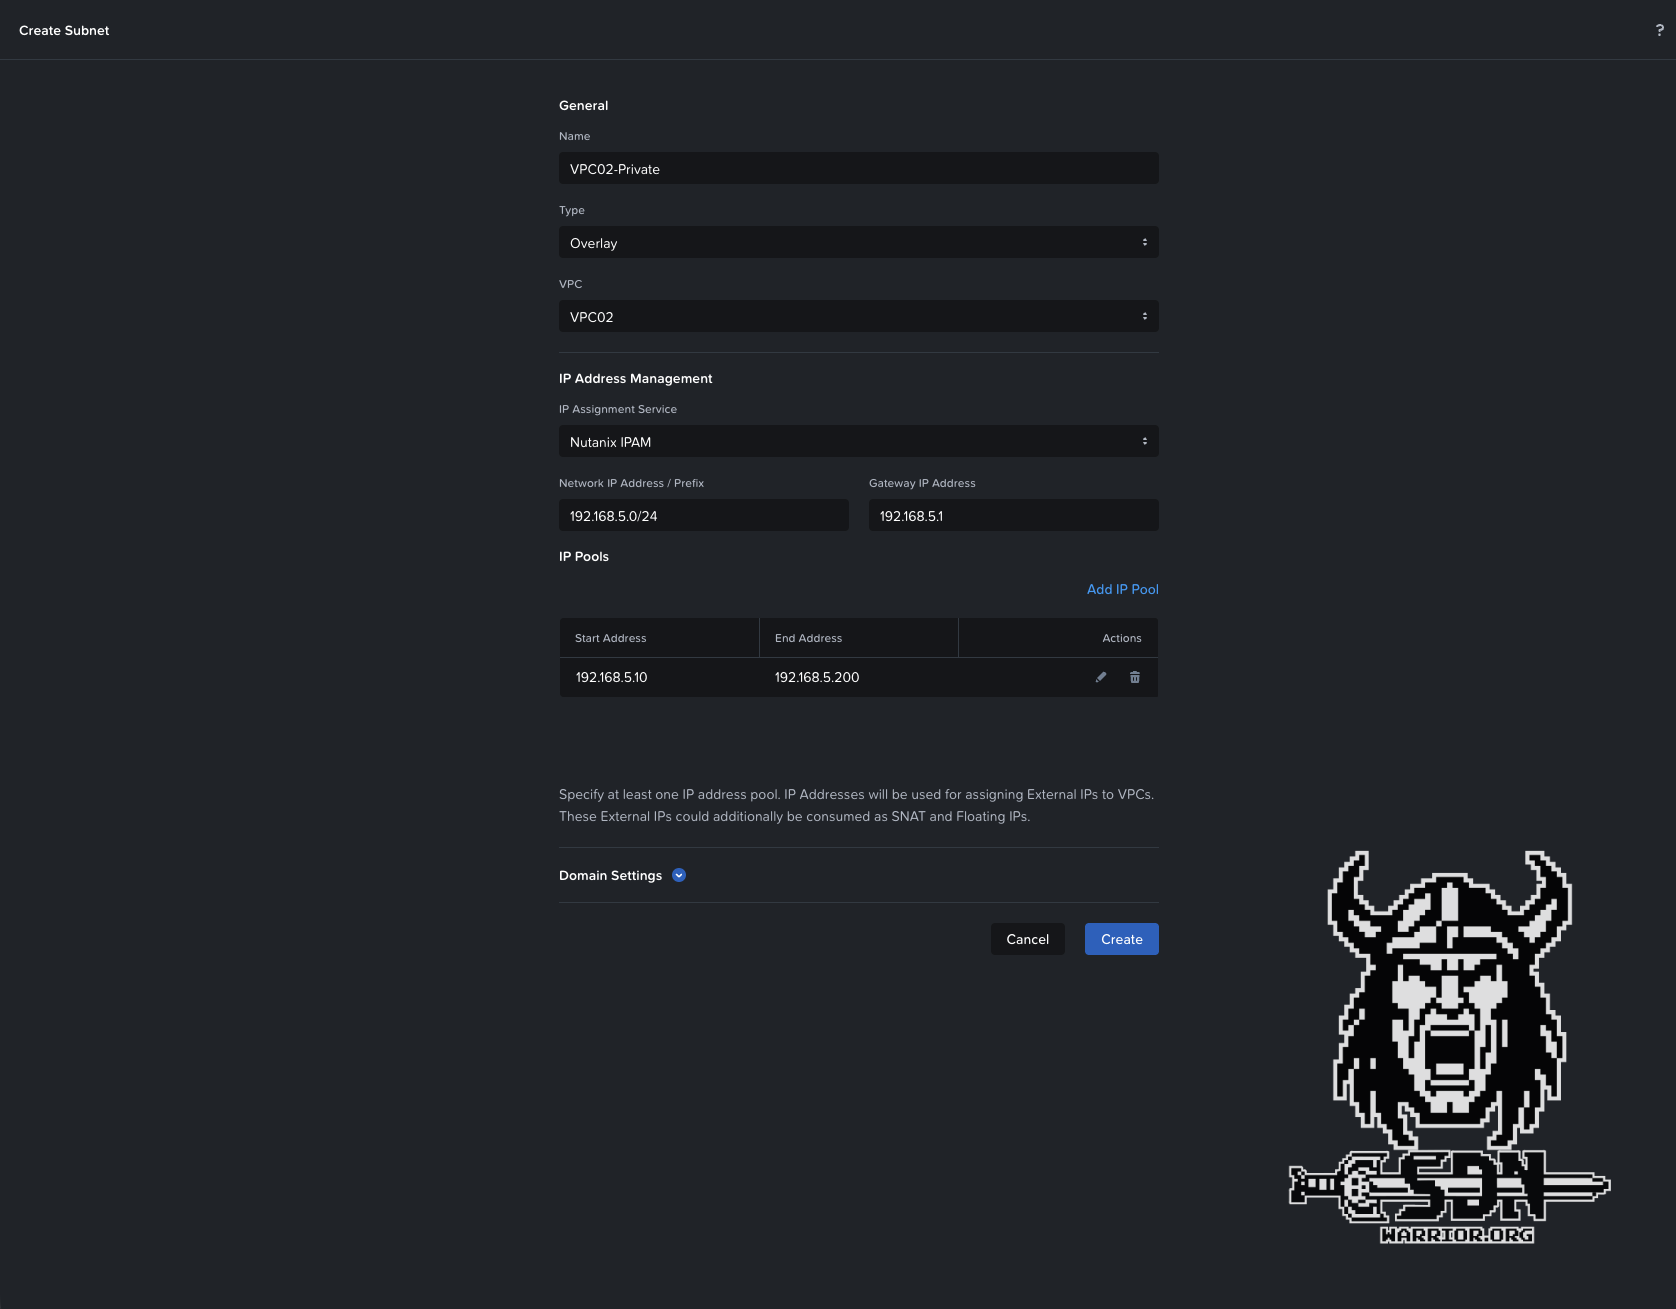
Create a private VPC Subnet
Here, too, the settings are very straightforward. We need a subnet name; this time, the type must be “Overlay” since we want to create a VPC subnet. The subnet must be assigned to the correct VPC—in my example, it’s VPC02. The actual subnet prefix and the gateway must be configured. If we don’t want to use automatic IP addressing in the subnet, we’d be done here. In my example, however, I want to keep this option open, so I’m defining an IP pool. When creating the VM, an IP address can then be automatically assigned from this pool. Since the VPC has a DNS server configuration, I don’t need to adjust anything in the domain settings to ensure that, at the end of the day, my VMs are assigned the correct DNS servers. Once the subnet has been saved and created, it can be used like any other network in Nutanix with IPAM enabled.
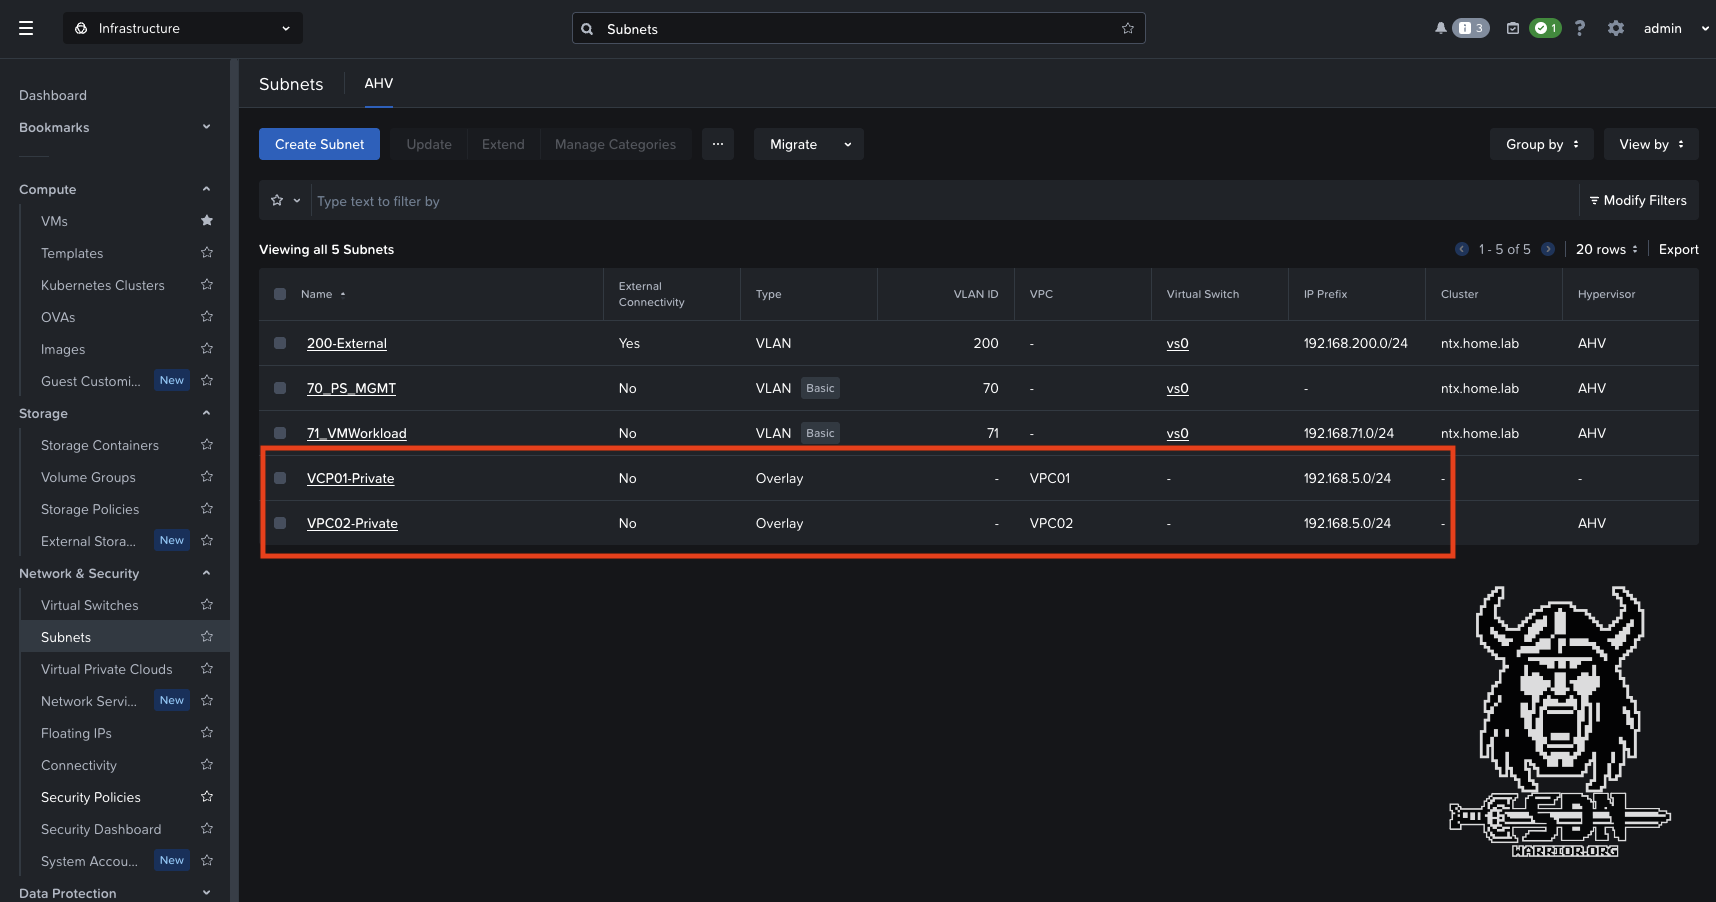
VPC Subnets
As you can clearly see in the screenshot, I’ve created two VPC subnets, and both use the same IP network; however, since they’re in separate VPCs, there are no issues, and each VM can communicate with the outside world.
Testing the North-South connection
To test out the whole setup, I created two Alpine Linux VMs, connected each to one of the two networks I had set up, and had Nutanix IPAM assign an IP address to each. I’ll admit that this whole Nutanix IPAM thing still confuses me a bit, and I need to take a closer look at it when I get the chance. On the one hand, it’s practical; on the other, it’s a bit annoying—but that’s just my current opinion, based on limited experience with the feature.
Anyway—let’s get back on track. I’m happy to report that the VMs were automatically assigned IP addresses, and they were able to connect to the internet via SNAT right away.
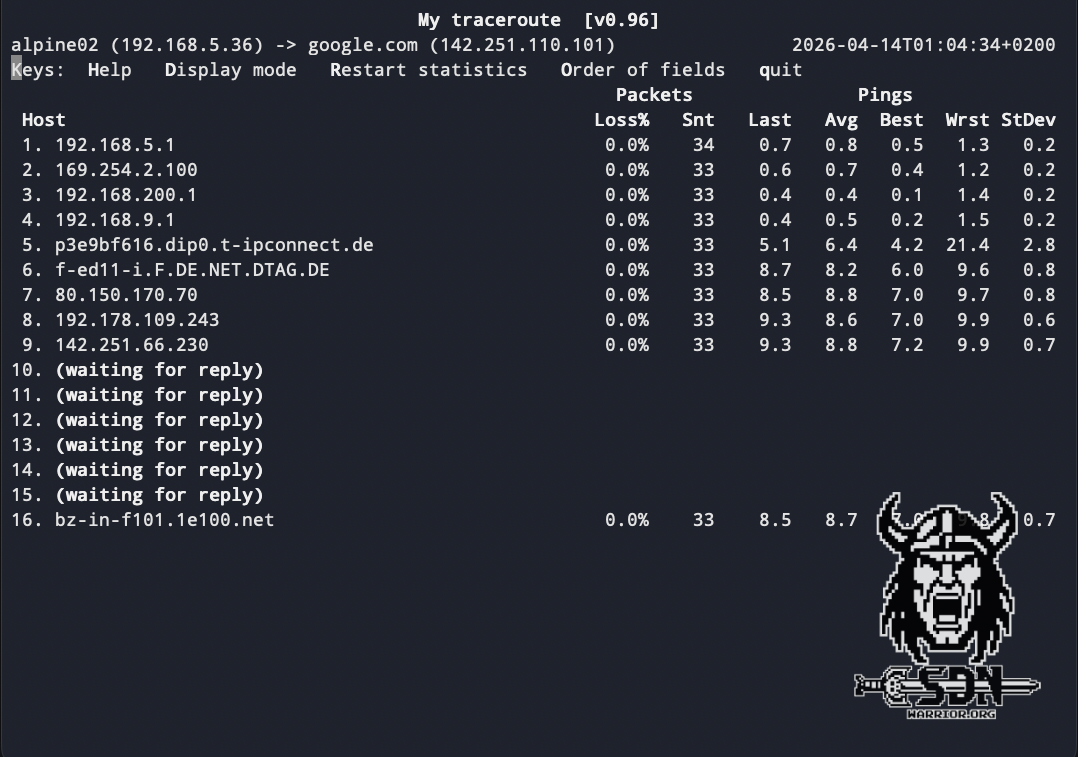
My Traceroute
To test this, I used the My Tracroute tool, and in the screenshot you can clearly see the gateway I configured as an external VLAN listed as the third hop—in this case, my LAB router. As a cross-check, I look at the assigned NAT IP addresses for the VPC in the VPC Summary and filter for outbound traffic in my firewall; in the firewall log, I see the generated traffic using the second IP address of my VPC as SNAT IP.

VPC SNAT IPs

Firewall
So our VPC is now fully functional, but one problem remains. While the VM can communicate outbound, by default it is initially isolated from the outside world. Perhaps I should also mention that VMs within a VPC can communicate with all subnets in that VPC, though this is one of the basic features of a VPC. There is another useful feature that allows you to make a VM accessible from outside the VPC after all.
Floating IPs
You can change this using floating IPs; this feature allows you to request an IP address from the external VLAN and bind it to a VM. Technically speaking, this is simply a 1-to-1 NAT. In other words, it doesn’t work for every protocol, but at least my VM would be reachable. I can also request a maximum of 50 floating IPs per external VLAN. Therefore, the better approach when services need to be exposed to the outside world is to deploy them in a routed VPC network. However, this is a setup I will cover in a second article.
If you want to configure a floating IP, you can do so under Infrastructure -> Network & Security -> Floating IPs -> Request Floating IP. The process is super simple and doesn’t really need much explanation. Select the external subnet, specify the number of floating IPs you want to request, and assign the floating IP to a VM—done.
How Overlay Networks Work - The Super-Short Version?
Perhaps I should also briefly explain how the whole thing works.
Witchcraft and black magic!
Okay, just kidding. But seriously now. To give a simple example, our test VM is located in VPC01 on AHV Host 1. The gateway services are running on AHV Hosts 2 and 3, with AHV Host 3 automatically selected for the VPC. If the VM now wants to communicate externally, the traffic is encapsulated using Geneve and sent to AHV Host 3, since that’s where our gateway services for the VPC are running. The Geneve traffic is decapsulated on AHV3, the gateway services perform SNAT, and send the traffic out via the external subnet VLAN to the next hop. The reply is sent back to AHV3 based on the SNAT IP; the packet is wrapped up nicely in Geneva and sent back to AHV1.
Another example would be two VMs sitting in the same VPC network that want to communicate with each other. If both VMs are on the same host, the traffic is delivered normally, just like in any other network. No Geneve magic is required.
If, for example, the destination VM is on the second AHV host and the source remains on the first AHV host, the traffic is transported via Geneve to AHV 2 and delivered to the VM there. Since Geneve traffic encapsulates the original packet, jumbo frames are actually mandatory, as mentioned earlier.
Summary
In short, VPCs are a powerful and important feature in Nutanix as well, and they work quite differently from NSX, although the end result is more or less the same. I can use overlapping networks; my VPC is isolated by default, and ideally, as a user, I don’t need extensive networking knowledge. Here I have to say that NSX has an advantage in terms of ease of use, since it relies heavily on auto-allocation, allowing me, for example, to automatically carve out networks from a larger subnet. The VPC administrator really only needs to specify what type of network they want and how many free IP addresses should be available.
Anyway, NSX isn’t the focus here. But there will definitely be more articles on Flow and VPCs, because I feel like I’ve only scratched the surface of what’s possible. I’m particularly interested in the setup with a transit VPC and a BGP gateway.
I hope you enjoyed this short excursion into Flow. I’ll continue diving down the rabbit hole to discover even more features of Flow. If you were hoping there would be a clear winner by the end, I’m afraid I have to disappoint you, because I’d have to go much deeper for that. Sure, NSX has more features than Flow, but the exciting question is: do you really need them, or is a stripped-down solution sufficient here? Based on my many years of experience with customer projects and NSX, I can say that many customers don’t even begin to utilize the potential, and I don’t think it will be any different for Nutanix customers.
