VCF Stretched Cluster
A short article on how to build a stretched vSAN cluster in the VCF.
2210 Words // ReadTime 10 Minutes, 2 Seconds
2025-03-13 23:00 +0100
Introduction
This is my third article in my VCF Homelab series. On second thought, I may have put the cart before the horse, because a stretched vSAN cluster requires a functioning management domain. But ok, that shouldn’t bother us now. I’ll try to cover all the essentials of the deployment in this article.
What are the benefits of a stretched vSAN cluster and why does it have to be vSAN?
Well, first the obvious. We have to use vSAN because we have a consolidated design here and VCF (version 5.2.1) does not allow any other principal storage in the consolidated design (also, this article is about a vSAN stretched cluster). Secondly, we want to use the synchronous replication of vSAN to the second site. Another reason is “German Angst”. We want to have redundancy here and a muti AZ design. In Germany, there have traditionally been stretched clusters across multiple fire compartments or buildings for a long time. In the past, I myself have already implemented such scenarios with layer 2 over layer 3 (aka VxLAN). The much more elegant way (and also the way supported by VCF) is the vSAN stretched cluster.
Let’s get started
Of course, as always, there is a flip side to the coin. We can’t just stretch a workload domain and all is well. This is certainly not possible via the GUI of the SDDC Manager. Yes, that’s right, we will work with the API. But more on that later. If we think about using one or more stretched workload domains, this always means that we also have to stretch our management domain. This gives us the following requirements:
- 8 ESXi servers for our Management Domain (4 per AZ)
- Minimum 6 ESXi servers for Workload Domain (8 recommanded minimum)
- Both availability zones must contain an equal number of hosts to ensure failover in case any of the availability zones goes down.
- Redundant L3 gateways
- A set of VLANs
- A vSAN Witness Host (ESA or OSA Wthness Appliance)
You cannot stretch a cluster in the following conditions:
- The cluster is a vSAN Max cluster.
- The cluster has a vSAN remote datastore mounted on it.
- The cluster shares a vSAN Storage Policy with any other clusters.
- The cluster includes DPU-backed hosts.
Latency vSphere
- Less than 150 ms latency RTT for vCenter Server connectivity.
- Less than 150 ms latency RTT for vMotion connectivity.
- Less than 5 ms latency RTT for VSAN hosts connectivity.
Latency vSAN Site to Witness
- Less than 200 ms latency RTT for up to 10 hosts per site.
- Less than 100 ms latency RTT for 11-15 hosts per site.
Latency NSX Managers
- Less than 10 ms latency RTT between NSX Managers
- Less than 150 ms latency RTT between NSX Managers and transport nodes.
VLANs
| Function | Availability Zone 1 | Availability Zone 2 | HA Layer 3 Gateway | Recommended MTU |
|---|---|---|---|---|
| VM Management VLAN | ✓ | ✓ | ✓ | 1500 |
| Management VLAN (AZ1) | ✓ | X | ✓ | 1500 |
| vMotion VLAN | ✓ | X | ✓ | 9000 |
| vSAN VLAN (AZ1) | ✓ | X | ✓ | 9000 |
| NSX Host Overlay VLAN | ✓ | X | ✓ | 9000 |
| NSX Edge Uplink01 VLAN | ✓ | ✓ | X | 9000 |
| NSX Edge Uplink02 VLAN | ✓ | ✓ | X | 9000 |
| NSX Edge Overlay VLAN | ✓ | ✓ | ✓ | 9000 |
| Management VLAN (AZ2) | X | ✓ | ✓ | 1500 |
| vMotion VLAN (AZ2) | X | ✓ | ✓ | 9000 |
| vSAN VLAN (AZ2) | X | ✓ | ✓ | 9000 |
| NSX Host Overlay VLAN (AZ2) | X | ✓ | ✓ | 9000 |
In your Lab setup you can also use 1700 byte MTU instead of 9000 byte mtu. Redundant gateways are heavily dependent on the physical network design. For a spine/leaf network with top of rack switches, you can use VRRP, HSRP or anycast gateway technology, depending on the manufacturer, expected traffic, fabric design and so on. It depends heavily on the underlay design which is the right one here. In my setup, I have implemented the gateways on my top of rack switch.
Deploy vSAN Witness Host
A vSAN Witness Host is required for a Stretched vSAN Cluster. Ready-made appliances can be downloaded from the Broadcom support portal. These are delivered as OVA and must be deployed on a third independent site. vSAN Witness can be connected either Layer 2 or Layer 3.
After the successful deployment, the witness host must be registered in the vCenter of the management domain. You must add the vSAN witness host to the datacenter. Do not add it to a folder. Use the fully qualified domain name (FQDN) of the vSAN witness host, not the IP address. There are a few adjustments to be made to the witness host:
- Remove the dedicated VMkernel adapter for witness traffic on the vSAN witness host.
- Remove the network port group from the virtual machine on the vSAN witness host.
- Enable witness traffic on the VMkernel adapter for the management network of the vSAN witness host.
A step-by-step guide can be found in the VCF 5.2 Administration Guide.
Commission Host
As I already wrote in the intro, I assume for the article that a management domain is already deployed, but that it is not yet a stretched cluster. The physical network is configured and all VLANs and IP networks are available. Another network pool is also required. The vSAN and vMotion network is defined in this network pool.
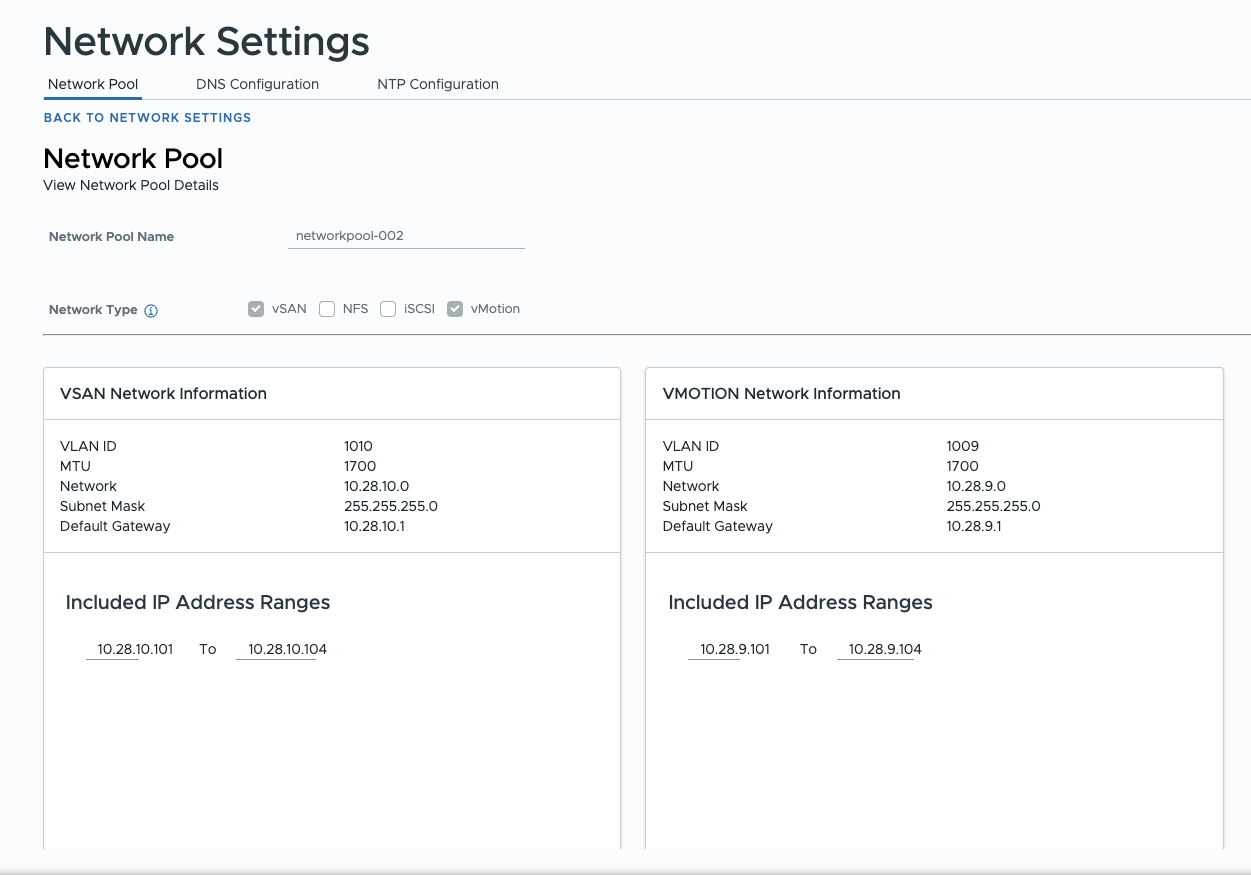
Network Pool (click to enlarge)
Now that the preparations are complete, I can add the additional hosts in the sddc manager. These must have the same build as the existing hosts in the cluster. If, for example, the MGMT domain has been patched with ESXi patches to a different build than is in the BoM of VCF 5.2.1, then the additional hosts must be updated to the same version before they are provisioned.
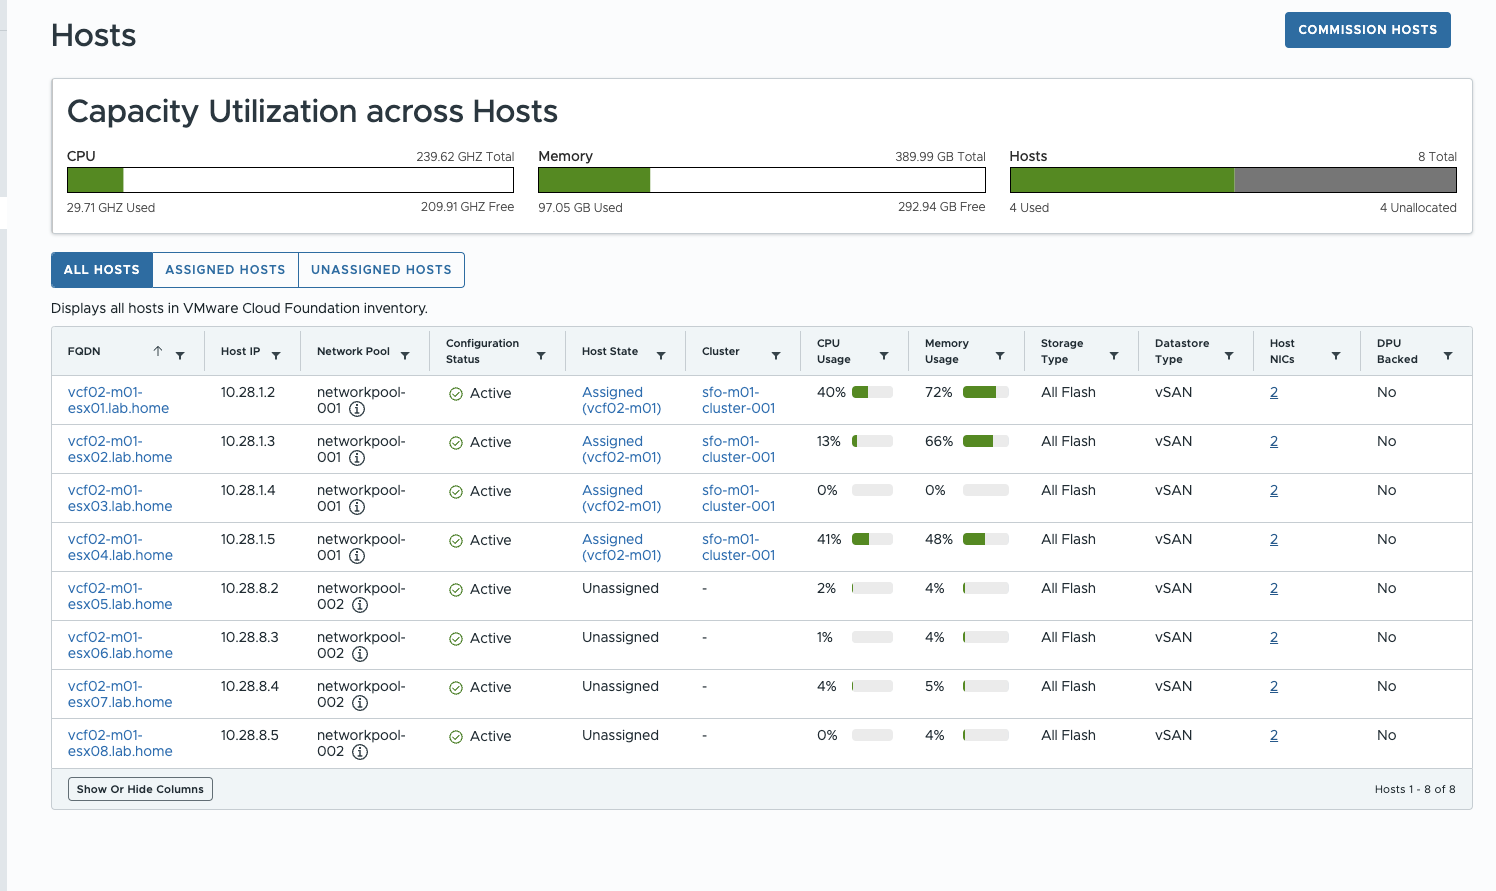
SDDC Manager (click to enlarge)
After the hosts have been successfully put into operation in the SDDC Manager, they must not be added to the management domain, as stretching the cluster is not possible via the GUI. Next, the cluster stretch spec must be created – this is the fun part of the deployment.
Stretch a vSAN Cluster (aka Fun Part)
Unfortunately, the actual stretch of the cluster cannot be conveniently carried out in the SDDC GUI. A JSON cluster stretch spec must be created and then passed to the SDDC manager via an API call.
The ESXi host ID is required for the JSON. This can be read out via an API call. The easiest way to do this is to use the Developer Center in the SDDC. Of course, any API tool will also work. At this point, I was just too lazy to generate an API token and did all the queries in the developer center of the SDDC manager.
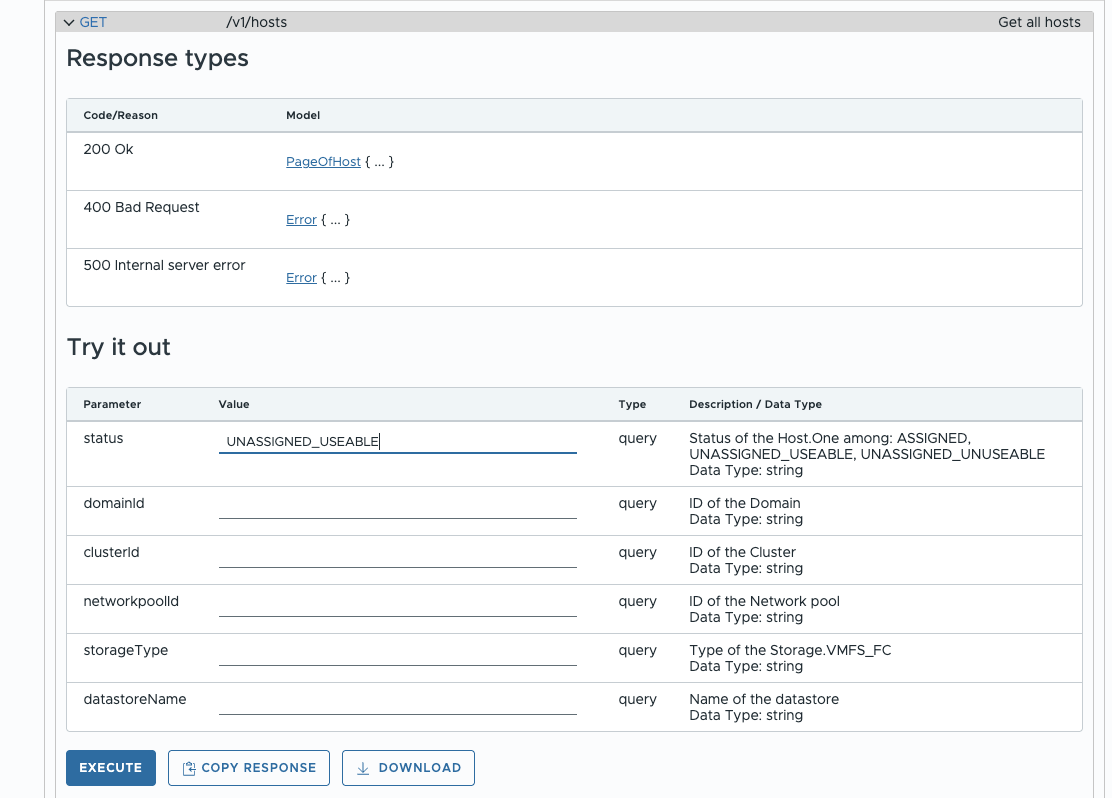
Developer Center (click to enlarge)
The answer contains the IDs of the ESX servers, which can be easily transferred to the cluster stretch spec. My cluster stretch spec looks like this:
{
 "clusterStretchSpec": {
  "hostSpecs": [
   {
    "hostname": "vcf02-m01-esx05.lab.home",
    "hostNetworkSpec": {
     "networkProfileName": "sfo-w01-az2-nsx-np01",
     "vmNics": [
      {
       "id": "vmnic0",
       "uplink": "uplink1",
       "vdsName": "sfo-m01-vds1"
      },
      {
       "id": "vmnic1",
       "uplink": "uplink2",
       "vdsName": "sfo-m01-vds1"
      }
     ]
    },
    "id": "2bb45762-b2b9-4d94-8003-980f32d449f2",
    "licenseKey": "XXXX-XXXXX-XXXXX-XXXXX-XXXXX"
   },
   {
    "hostname": "vcf02-m01-esx06.lab.home",
    "hostNetworkSpec": {
     "networkProfileName": "sfo-w01-az2-nsx-np01",
     "vmNics": [
      {
       "id": "vmnic0",
       "uplink": "uplink1",
       "vdsName": "sfo-m01-vds1"
      },
      {
       "id": "vmnic1",
       "uplink": "uplink2",
       "vdsName": "sfo-m01-vds1"
      }
     ]
    },
    "id": "a1fafaf3-bb88-4ee6-9a1b-a7ca0e8e9c47",
    "licenseKey": "XXXX-XXXXX-XXXXX-XXXXX-XXXXX"
   },
   {
    "hostname": "vcf02-m01-esx07.lab.home",
    "hostNetworkSpec": {
     "networkProfileName": "sfo-w01-az2-nsx-np01",
     "vmNics": [
      {
       "id": "vmnic0",
       "uplink": "uplink1",
       "vdsName": "sfo-m01-vds1"
      },
      {
       "id": "vmnic1",
       "uplink": "uplink2",
       "vdsName": "sfo-m01-vds1"
      }
     ]
    },
    "id": "a8ece8a4-9264-4b05-8637-02cbc0a85f45",
    "licenseKey": "XXXX-XXXXX-XXXXX-XXXXX-XXXXX"
   },
   {
    "hostname": "vcf02-m01-esx08.lab.home",
    "hostNetworkSpec": {
     "networkProfileName": "sfo-w01-az2-nsx-np01",
     "vmNics": [
      {
       "id": "vmnic0",
       "uplink": "uplink1",
       "vdsName": "sfo-m01-vds1"
      },
      {
       "id": "vmnic1",
       "uplink": "uplink2",
       "vdsName": "sfo-m01-vds1"
      }
     ]
    },
    "id": "c4e8e06f-5229-4d3c-86a3-a9f0f76fdea2",
    "licenseKey": "XXXX-XXXXX-XXXXX-XXXXX-XXXXX"
   }
  ],
  "isEdgeClusterConfiguredForMultiAZ": false,
  "networkSpec": {
   "networkProfiles": [
    {
     "isDefault": false,
     "name": "sfo-w01-az2-nsx-np01",
     "nsxtHostSwitchConfigs": [
      {
       "uplinkProfileName": "sfo-w01-az2-host-uplink-profile01",
       "vdsName": "sfo-m01-vds1",
       "vdsUplinkToNsxUplink": [
        {
         "nsxUplinkName": "uplink-1",
         "vdsUplinkName": "uplink1"
        },
        {
         "nsxUplinkName": "uplink-2",
         "vdsUplinkName": "uplink2"
        }
       ]
      }
     ]
    }
   ],
   "nsxClusterSpec": {
    "uplinkProfiles": [
     {
      "name": "sfo-w01-az2-host-uplink-profile01",
      "teamings": [
       {
        "activeUplinks": [
         "uplink-1",
         "uplink-2"
        ],
        "name": "DEFAULT",
        "policy": "LOADBALANCE_SRCID",
        "standByUplinks": []
       }
      ],
      "transportVlan": 1011
     }
    ]
   }
  },
  "witnessSpec": {
   "fqdn": "vcf02-osa.lab.home",
   "vsanCidr": "192.168.12.0/24",
   "vsanIp": "192.168.12.22"
  },
  "witnessTrafficSharedWithVsanTraffic": false
 }
}
Next, the cluster stretch spec can be validated.The cluster ID is required for this.
This is also done as an API call. To do this, I go to the Developer Center, then to the managing clusters section, expand GET /v1/cluster end execute the API call.
Here is a small excerpt of what the response looks like. The correct ID can be found in the “id” field at the top level, in my case its “e04c96fe-263c-4355-bdcf-7464b03e35d2”. The domain ID must not be used.
{
    "elements": [
        {
            "id": "e04c96fe-263c-4355-bdcf-7464b03e35d2",
            "domain": {
                "id": "40a61f61-0686-4514-b6a9-ba47c8533be9"
            },
            "name": "sfo-m01-cluster-001",
            "status": "ACTIVE",
            "primaryDatastoreName": "m01-cluster-001-vsan",
            "primaryDatastoreType": "VSAN",
            "hosts": [
                {
                    "id": "034f44ca-1654-450c-915f-6d3e072bee68"
                },
                {
                    "id": "2bb45762-b2b9-4d94-8003-980f32d449f2"
                },
                {
                    "id": "7cdd8928-575d-44b0-a604-834d3dd0bf13"
                },
                {
                    "id": "9cbbe32f-31ce-450a-863c-31c39e248ab0"
                }
To perform the validate cluster stretch spec, I’ll expand the “APIs for managing clusters” section and expand POST /v1/clusters/{id}/validations. I enter the unique ID for the management cluster in the id text field. In addition, the cluster stretch spec must be copied into the body field.
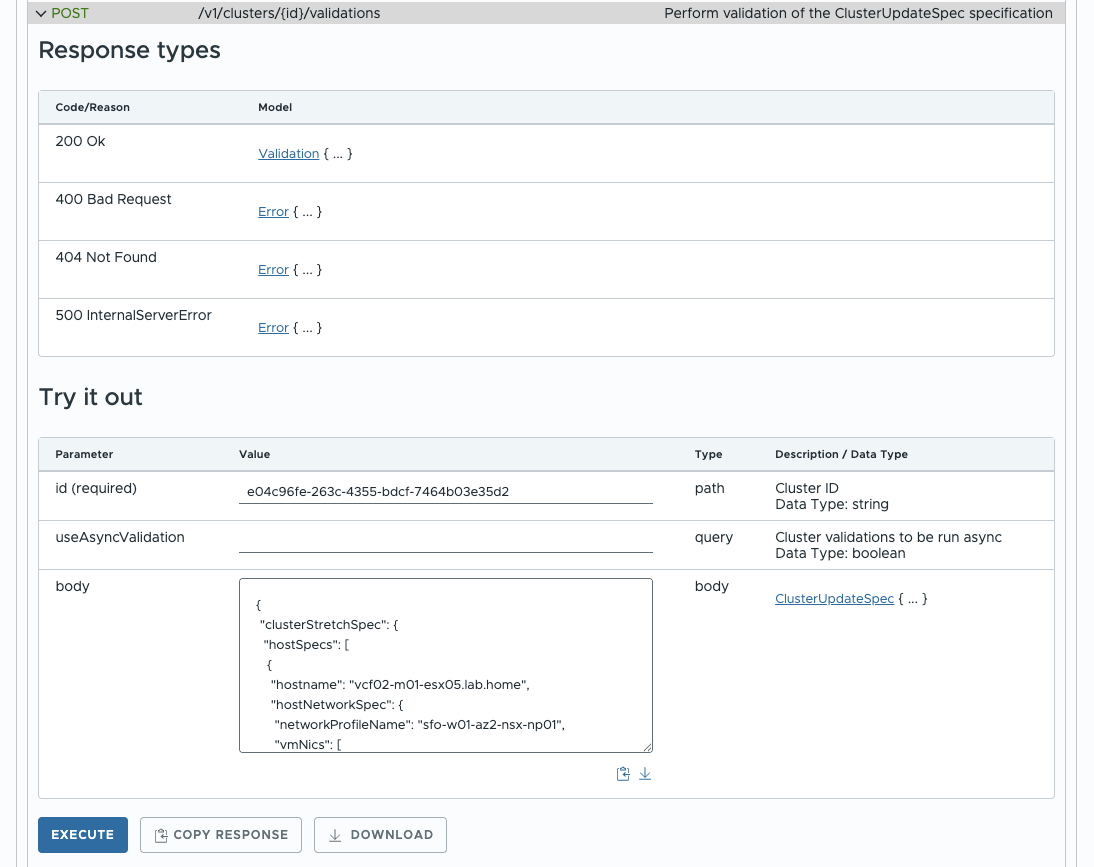
cluster stretch spec Validation (click to enlarge)
After the validation has been successfully completed, the cluster can be stretched. To start the actual task, another API call must be made. This time PATCH /v1/clusters/{id}. The process is the same as for the validation. I copy the cluster ID into the ID field and copy the cluster stretch spec into the body field. After executing, the cluster stretch begins. This can be followed in the SDDC in the task bar.
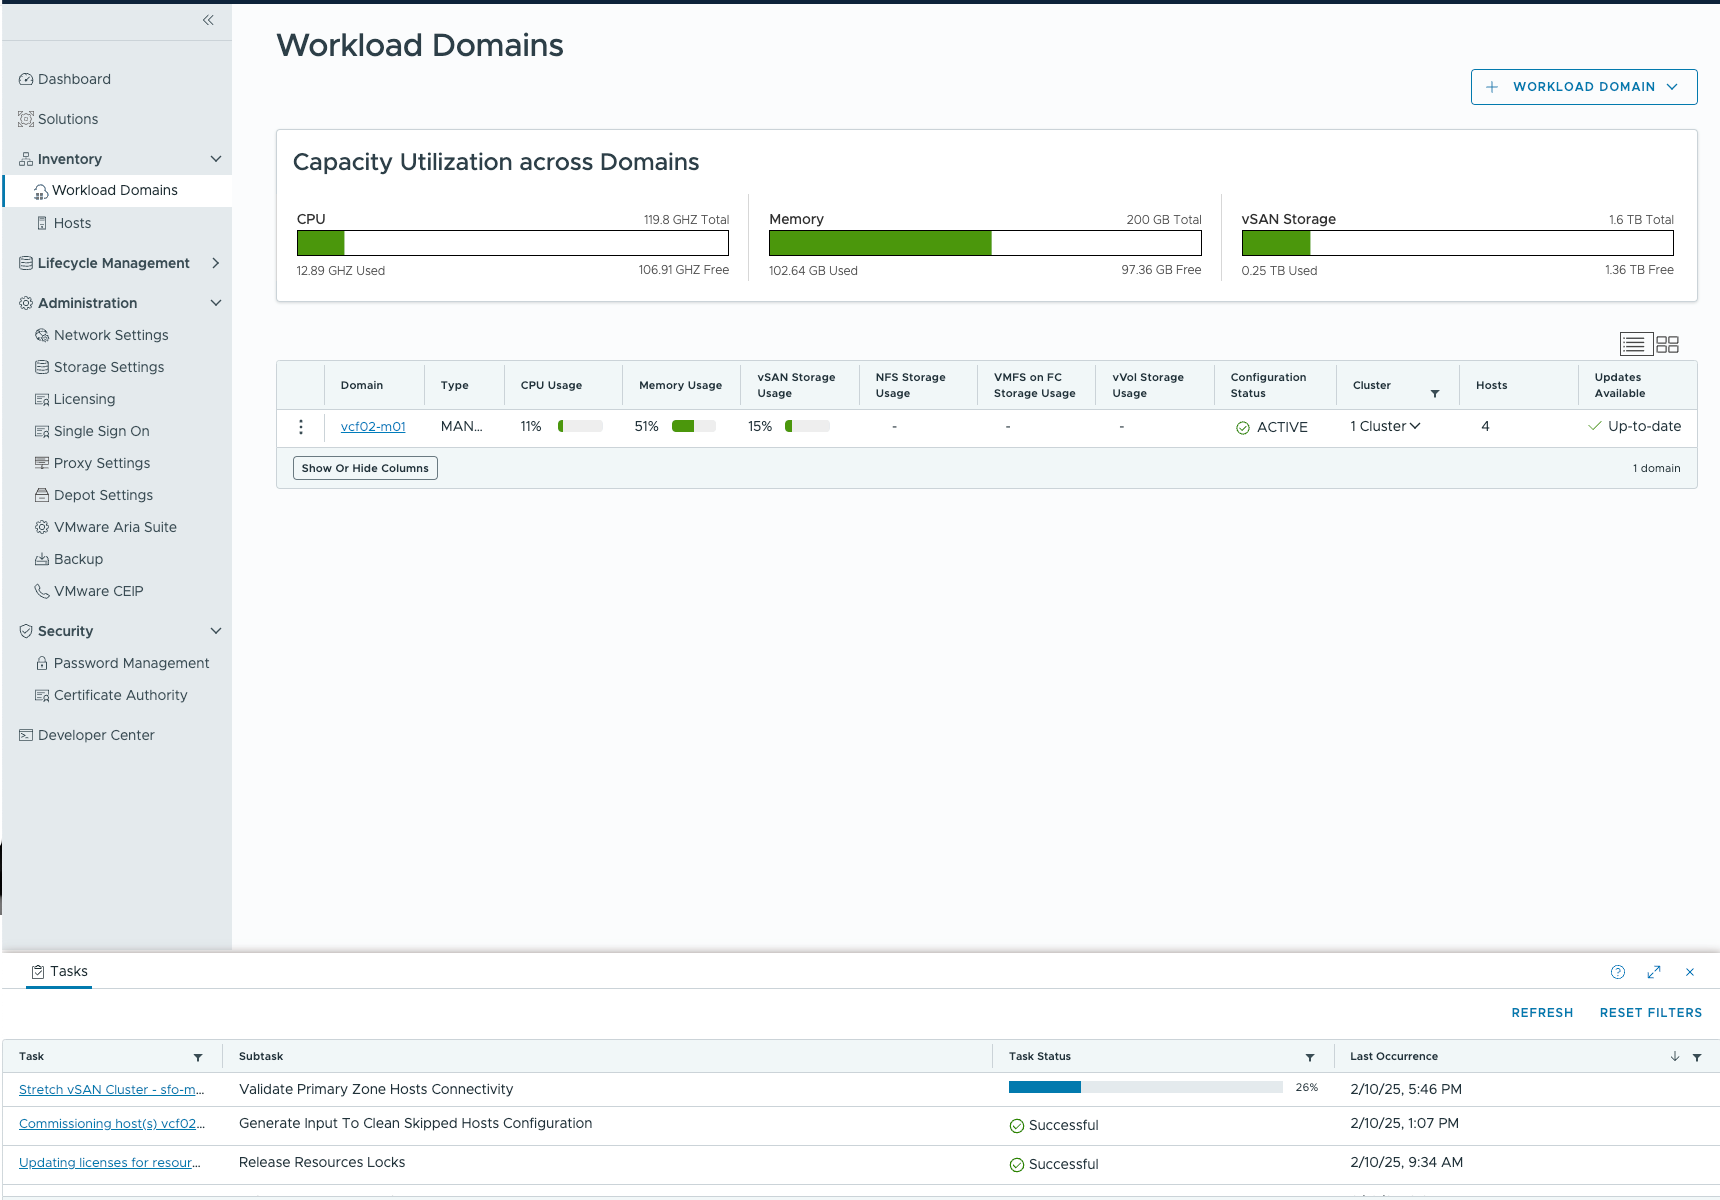
Cluster Stretch (click to enlarge)
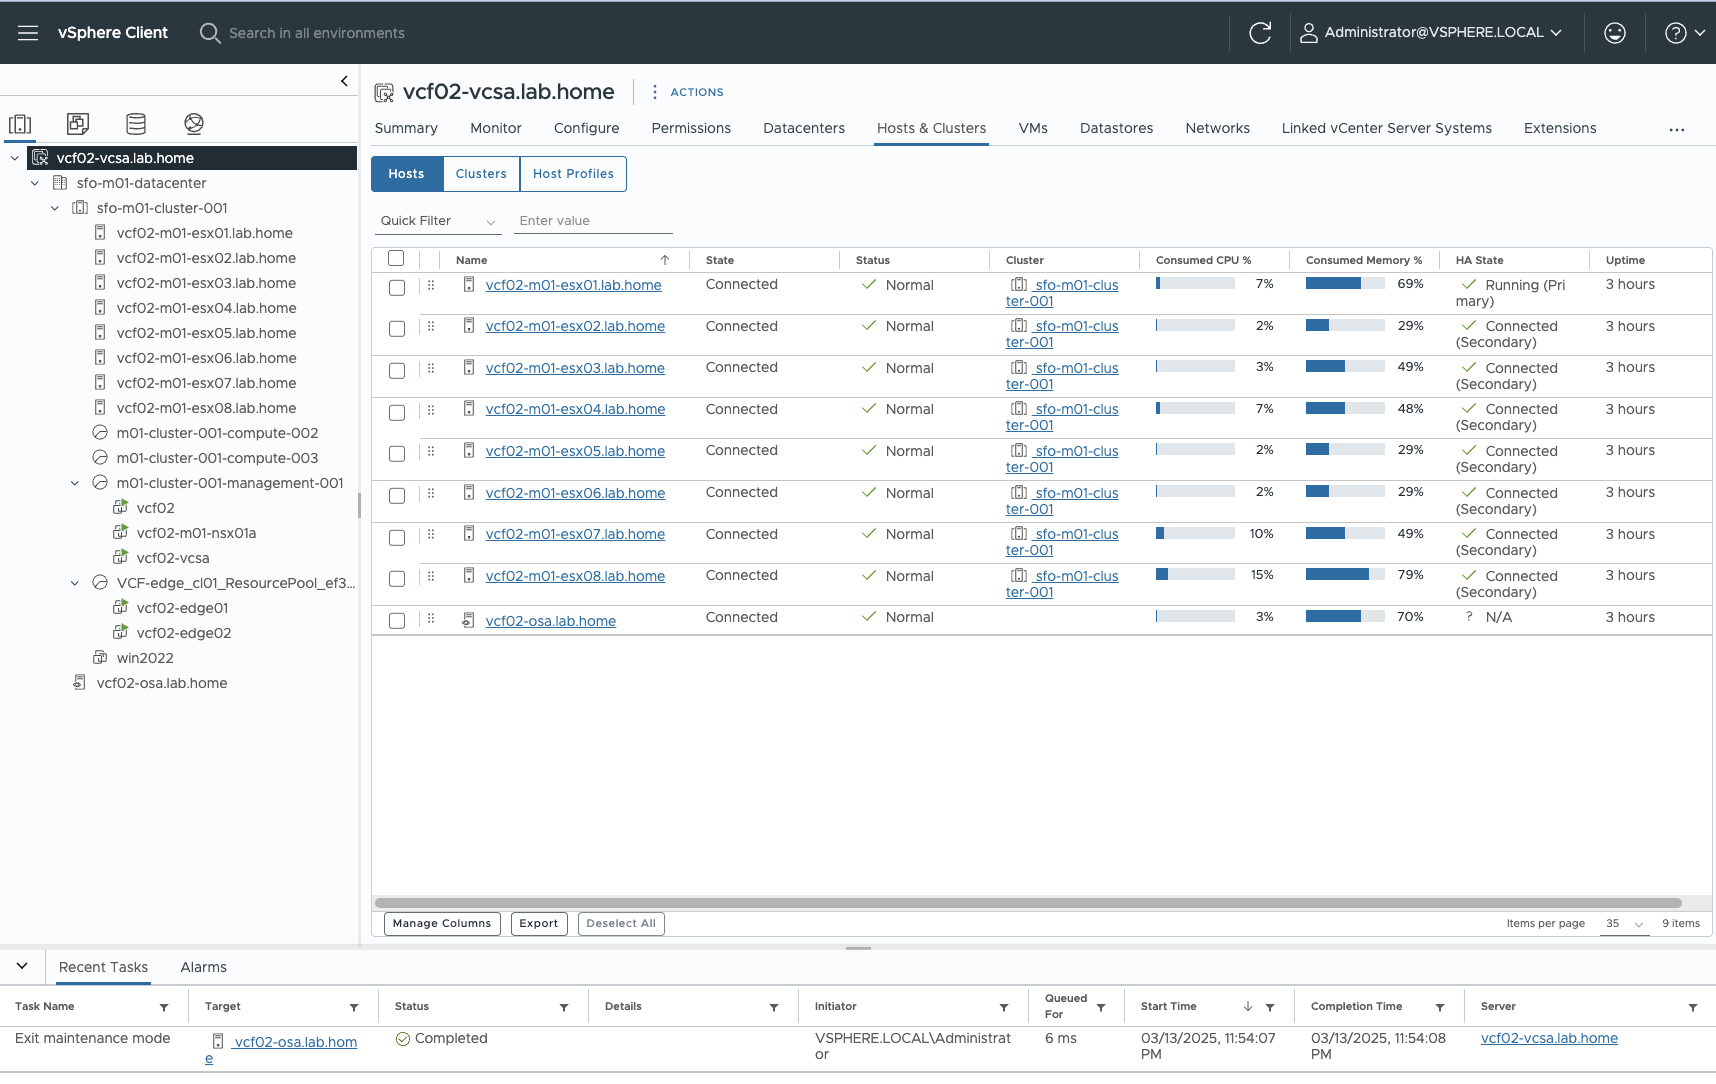
Depending on the performance of the environment, the process may take some time. For me, it was comparable to the duration of the bring-up of the unstretched management domain. If the task has been completed successfully, the SDDC and the vCenter should look like the following screenshots.
Stretched Cluster SDDC (click to enlarge) Stretched Cluster vCenter (click to enlarge)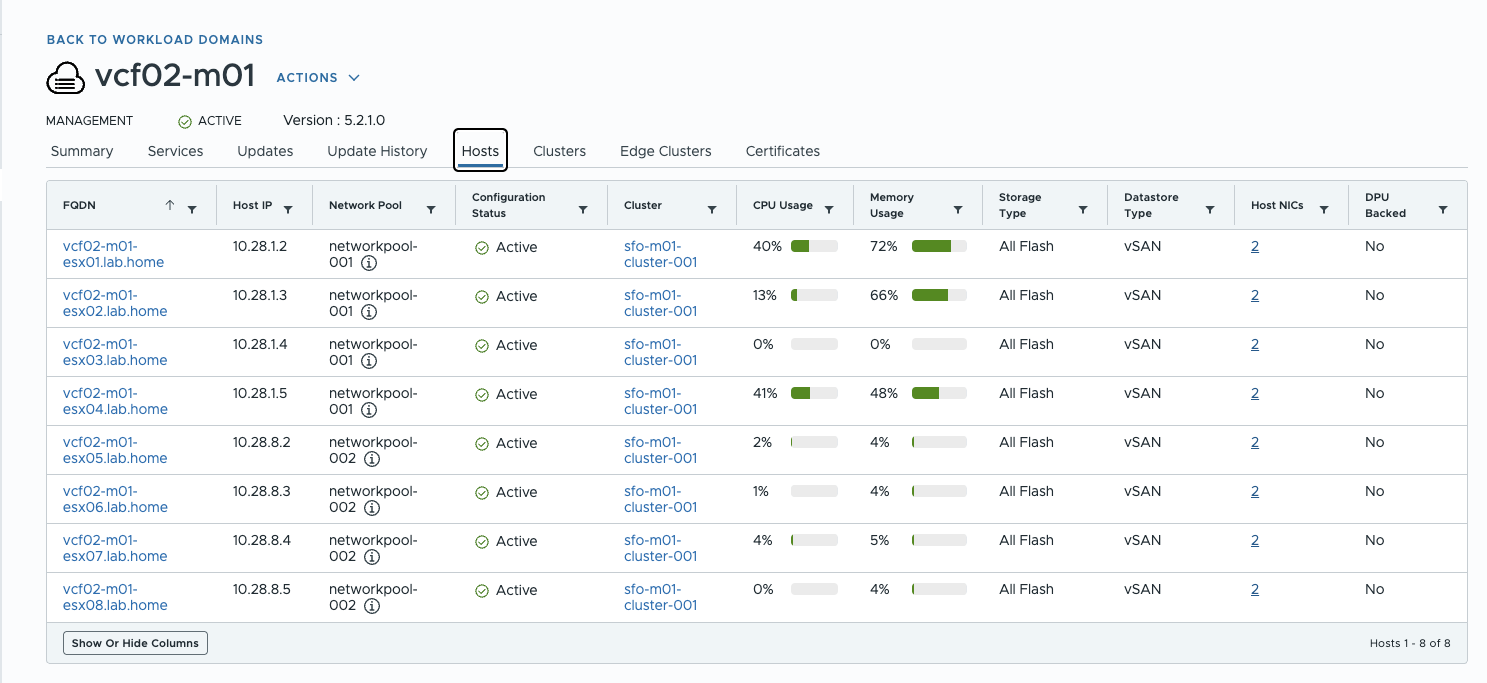
Notes
Further stretched cluster maintenence operations like upgrades can be carried out via GUI. A cluster shrink, expand or a cluster unstretch must currently still be carried out via API.
You also need to think about BGP peering. Depending on the setup, each side has its own AS number for BGP and Broadcom recommends working with route maps and local preference to control traffic. Personally, I would say: it depends. However, this topic is so extensive that it may get its own blog article at some point. In addition, you have to worry about the placement of VMs, storage policies and much more…
Lab Hardware and Sizing of the VMs
Perhaps a brief word about the resources used. I could have set up the lab more economically. There is potential for savings in the NSX managers, where only one manager would have been needed with some adjustments or non nested edge vms. But I didn’t want anything unexpected to happen to me during the deployment, so I decided to build the whole thing as close to reality as possible. My next attempt will be to build the setup as resource-efficient as possible.
As a nested ESX server, I used the Nested ESXi Virtual Appliance from William Lam and customized it for my use case. Each of the 8 ESXi virtual servers has 10 cores, 40GB of RAM and 3 hard disks. 16GB for the OS, 40 GB as an OSA cache tier and 400 GB as an OSA capacity tier. I use 2 network cards.
The virtual ESX servers run on 4 Minisforum MS-01 with 2x10 Gb network and 96 GB Ram each. I have 2 virtual servers running on each MS-01. The VMs run on local NVMe storage so that they are not unnecessarily moved via DRS. I have a nested ESXi server of AZ 1 and AZ 2 running on an MS-01. The vSAN Witness Appliance runs on my management ESX server.
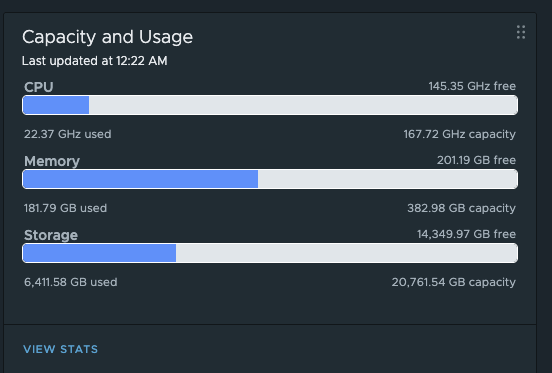
Lab usage (click to enlarge)
After the lab has booted and all services are running as they should, the resource requirements calm down a bit. I still have 200GB of RAM free on my physical hosts, so there is room for expansion and further tests.
Conclusion
Deploying a stretched cluster is not that difficult if you follow all the preparations and meet all the requirements. The real challenge lies elsewhere, namely in the design of the actual stretched cluster.
