VCF 9.1 - C.E.R.B.E.R.U.S.: A Let's Encrypt Automation Pipeline
Fun with certificates - we've all been there, right? In this - perhaps brief - blog post, I'll explain how to automate the whole process and use Let's Encrypt. Since this post contains a lot of code, I've decided to publish it all in my public GitHub repo.
vcf9.1certificatesletsencryptacme
4172 Words // ReadTime 18 Minutes, 57 Seconds
2026-09-05 01:00 +0200
Introduction
If this were a marketing-driven blog, I’d call my pipeline C.E.R.B.E.R.U.S. - short for Certificate Exchange, Renewal & Backend Engine for Reliable Unified Security. But we’re dealing with a deadly serious topic here: certificates! And who hasn’t experienced that beautiful moment after deploying VCF 9.1 and Google Chrome clearly reminds you that you’re still using a self-signed certificate? Been there, done that.
But enough with the jokes. I want to use the pipeline to solve more than just one certificate warning. My goal is to ensure that my entire VCF setup-including Fleet and Management as well as Workload Domain components-is fully and automatically provisioned with valid certificates. The whole process should be Git-driven and declarative. I also want to rely on the ACME standard, since VCF natively only supports automatic certificate enrollment with a Windows-based CA, which unfortunately comes with several drawbacks.
First, you have to enable the Windows CA web service, which can quickly become a security risk and is simply no longer up to date (depending on who you ask, it was never up to date to begin with); second, Basic Auth is required for authentication. I’m sure I don’t need to explain to anyone that Basic Authentication doesn’t provide sufficient protection and is completely insecure without transport encryption - or would you send your password on a postcard, for example?
Unfortunately, there’s currently no ACME support in VCF 9.1, but luckily we live in modern times, and I decided to code my own solution for the problem. How hard could it be? Well, in the end it took longer than I expected, and despite massive artificial help, I’ve run over 58 workflows in the last two days and replaced my vCenter certificate at least 30 times. All of this so that you don’t have to.
The actual idea
The actual idea came to me pretty quickly: I want to use ACME because, in theory, it makes me independent of the CA. ACME is a well-documented standard and should be familiar to most people through Let’s Encrypt (which played a major role in developing and popularizing it).
So what do I need to get started? First of all, an ACME client-I found one very quickly in Certbot. I also need to be able to complete the ACME challenge to prove to the CA that I’m authorized to request a Cert. This can be done, for example, via HTTP-01 or the DNS-01 challenge. Since I have a public domain i’m using the DNS challenge. I’d also like to mention that I bought a $20 domain just because of this article - no Bullsh#!t.
However, since I definitely wanted to automate and centralize the issuance and renewal processes, my Gitea service quickly came to mind as the “source of truth.” Certbot and the rest of my automation stack will run on a VM, since I didn’t want to open up yet another side quest.
Being as smart and creative as I am, I’ve named my VM “CertManager,” and since my readers are all smart too, they surely won’t confuse my VM with the Kubernetes project “cert-manager.” Now that all the confusion has hopefully been straightened out, I can finally start building.
Building the “CertManager”
You can use any standard Linux distribution of your choice. In my case, it’s Ubuntu 26.04 LTS-not because it’s the best Linux distribution, but because it’s the one I’m most comfortable working with. The server will serve as my central hub for handling CSR requests, getting certificates, triggering APIs, and hosting a Gitea Runner. It’s important to note that “CertManager” is merely the executing instance. But let’s first take a look at the planned workflow, and to keep things simple, we’ll start with just the Let’s Encrypt mode of C.E.R.B.E.R.U.S..
Since, as we all know, a picture is worth a thousand words, I’ve created a workflow diagram.
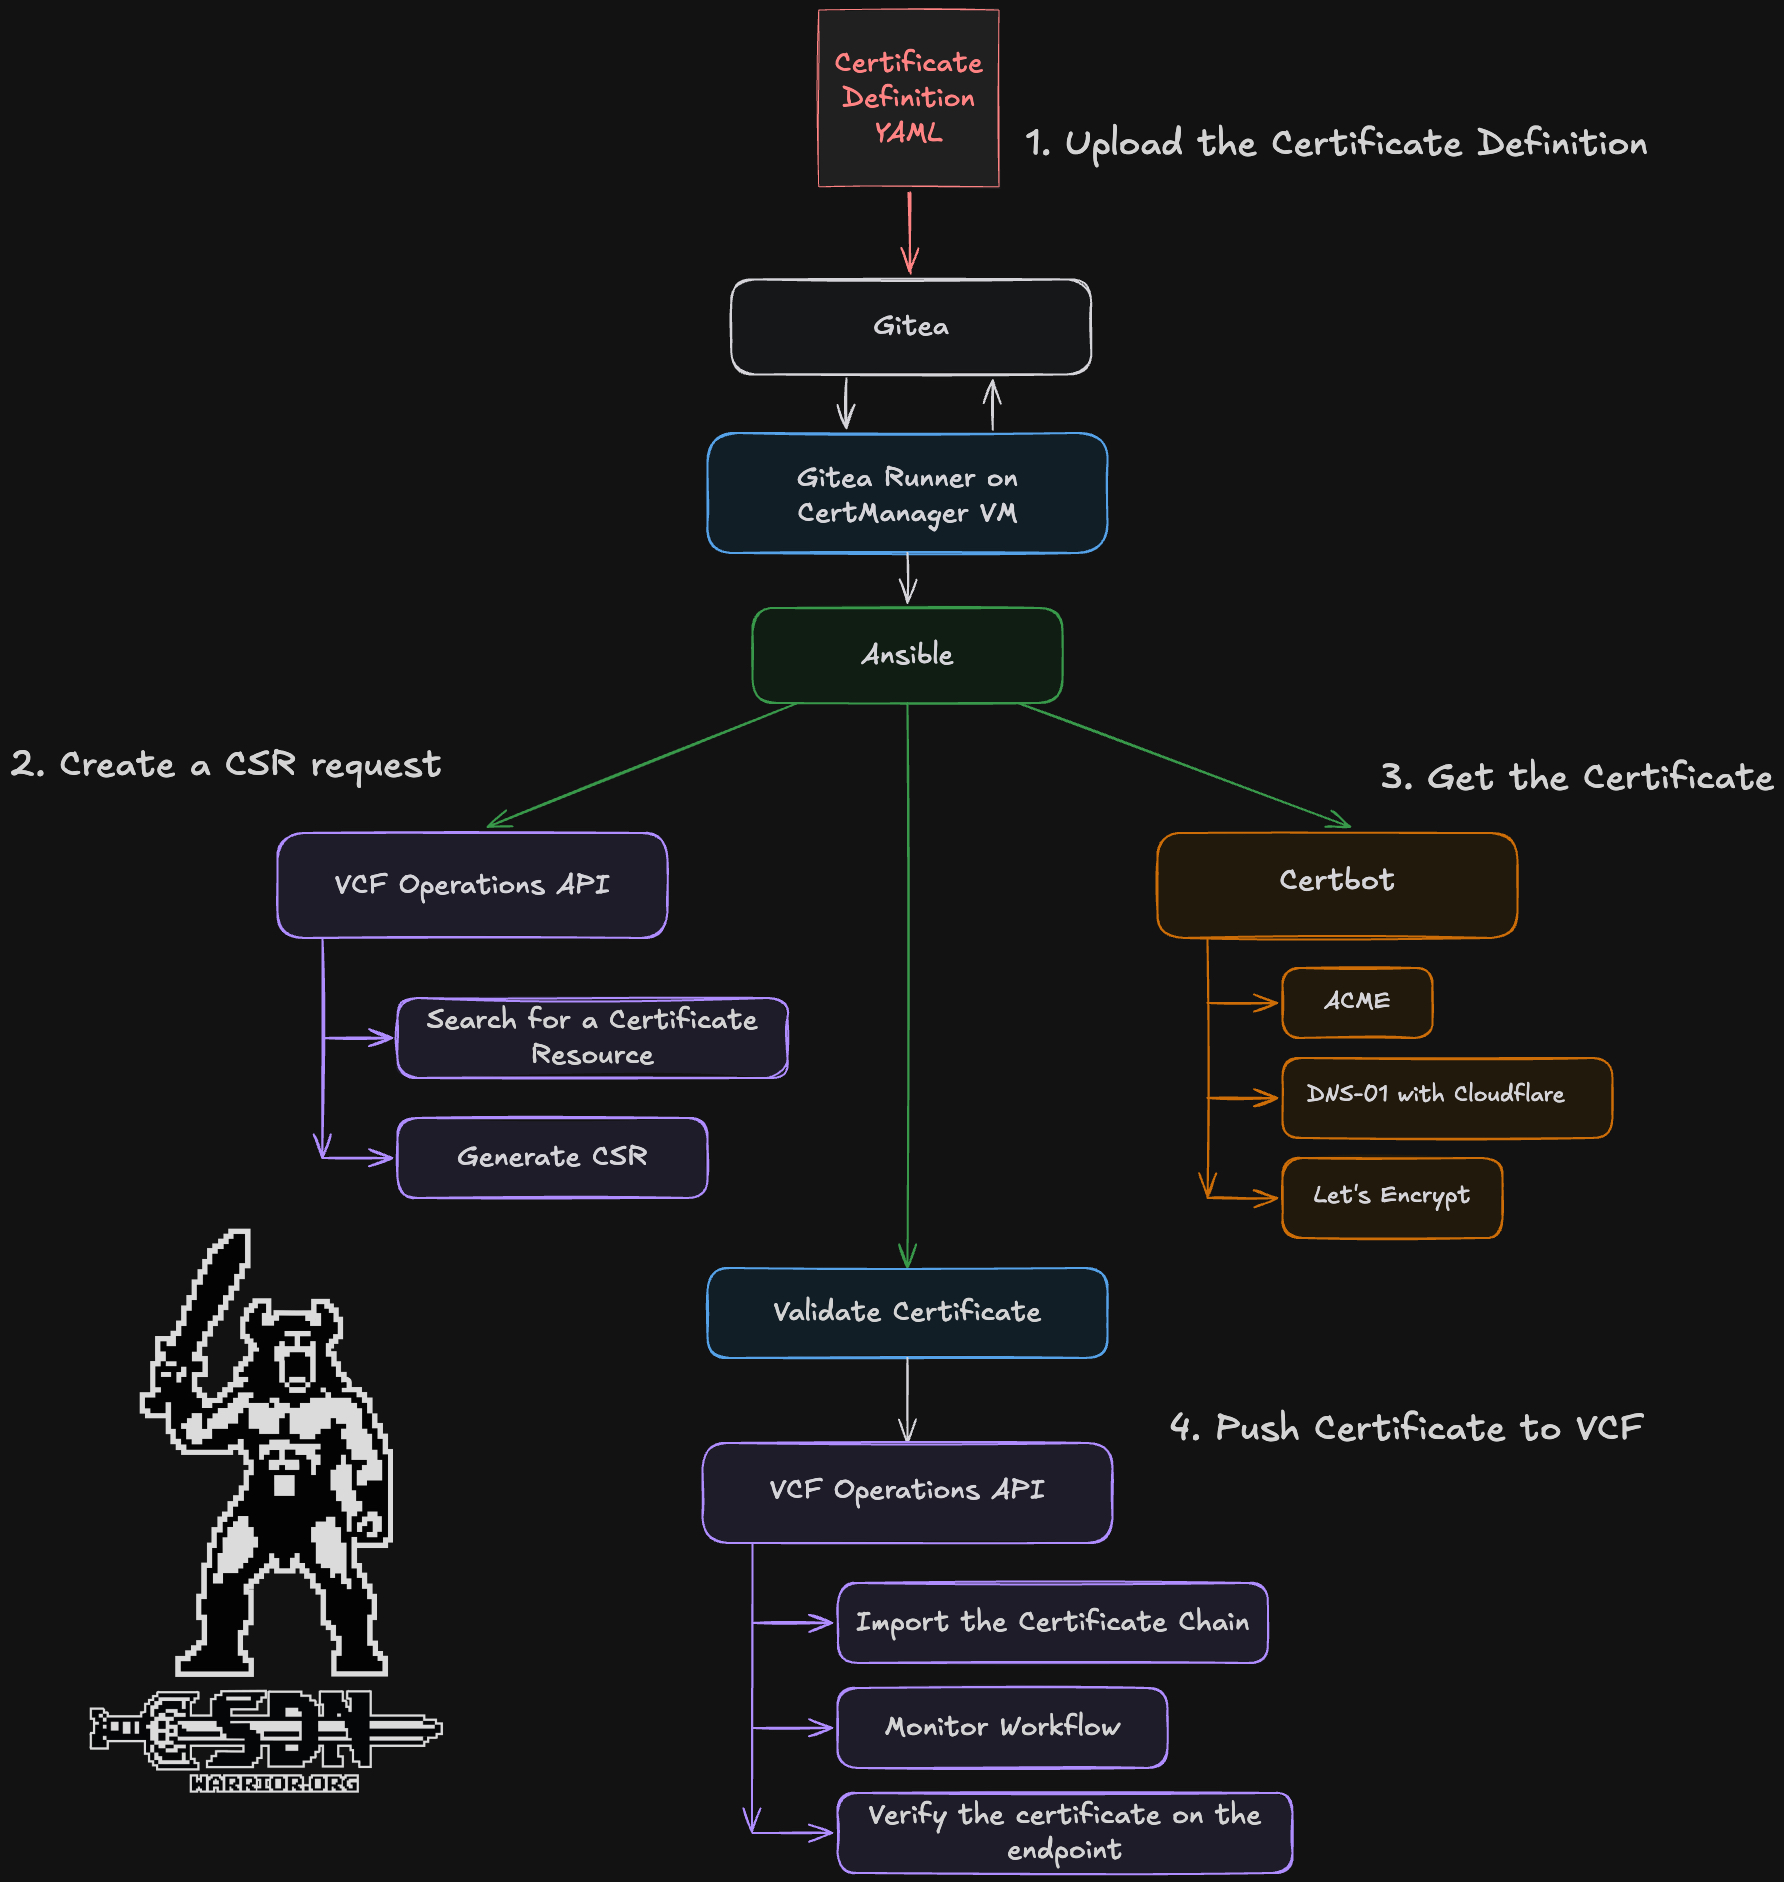
At first glance, the workflow is very simple: a certificate definition must be uploaded to Gitea; the runner retrieves it and uses Ansible to trigger the VCF Operations API to generate a CSR. Next, the actual certificate is issued via ACME and Let’s Encrypt. Finally, it’s passed to VCF via the VCF Operations API and replaced on the target system. Simple, right? Well, we’ll get to that later. The great thing about this workflow is that the certificate’s private key is never accessible to any systems. The key remains securely with VCF Operations.
Now that the principle is clear, there are still a few requirements that our Linux system must meet. The following software is required:
- Git
- Python 3
- Ansible
- OpenSSL
- Certbot
- Certbot DNS Cloudflare Plugin
- Gitea Actions Runner
- Node.js 22
- C.E.R.B.E.R.U.S. - Git repository
Ubuntu comes with most of it already installed; the rest can be easily installed with this command.
sudo apt update
sudo apt install -y \
  git \
  python3 \
  ansible-core \
  openssl \
  curl \
  ca-certificates \
  certbot \
  python3-certbot-dns-cloudflare

curl -fsSL https://deb.nodesource.com/setup_22.x -o /tmp/nodesource_setup.sh
sudo -E bash /tmp/nodesource_setup.sh
sudo apt install -y nodejs
You can find the actual repository here.
On my server, I’ve kept the Git repository and runtime data neatly separated in different directories. You don’t have to do this, but I recommend it. I cloned my repository to /opt/vcf-certmanager, and my runtime data is located at /etc/vcf-certmanager. The runtime directory contains, for example, the generated CSRs and the final certificates - in other words, everything you need to get the job done. The VCF operations credentials are stored in encrypted form in an Ansible Vault, and the password for the vault is located at /etc/vcf-certmanager/vault-pass. This is important so that the vault can be opened automatically later on. The vault-pass file is protected from unauthorized access via file permissions. For the automated workflow, I use a dedicated gitea-runnerservice account as well as separate groups for runtime data and secrets.
/opt/vcf-certmanager
├── ansible/
│   ├── inventory/
│   ├── playbooks/
│   └── vars/
│       └── vault.yml
├── certificates/
├── .gitea/
│   └── workflows/
├── hooks/
└── scripts/

/etc/vcf-certmanager
├── certificates/
└── vault-pass
The individual directories serve the following purpose:
/opt/vcf-certmanager/ansible– Contains the Ansible inventory, playbooks, and variables./opt/vcf-certmanager/certificates– Contains the YAML definitions for the individual VCF certificates and endpoints./opt/vcf-certmanager/.gitea/workflows– Contains the Gitea Actions workflows./opt/vcf-certmanager/hooks– Contains the hooks used for the ACME DNS-01 challenge./opt/vcf-certmanager/scripts– Contains helper and wrapper scripts used by the certificate workflow./etc/vcf-certmanager/certificates– Contains the runtime data for each certificate, including the CSR, issued certificate, and certificate chain. No private keys are stored here./etc/vcf-certmanager/vault-pass– Contains the password used to automatically unlock the Ansible Vault.
My personal user account is only used for manual testing and repository maintenance and is therefore not relevant for the automated operation of VCF CertManager.
| User | Paths | Permissions |
|---|---|---|
| root | /etc/vcf-certmanager |
root:root - 755 |
| root | /etc/vcf-certmanager/vault-pass |
root:vcf-certmanager-secrets - 640 |
| gitea-runner | /etc/vcf-certmanager/certificates/etc/vcf-certmanager/certificates/<endpoint> |
gitea-runner:vcf-certmanager-runtime - 2770 |
The gitea-runner user is a member of the vcf-certmanager-runtime group for access to certificate runtime data and the vcf-certmanager-secrets group for read access to the Ansible Vault password.
The 2770 permissions on the certificate directories include the setgid bit, ensuring that newly created files and directories inherit the vcf-certmanager-runtime group.
Ansible is configured to use /etc/vcf-certmanager/vault-pass as its Vault password file, allowing the encrypted vault.yml to be opened non-interactively during automated runs.
Get the runner running
The next component I need is the Gitea Actions Runner. I run it directly on the CertManager host rather than in a container. I didn’t want to complicate things any further. This allows the workflow to directly access locally installed tools such as Ansible, Certbot, OpenSSL, and Node.js. To keep this example simple, I’m using a single gitea-runner user for the entire automation process. How you implement this in practice is up to you, but I’m a fan of keeping it simple.
- Create the user and the required directories:
sudo useradd \
  --system \
  --home-dir /var/lib/gitea-runner \
  --create-home \
  --shell /bin/bash \
  gitea-runner

sudo mkdir -p \
  /etc/gitea-runner \
  /etc/vcf-certmanager/certificates

sudo chown -R gitea-runner:gitea-runner \
  /var/lib/gitea-runner \
  /etc/gitea-runner \
  /etc/vcf-certmanager
- Download and install the Gitea Runner. At the time I built this setup, I was using version 3.3.1:
VERSION=3.3.1

curl -L \
  -o /tmp/gitea-runner \
  "https://dl.gitea.com/gitea-runner/${VERSION}/gitea-runner-${VERSION}-linux-amd64"

sudo install -m 0755 \
  /tmp/gitea-runner \
  /usr/local/bin/gitea-runner
- Generate the runner configuration:
sudo -u gitea-runner -H bash -c \
  'gitea-runner generate-config > /etc/gitea-runner/config.yaml'
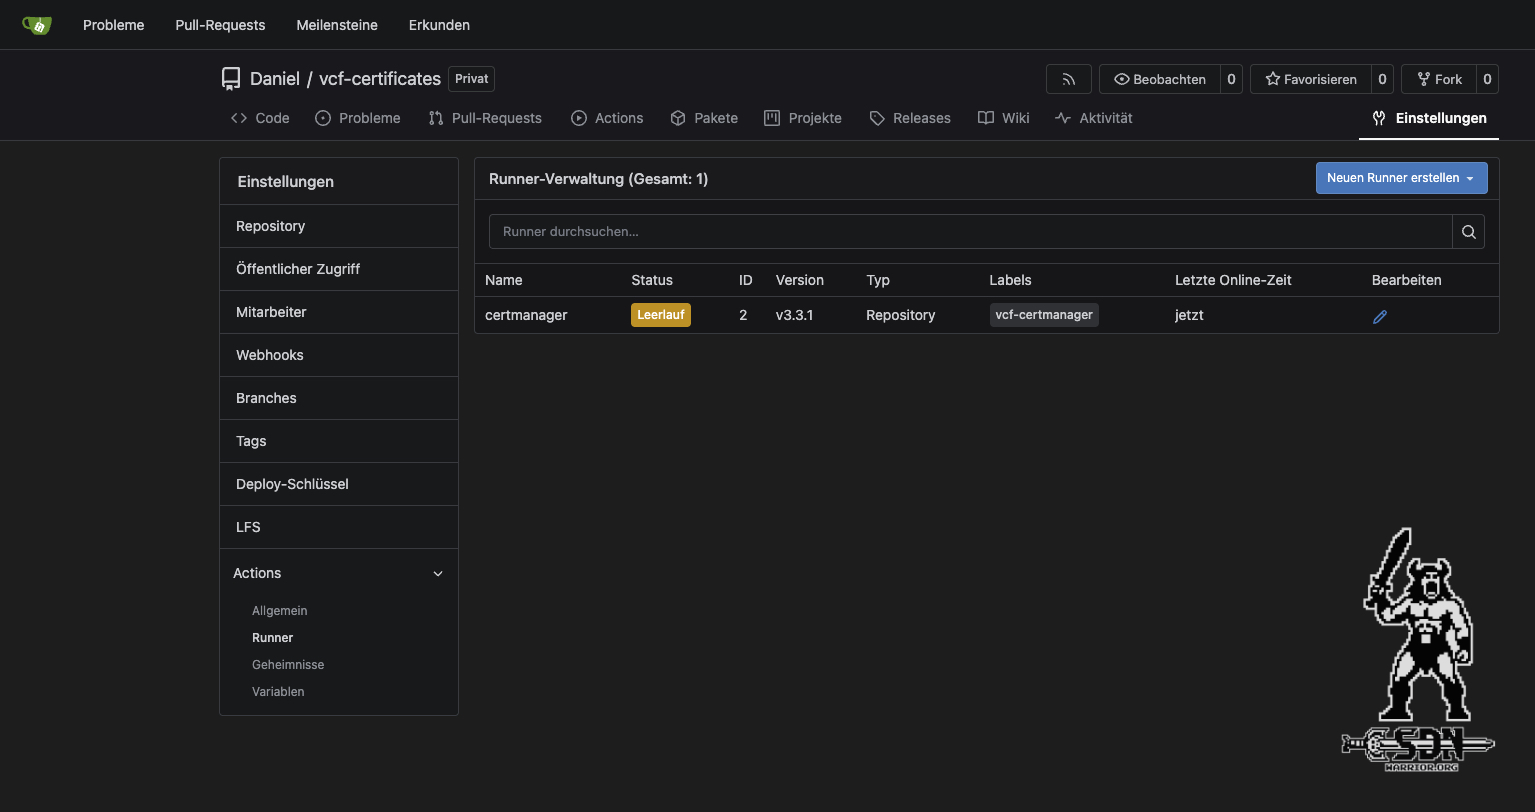
- Register the Runner with Gitea. You can get the registration token from the Actions Runner settings in Gitea.
The registration command starts an interactive setup. You will be asked for the Gitea instance URL, the registration token, a name for the runner, and the runner labels.
sudo -u gitea-runner -H bash -c '
  cd /var/lib/gitea-runner
  gitea-runner \
    --config /etc/gitea-runner/config.yaml \
    register
'
I have chosen the following values:
Enter the Gitea instance URL:
http://192.168.11.28:3000/

Enter the runner token:
<YOUR_REGISTRATION_TOKEN>

Enter the runner name:
certmanager

Enter the runner labels:
vcf-certmanager:host
- Create the systemd service
sudo tee /etc/systemd/system/gitea-runner.service > /dev/null <<'EOF'
[Unit]
Description=Gitea Actions Runner
After=network-online.target
Wants=network-online.target

[Service]
Type=simple
User=gitea-runner
Group=gitea-runner
WorkingDirectory=/var/lib/gitea-runner
Environment=HOME=/var/lib/gitea-runner

ExecStart=/usr/local/bin/gitea-runner \
  --config /etc/gitea-runner/config.yaml \
  daemon

Restart=always
RestartSec=5

[Install]
WantedBy=multi-user.target
EOF

sudo systemctl daemon-reload
sudo systemctl enable --now gitea-runner
Gee, Brain, whaddya wanna do tonight?
The same thing we do every night, Pinky. Try to take over the world (and Issue Certificates)!" Anyone who doesn’t think of ACME Labs when they hear that probably had a sad childhood or is too young. All I’m really trying to say is that I still need to configure ACME.
Before we can even think about certificate requests, we need to configure Certbot. In my environment, I generally use a split DNS setup. This means that I’ve created a forward and reverse lookup zone for my domain sdn-warrior.cloud in my local DNS. I don’t want any private IP addresses to be exposed on the internet via Cloudflare. The Cloudflare zone is used solely for the DNS challenge. To do this, I set up an API token for the appropriate zone and save the token as a file on my CertManager VM. For example, I chose the path /etc/letsencrypt/cloudflare/sdn-warrior-cloud.ini. It’s important that this file contains only the following content:
dns_cloudflare_api_token = YOUR_CLOUDFLARE_API_TOKEN
Since the API token is a secret, this should never be pushed to Git, and you should make sure the file permissions are set correctly. You know how to do that. That’s basically all the configuration you need to use Cloudflare. Of course, you can also use other DNS providers for ACME – as long as there’s a compatible plugin for Certbot available.
Fun with YAML - Certificate Definition
To create a certificate using the pipeline, it must first be defined - sounds logical, right? This is all done with a small YAML file, and once you have a valid file, it just needs to be slightly adjusted. C.E.R.B.E.R.U.S. is designed to be flexible in this regard, and not all parameters necessarily make sense for Let’s Encrypt - but the idea behind it was that you could swap out the CA and only need to make minimal adjustments. If you’re as excited about YAML as I am, don’t worry - it’s really easy. I’ve also added a YAML file to the repository for all supported services. Let’s see what the cat dragged in.
---
certificate:
  name: ops01-fleetlcm
  enabled: true

  common_name: fleetlcm.vcf.sdn-warrior.cloud

  subject:
    country: DE
    state: RLP
    locality: NW
    organization: SDN-Warrior
    organizational_unit: SDN-Warrior

  sans:
    - fleetlcm.vcf.sdn-warrior.cloud

  ip_sans: []

  key:
    type: rsa
    size: 4096

  acme:
    server: https://acme-v02.api.letsencrypt.org/directory
    issuance_timeout: 300

  challenge:
    type: dns-01
    provider: cloudflare
    credentials_file: /etc/letsencrypt/cloudflare/sdn-warrior-cloud.ini
    propagation_seconds: 30

  deployment:
    type: vcf_operations
    ops_endpoint: ops01.vcf.sdn-warrior.cloud
    appliance: VCF_SERVICES_RUNTIME
    target: fleetlcm.vcf.sdn-warrior.cloud
    validate_certs: false
    root_ca_file: /etc/ssl/certs/ISRG_Root_X1.pem

  renewal:
    renew_before_days: 30
The most important parts are:
-
name and enabled – Identify the certificate within the automation and control whether it should be processed. You don’t have to delete a certificate; you can simply disable it.
-
common_name, subject, and sans – Define the certificate’s identity and the DNS names that must be included in the certificate.
-
ip_sans – Reserved for IP address SANs. These are not currently supported by the VCF Operations workflow, but the definition is already prepared for other APIs or future implementations.
-
key – Defines the requested key type and key size. The private key itself is still generated and stored within VCF Operations.
-
acme and challenge – Define the ACME server and the method used to verify domain ownership. In this example, “Let’s Encrypt” is used along with a DNS-01 challenge via Cloudflare. Currently, an experimental implementation using an ACME bridge and a Windows CA is still supported. However, this implementation has very limited functionality and is currently only a proof of concept to demonstrate that other ACME interfaces can also be used.
-
deployment – Describes where the certificate should be installed. The value appliance identifies the VCF component type, while target specifies the actual endpoint whose certificate is to be replaced. The root_ca_file is a Let’s Encrypt-specific option; since Operations always requires the full certificate chain, the ISRG Root X1 is appended to the certificate chain generated by Certbot. This is still static in the current version and will likely be converted to a dynamic configuration in a future release.
-
renewal – Specifies when the certificate is eligible for renewal. In this example, the automation begins the renewal process 30 days before expiration.
In Git We Trust!
Now that we have a rough idea of what the certificate definitions should look like, they need to be stored somewhere – and this is where my Gitea comes in, because only what’s in Git is true. As mentioned at the beginning, the CertManager VM is merely the execution platform. Local definitions are not taken into account; all definitions must be pushed to the Git repository under the “certificates” folder. The persistent runtime data remains outside Git on the CertManager VM.
Aside from the fact that the generated files aren’t stored in the repository, this also makes it easy to track changes to the certificate configuration. If I change a SAN, replace an endpoint, or adjust the renewal settings, that change becomes part of the Git history. Now we finally have everything we need to do something useful with the definition. In the next step, Gitea takes over and launches the actual certificate pipeline.
Starting the Pipeline with Gitea Actions
I’ve currently created two workflows for the certificate lifecycle: auto-new-certificate.yml and scheduled-certificate-renewal.yml. I think the names pretty much explain what they do. The first workflow, auto-new-certificate.yml, monitors the certificates directory in the main branch, and whenever a new definition is pushed to the repo, the workflow starts on the CertManager VM. The workflow checks which certificate definition was just added with the push. Changes to a definition or deletions do not trigger the workflow. It is important to understand this. Within the workflow, a few basic checks are performed - such as verifying that the YAML structure is valid - but this area certainly has room for improvement. If enabled is set to false, the definition remains in Git and the workflow skips it. Once all the prechecks are complete, the actual pipeline is started: ./scripts/run-certificate-pipeline.sh “${CERTIFICATE_NAME}”.
Creating certificates is nice, but unfortunately, they also have a relatively short lifespan and need to be replaced regularly. That’s where the second automation comes into play. With scheduled-certificate-renewal.yml, certificates can be automatically renewed - and by “renewed,” I mean, in this case, re-created and replaced. To do this, a cron schedule within Gitea Actions workflow is set up that runs by default at 3:15.
Why 3:15? No idea - why not? You can change that, of course. But what’s cool is that you can also start the workflow manually from Gitea. By default, the workflow checks whether the certificate needs to be renewed yet. This is based on the value in the certificate definition and is set to 30 days in my case.
However, it doesn’t rely on any local certificates stored in working directories; instead, the CertManager server connects to the actual endpoint and checks how long the certificate is still valid. But if you want to change the certificate immediately for whatever reason, you can use “Force mode” to have the certificate regenerated regardless of its validity. Pretty cool, huh? When the certificate is about to expire, the same workflow kicks in at 3:15 a.m. and replaces it.
New YAML pushed
      |
      v
auto-new-certificate.yml
      |
      v
run-certificate-pipeline.sh


Scheduled check
      |
      v
scheduled-certificate-renewal.yml
      |
      +--> Certificate still valid --> Do nothing
      |
      +--> Renewal required
                |
                v
       run-certificate-pipeline.sh
The Pipe of Doom
I think now is the perfect time to take a look at the pipeline itself. But don’t worry – I’m not going to explain every command here. Okay, okay, maybe the name is a little too dramatic, but whenever I hear “Pipeline,” I have to think of an old episode of Beavis and Butt-Head where one of them gets stuck in a pipe and yells, “Help, I’m stuck!” It has nothing to do with the topic, but sometimes I get sidetracked.
The script itself is relatively unspectacular but still important, because VCF doesn’t always make things easy for us. In version 9.1.1, there are now three APIs you have to use if you really want to replace all the certificates. At the current stage of development, the Cloud Proxies aren’t working yet, since this feature was just added in 9.1.1 and I haven’t had time to implement it yet. What does work, however, are Fleet components like VCF Operations and actual domain components like ESX and vCenter.
case "${APPLIANCE}" in
    VCENTER|SDDC_MANAGER|NSXT_MANAGER)
     CERTIFICATE_PLAYBOOK="ansible/playbooks/vcf-certificate.yml"
     ;;

    VCF_OPERATIONS|IDENTITY_BROKER|VCF_SERVICES_RUNTIME|ESX)
     CERTIFICATE_PLAYBOOK="ansible/playbooks/vcf-management-certificate.yml"
     ;;
esac
The good news is that both paths use the same three-step process, so there aren’t actually that many differences. Nevertheless, each path has its own playbook and can be customized independently of the other.
Step 1 - Let VCF Operations create the CSR
In the first step, a CSR is generated via the VCF Operations API. Depending on the component type, either the VCF Component API or the VCF Management API is used for this purpose. The private key remains in Operations. In VCF 9.1, a maximum of one CSR was allowed per component. In 9.1.1, after the update, I had CSRs in the system for multiple components that I hadn’t generated myself. Therefore, I had to adjust the pipeline again to ensure that the selection of the correct CSR is robust. In the first version, I simply assumed that only one CSR would ever be returned. The CSR is temporarily stored in the working directory on the CertManager VM.
Step 2 - Send the CSR
Once the CSR is on the CertManager VM, it is validated to ensure that all information required for ACME is present. Certbot will then use this CSR to request a valid certificate from Let’s Encrypt, provided the DNS challenge was successful.
For the Cloudflare implementation, Certbot uses the DNS plugin in combination with the values from the certificate definition. The actual command looks like this:
certbot certonly \
 --server https://acme-v02.api.letsencrypt.org/directory \
  --dns-cloudflare \
  --dns-cloudflare-credentials /etc/letsencrypt/cloudflare/sdn-warrior-cloud.ini \
  --dns-cloudflare-propagation-seconds 30 \
  --csr /etc/vcf-certmanager/certificates/<certificate-name>/request.csr \
  --cert-path /etc/vcf-certmanager/certificates/<certificate-name>/cert.pem \
  --chain-path /etc/vcf-certmanager/certificates/<certificate-name>/chain.pem \
  --fullchain-path /etc/vcf-certmanager/certificates/<certificate-name>/fullchain.pem \
  --non-interactive \
  --agree-tos
The Cloudflare plugin automatically creates and deletes the required _acme-challengeTXT record. The values used here are not hard-coded; instead, they are taken from the certificate definition shown earlier. Most importantly, Certbot receives the CSR via –csr. Therefore, no new private key is generated.
Afterward, the certificate is validated by C.E.R.B.E.R.U.S.. Among other things, the common name and SANs are checked, and the public key from the request is compared to the public key of the certificate. If anything doesn’t match, the pipeline is aborted.
There’s also a VCF-specific requirement. Let’s Encrypt does not normally include the self-signed root certificate in the full chain that is delivered. However, VCF operations require the complete chain, so if something is defined under root_ca_file in the certificate definition, C.E.R.B.E.R.U.S. appends this file, thereby ensuring a valid certificate chain for VCF operations. As of today, this is still done statically and is the next item on my roadmap.
Step 3 - Send it home
If all validations were successful, the complete certificate chain is passed to operations via the API, and VCF Operations begins the certificate exchange.
Limitations and What’s Next
C.E.R.B.E.R.U.S. already covers a large part of the VCF certificate lifecycle, but there are still some limitations and areas I would like to improve. The current version has been tested with VCF 9.1 and 9.1.1. Support varies slightly depending on the component, as not every VCF service provides certificate management via the same API.
Cloud proxies are not currently supported. They use a different API than the Fleet and Domain components and therefore require a separate implementation. There is also an experimental ACME bridge implementation for the Microsoft Windows certificate authority. The basic concept already works, but it has not been tested with VCF 9.1.1 and requires an ACME bridge. I used an open-source solution for this. But I have to admit, I’m not sure yet whether I’ll continue maintaining this solution in the future. It was initially intended only to demonstrate that ACME enables the exchange of CAs. Since the Windows CA doesn’t natively support ACME, this might not be the best choice - it was just what was available.
Another item on my roadmap is the dynamic management of the root certificate authority. Currently, the required root certificate is statically configured via root_ca_file and appended to the chain before being sent back to VCF Operations.
There is also room for improvement in input validation, error handling, and support for additional certificate endpoints and APIs. However, the most important part is already in place: the certificate authority itself is no longer tightly coupled to the automation. The same general workflow can be reused while the ACME endpoint or the certificate backend is swapped out with relatively minor changes.
Another point is automatic renewal, which could also be improved. Currently, I don’t catch any endpoints that don’t respond. Since I often have my lab turned off or partially turned off, the automatic renewal process falls apart. This is a minor issue, but I haven’t included it in the release yet.
C.E.R.B.E.R.U.S. in action
Conclusion
A 60-euro electricity bill and a handful of evenings – that’s all it took to build a halfway decent ACME support for VCF. It’s also my first pipeline, and without AI assistance, I certainly wouldn’t have been able to get it done in time.
I’m making the entire code available under the Apache License 2.0, and I welcome any improvements that are incorporated. I’d love to see ACME integrated natively into the product – the implementation in Proxmox, for example, is a breeze and works perfectly. I hope this post has been helpful to some of you. But for now, I’m looking forward to tackling other topics. Thanks for reading.